Tuesday, March 21, 2023

Crafting Adventures: Toddler Sweater Dress

 The following post contains affiliate links.  If you click through one of these links and make a purchase, I may make a small commission from the retailer at no additional cost to you.  Thank you for your support!


We all have a fabric stash, right?  Maybe it's scrap leftover from previous projects; maybe it's supplies you purchased for a project that you never got around to making; or maybe it's a small collection of "better snag this while it's on sale, I'm sure I can use it for something!"  I've got...all of those.  I've also got an ever-growing stash of clothing that no longer fits either myself or my husband but which is still in excellent condition.  Now, I should probably consign or donate this clothing, but something about each piece makes me want to upcycle it instead.

When I was pregnant with my first baby, I was a tiny, cute pregnant lady who wore tiny, cute maternity clothes.  By the time I was pregnant with my third baby, those tiny, cute maternity clothes were too small for my massive belly, so many of them entered the upcycle stash because I was still sentimentally attached to them.  This white sweater is one such piece- I wore it for our Christmas card picture where we formally announced my second pregnancy:

Christmas 2016

In the week between Christmas and New Years this past December, when no one was quite sure what day it was and the world was a haze of wrapping paper and cookie crumbs, I picked up this sweater and decided to give it new life.

I used the Delaney Dress and Tunic pattern from Peek-a-boo Pattern Shop.  I had already used this pattern once when making our 2022 Halloween costumes so I knew it was easy to follow and produced a cute, comfy, well-sized garment.  Plus, upcycling generally comes with some shortcuts along the way (at least, the way I do it) so I knew I could throw this together in an afternoon.

I used the dress-length pattern with long sleeves, a regular banded neckline (no hood), and no kangaroo pocket in a size 2T to turn my maternity sweater into a simple A-line long sleeved dress for my toddler who was wearing size 2T in typical retail clothing.  Because I wanted to take advantage of the cuffs that already existed on this knit sweater, I cut the sleeve pattern short by the length they would have been hemmed (3/4", per the pattern instructions).  I used the sweater's original neck band to create the neckband for the dress and didn't need to worry about folding it in half because there was only a raw edge on one side.  In the original pattern, the front hemline of the dress (or tunic) curves upwards in the middle, and the back hemline curves downwards, so that it is slightly shorter in front than it is in the back.  I wanted to take advantage of the knit band that already existed around the bottom of the sweater, so I opted to not incorporate these curves.  Instead, I cut both the front and back pieces so that they were the length of the shortest point of the front pattern piece.  This resulted in a simple A-line silhouette with a straight hem all the way around (that I didn't actually have to hem!) and the whole dress came together rather quickly.  Of course, a serger would have been the ideal machine to construct this garment with, but I don't have one yet, so instead I used a good ol' zig-zag stitch.  

While I don't have step-by-step pictures of this make, I did create a little reel on Instagram that shows the construction (and some action shots of the finished product!) which you can see here.

The Delaney Dress and Tunic pattern is for sizes 3 months - 12 years and has many different options- dress or tunic lengths; hood or banded neckline; short, 3/4, or long sleeves; and an optional kangaroo pocket.  

Have you upcycled anything lately?

Much love,

The Geeks

Monday, March 6, 2023

Crafting Adventures: Anne of Green Gables


So even though it turns out our school only let kids 2nd grade and under dress up for it, we still had a lot of fun putting together a costume for Read Across America Day for my 3rd grader.  We even did a photoshoot and put together a fun little film which you can check out over on my Instagram account.


Once again I turned to the Oliver + S Building Block Dress book to create my own pattern for both the dress and the pinafore.  Here's a look at the pattern alterations I made, as well as some mistakes I would create were I to do this again.


I used the Building Block Dress book to draft an empire waist bodice with buttons in the back, a Peter Pan collar, a gathered ankle-length skirt, and simple long sleeves with elastic cuffs.  To make the elastic cuffs, I measured the wrist end of the original long sleeve pattern and cut out a rectangle of fabric which was the same width and 2 3/4" long.  Rather than stitching together the sides of the bodice and then inserting the sleeves, I inserted the open sleeves while the bodice sides were still undone.  I attached the cuff piece to the wrist of the sleeve, then folded it up and over and top stitched it in place, so that I had a rectangular tube attached to the bottom of each sleeve.  Then I measured the circumference of my little Anne-girl's wrist and cut a piece of 1" elastic to that length, inserted it into the cuff, and stitched down both ends.  I gathered the front and back skirt pieces separately and attached them to the front and back bodice pieces, then sewed up the side seams last, doing the sleeve, bodice, and skirt side seam all in one go.  This is not how the book instructs you to assemble the dress, but it worked best for how I wanted to create this.

For the pinafore, I created another empire waist bodice, but this time I lined the bodice and gave it a square neck.  The pinafore is slightly shorter than the dress, and the back gathered skirt is two separate pieces so that it stays separate in the back, with pearl snaps on the back of the bodice portion only.  

I bought a green queen size flat sheet and a white full size flat sheet at the thrift store to upcycle for this project.  I love using bedsheets for these historical-inspired costumes, like when I made our Hobbit outfits for last year's Renaissance Festival.  Working with thrifted bedsheets gives you a lot of fabric for pretty cheap, and I love being able to "cheat" by using the already finished edges for my seams and hems- the large hem at the top of a flat sheet looks fantastic as the hem of a long dress like this.


I definitely made some mistakes with this costume.  First things first, my girl is between sizes.  I assumed that, since the empire waist is not form-fitting, I could use the smaller size (the one that corresponds better to her waist measurement) since it's free-flowing in the hips, but I would have done better to just size up.  I sized up for the pinafore and it fits much better in the shoulders than the dress.  (I was planning to size up for the pinafore either way, however, because it was going to be worn on top of the dress.)  You can tell most obviously in the sleeve- even with the added cuff, the sleeve is much too short (although I wanted her to be able to push them up away from her wrists and have them stay put either way, because she doesn't like sleeves that touch her hands- but these sleeves became 3/4 rather than long sleeves).  I think my biggest mistake was in drafting the empire waist bodice, however.  I did not give myself enough room beneath the armscye- I believe I gave 1/2" exactly, which is the seam allowance, so the waist line lies even with the bottom of the arm hole, making the shoulder fit much too tight.  I should have lowered the waist by about an inch to give us more wiggle room there.  Finally, I chose the wrong fabric for making the pinafore.  The only white sheet I could find at the thrift store was this knit, t-shirt-like material.  I interfaced the "button" placket but it simply would not cooperate for sewing on buttonholes.  If I were better at making buttonholes I'm sure I could have conquered it, but instead I admitted defeat and installed snaps for a closure.  Of course I did this while a rambunctious toddler was pestering me and I was angry about the failed buttonholes, so one of the snaps is installed backwards!  You can't tell when the other two are closed, however.  


We found the boots at The Children's Place and the hat at Target- it's intended for an adult so the brim is much too wide, but I think that and the too-short sleeves are perfect for Anne Shirley when we first meet her in the book, as she would be wearing imperfect clothes that don't quite fit.  

All in all, I'm really proud of this costume.  It was a learning experience, and my girl is so happy wearing it.

Who is your favorite book character?

Much love, 

The Geeks
Friday, March 3, 2023

Crafting Adventures: If You Give a Mouse a Cookie


Here's another look at what my kindergartener looked like for his school's celebration of Read Across America Day yesterday.  He decided to dress as the mouse in If You Give a Mouse a Cookie.

The outfit was really simple to assemble.  He wore a long-sleeved neutral colored shirt that we already had in his closet, and a pair of denim overalls.  I made him some ears (which admittedly were a bit too floppy) and attached them to an old headband, and I made a pillow for him to carry around shaped like a chocolate chip cookie.

Here's a really simple how-to so you can make your own cookie pillow!

Supplies:

-a circular pillow form

-light brown fleece

-dark brown fleece

-tools to measure, cut, and sew

1. Lay your pillow form on top of your light brown fleece.  Trace around the outside of the pillow, approximately 1/2 an inch away from the pillow all the way around.  Alternatively, you can measure the diameter of your pillow and draw a circle on your fleece which is 1" larger in diameter than the pillow.

2. Fold the rest of your light brown fleece in half.  Draw another circle the same size as the one you just drew. Find the horizontal diameter of this circle (that is, the exact midpoint line, running side-to-side) and then measure down 2".  Draw a straight horizontal line at this point, slicing off the bottom of the circle.

3. Cut out this new partial circle from your folded fleece, resulting in 2 identical partial circles.

4. Free-hand cut out some vaguely chocolate chip shaped pieces of your dark brown fleece.  Pin them to your full circle piece, randomly distributed around the right side.

5. Attach the chocolate chips to the front of the cookie by sewing all the way around each shape with a zig-zag stitch.  I use one with a short length and a wide width.  Go around twice to make sure it's good and secure.

6. If you wish, you can fold the straight edge of each partial circle towards the wrong side by half an inch and stitch them down to hem these pieces.  I chose not to do this as the fleece will not fray, but it could give your pillow cover a cleaner look.

7. Lay one partial circle piece on top of your cookie front, right sides together.  Lay the other piece on top of that, right side down, so that the straight edge overlaps the other piece's straight edge.  By this I mean that if your first partial circle shares its rounded edge with the top of your cookie front and the horizontal line lies below the center line, then your second partial circle should be flipped upside down from this so that its rounded edge lines up with the bottom of your cookie front and the horizontal line lies above the center line.  Secure all 3 pieces together with either pins or clips.

8. Sew the 3 pieces together with a straight stitch and a 1/4" seam allowance.

9. Turn your pillow cover rightside out and you will have what's called an envelope pillowcase. The overlapping pieces on the back can be spread open, you can stuff your round pillow form inside, and the back pieces can overlap again to keep it tucked in safe.

Check out this video on my Instagram page for a visual look at this tutorial.

Now, who wants a cookie?

Much love,

The Geeks


Thursday, March 2, 2023

Read Across America 2023

 Does your school celebrate Read Across America Day?  It began as a celebration of Dr. Seuss and the way his books inspire kids to read.  Originally, the celebration at elementary schools across the country invited children to dress as their favorite Dr. Seuss character for a school day.  The celebration has evolved to encompass all beloved children's book authors, and kids are invited to simply dress as their favorite book character.  We love celebrating this day in our family- because we love wearing costumes, and we love books!  This year only second grade and below are dressing up at our school, but my oldest still wanted a chance to put on a costume, so we did a little photo shoot this weekend.


Here's our Anne Shirley, from Anne of Green Gables, making up stories and getting into trouble.  I'll share in another post about how I made this dress and pinafore out of a couple of thrifted bedsheets.


And here's my little mouse with his chocolate chip cookie, from If You Give a Mouse a Cookie.  He's excited to use his chocolate chip cookie pillow for rest time today!


Who is your favorite book character?  Have you ever had the chance to dress up like them?

Much love,

The Geeks

Friday, January 27, 2023

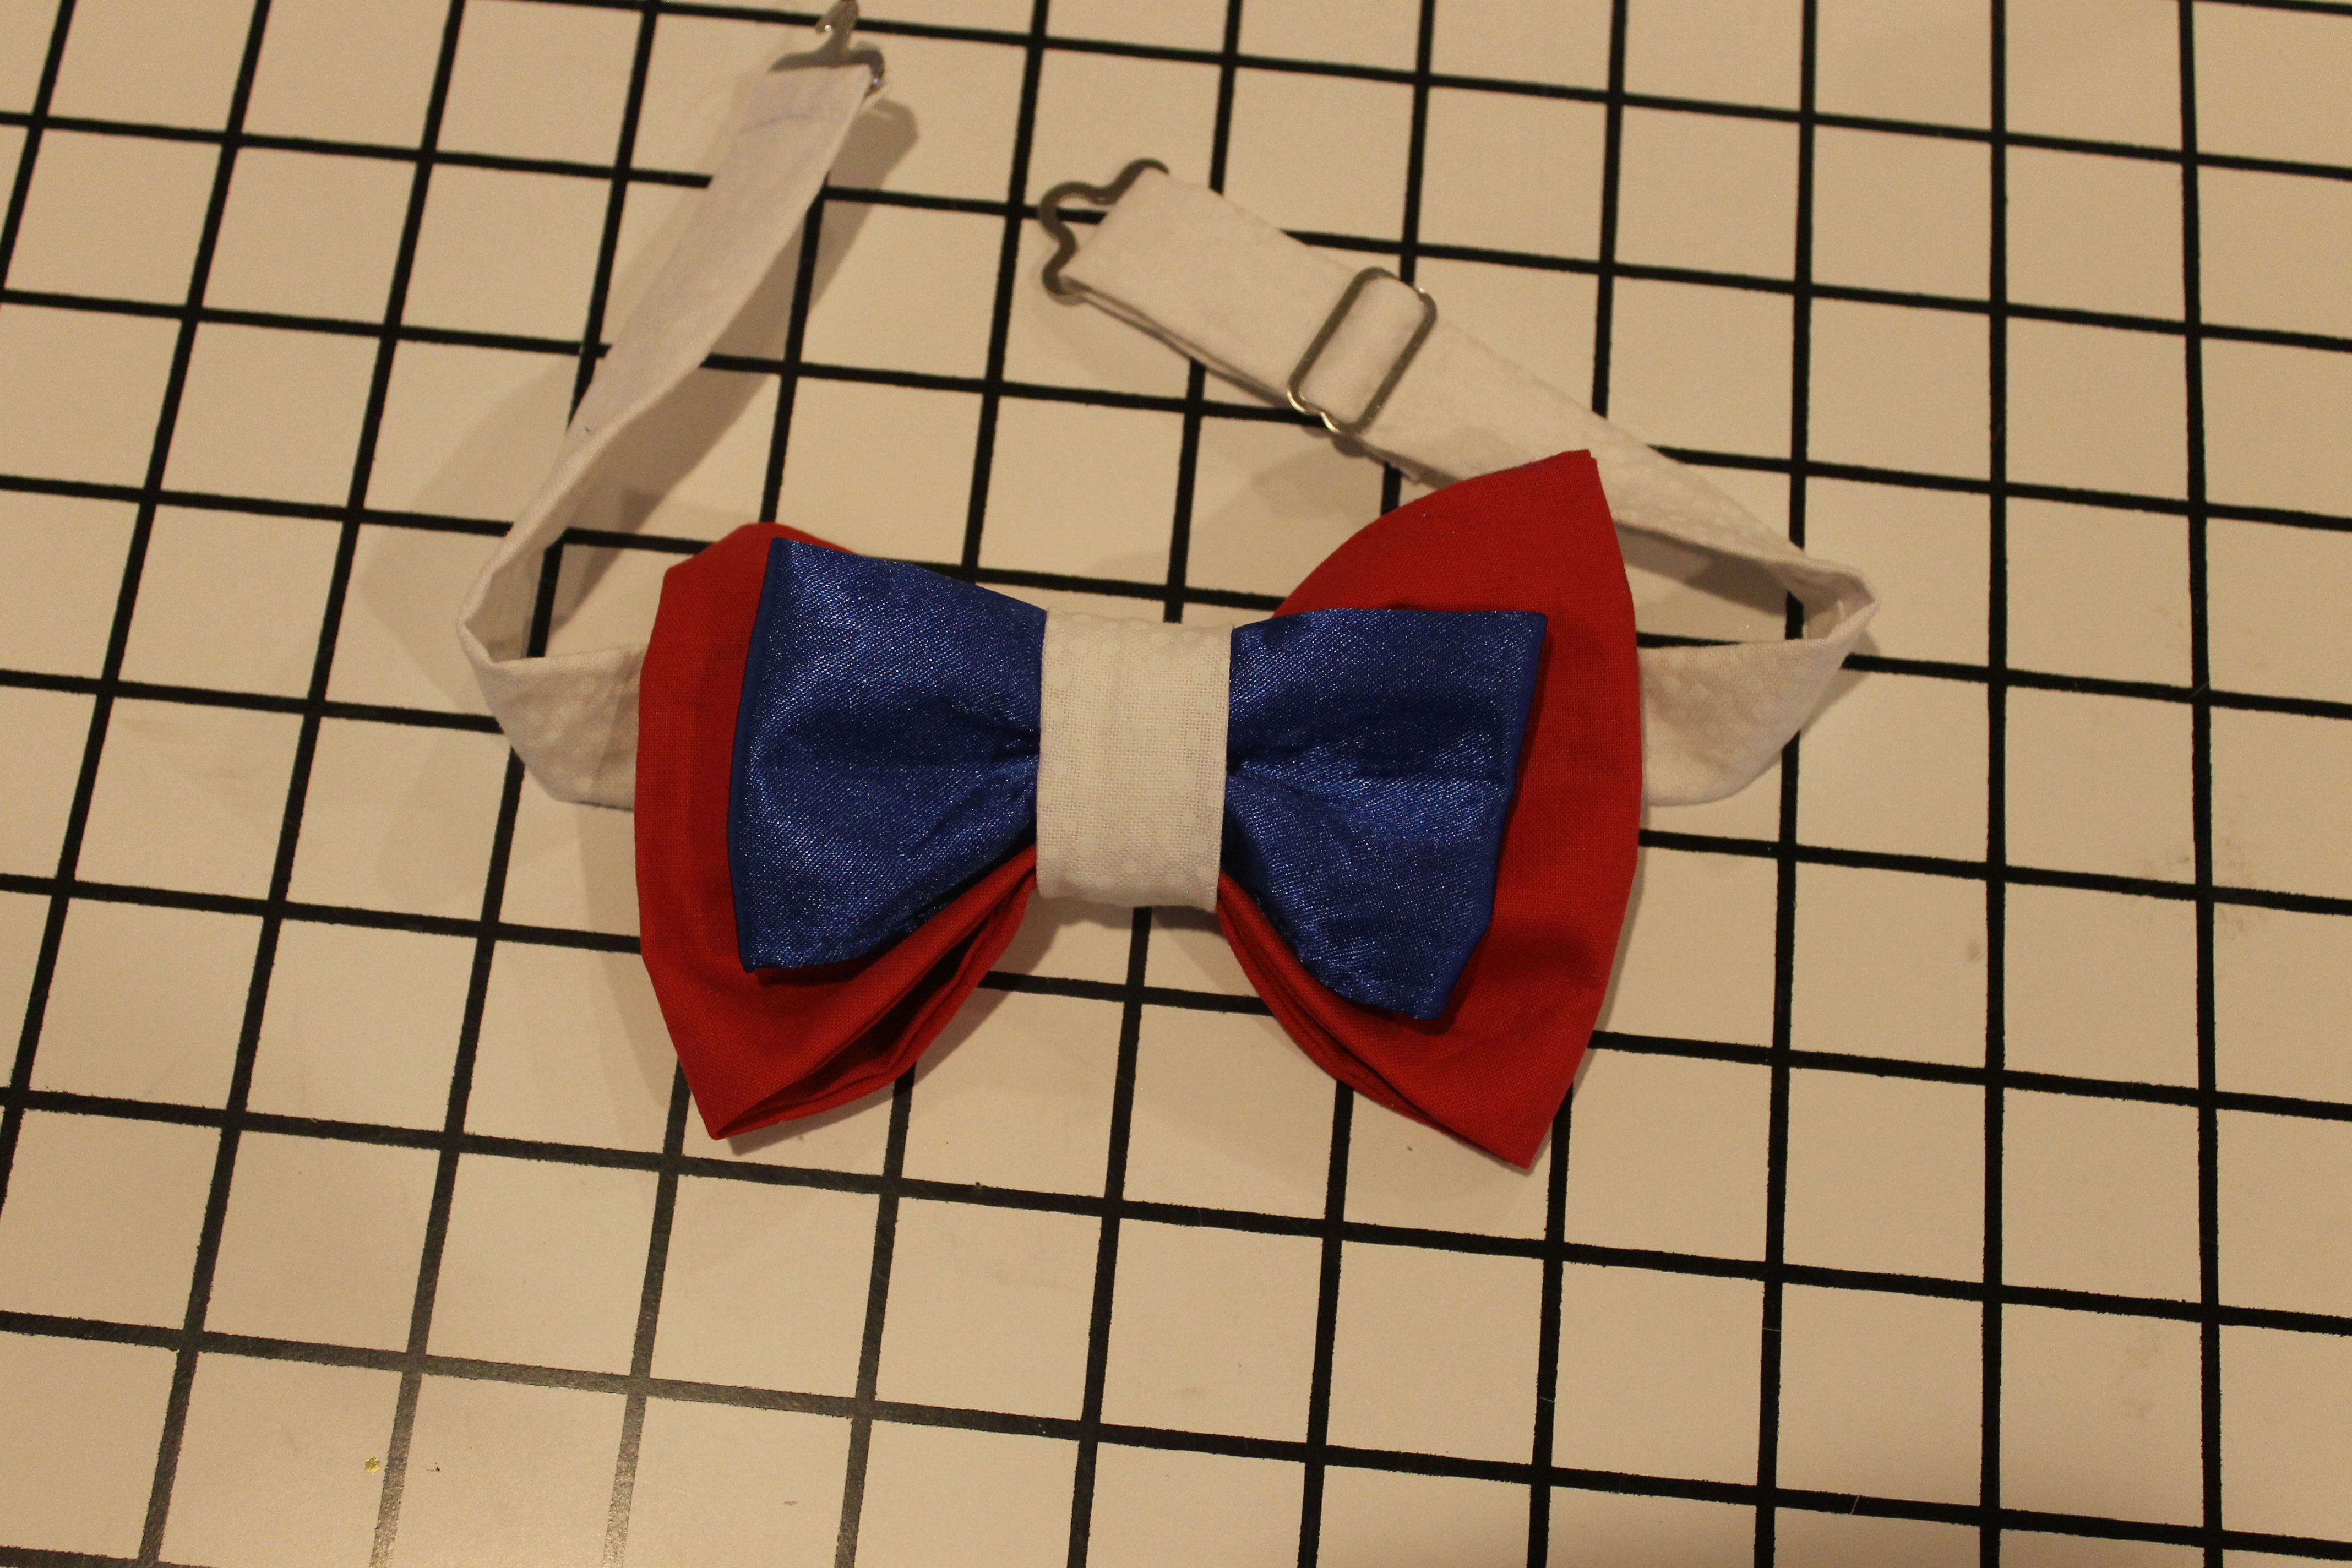
Crafting Adventures: Double Bow Tie

 My two oldest kids go to a school that requires uniforms- rather formal uniforms, including ties for the boys.  They have a sort of Spirit Week coming up next week where they get an out-of-uniform day, plus several themed days where they get to wear dress code-breaking accessories.  One of those days is red-white-and-blue themed, and so I decided to whip up a quick red, white, and blue bow tie for my Kindergartener to swap out for his regular uniform tie.  Also, it just so happens that Project Run and Play is hosting a Sew Your Stash link-up, so I was inspired to dig through my stash- specifically my scrap fabric pile from past projects- rather than buying new fabric.  I did have to buy one notion for this project, which is the bow tie clip set that I'll show you later in the post.

I have made many a bow tie in my day, including a set for all the men in our wedding party.  I've made several bow ties and regular ("fake") neck ties for my little man, too, using many different methods- snap tape, buttonhole elastic, Velcro... But I've never used an actual clip set to make a "real" clip-on tie before, and for whatever reason, I decided THIS project required one.  Honestly I'm so glad I did it though, because the whole thing looks much more professional than any tie I've made in the past, and the best part is I can swap out the bow and always use the same neck piece (unless I want a different color, of course).  And it was SO EASY.

For this quick project, you need:

-fabric for your large bow

-fabric for your small bow

-fabric for the loop around the middle (this can be the same as one of the bows, but for mine it's different)

-fabric for the neck piece (again this can be the same or complementary)

-a bow tie clip set, which can be found at JoAnn or other fabric retailers

-lightweight fusible interfacing


1. To start, cut your fabric as shown in the image above.  You need 2 large rectangles, 2 small rectangles, 1 neck piece, and 1 center piece for the bow.  I used 10.5"x4" for the large bow, 8.5"x2.5" for the small bow, 18.5"x2.5" for the neck piece, and 2"x4" for the bow center.  (Note that I took this photo with the original pieces of fabric I cut for this project, sorta eyeballing it, but later realized my center piece was too small and had to cut a new one.  The dimensions listed here are the ones you need although the actual piece of fabric shown in the image is obviously smaller than the listed dimensions.)  Finally, cut one piece of interfacing for both of your bows- I went with 5"x3" and 4"x2".  Apply the interfacing to the wrong side of one large and one small rectangle.


2.  Next, lay your two large rectangles right sides together and stitch around 3 sides, leaving one short side open, using a 1/4" seam allowance.  Turn right side out and press.  (To get really crisp corners, clip the corners before you turn it out.)  Repeat with the small rectangles.  


3. Next, take your large rectangle and fold it in half with the wrong side on the outside, lining up the short ends.  Sew those short ends together with a 1/4" seam allowance, press the seam open, and then turn your newly-created loop right side out.  Position it so that the seam is in the center and press flat into a rectangle.  Repeat with your small bow.  In the image above, the small (blue) bow is shown face up and the large (red) bow is shown face down.


4. Take your tiny rectangle, which will be the center loop holding the bows together.  Fold it in half, right sides facing, so that the long edges match up.  Sew down the long edge with a 1/8" seam allowance.  Turn right side out; you will have a long tube.  Fold that tube in half so that the raw edges are together, right sides facing, and sew the raw edges together with a 1/8" seam allowance.  Turn right side out, and press flat so that the seam is in the middle.  You'll have something that looks like the image above (only larger, because this one was my mistake piece).


5.  Place your small bow on top of your large bow and squeeze them into an accordion shape.  Slide the little loop over both bows.


6.  Take your neck piece and fold it in half, right sides facing, so that the long edges match up.  Sew down the long side with a 1/4" seam allowance.  Turn the loop right side out and press flat with the seam running down the middle.


This is the bow tie clip set I used.  I found it at my local JoAnn- I ordered curbside pickup so I wouldn't be tempted to waltz through the aisles grabbing more fabric I don't need- and the package comes with simple instructions on the back.  You can also find packages of bulk sets that will make several bow ties, but I just wanted to make one first to make sure I could handle it.


7.  Follow the instructions on the package to attach the hardware.  I highly recommend putting everything on and PINNING IT first, then attempting to hook it together, BEFORE you sew it in place, to make sure you have everything facing the right way.


8.  Slide the neck piece through the back of the bow tie loop and you're done!  The little slider bar that comes as a part of the hardware set can be used to adjust the strap, so this should grow with your child for quite some time.  I can't wait to see how he looks next week!

I'm entering this post into Project Run and Play's Sew Your Stash linkup.  All of the fabric came from my stash- my scrap stash, that is.  The red fabric was used in this past year's Christmas outfits, the blue fabric was used in my Nutcracker costume, and the white fabric had been hanging around in my stash forever until it finally became the lining in some of our Hobbit costumes.  All of the fabric is from JoAnn.

Made anything for your little guy lately?  Have you ever sewed with a bow tie clip set before?

Much love,

The Geeks

Friday, January 13, 2023

Crafting Adventures: Fancy Pink Dress


Every year, the kids' school puts on a Father-Daughter Dance.  This event typically takes place in January or February, near Valentine's Day, so last year, I assumed it would fall at the same time.  I got it in my head that I wanted to sew up a sweet little Valentine's dress for our daughter to wear to the dance, but then I found out that it wouldn't be happening until later in the spring.  Still, I couldn't be deterred, and decided to go ahead and make the dress I had in my head.

I saw this gorgeous dress on Pinterest, via Sew Much Ado:


Her blog post includes a pattern and tutorial for a size 4 dress, but that wasn't the right size for my girl, so I turned to the Oliver + S Building Block Dress Book to draft my own pattern.

To mimic the Sew Much Ado dress, I altered the Building Block Dress pattern following the directions in the book to have an empire waist, keyhole button back, and bell sleeves with ruffles.  I also loved the look of the lace overlay in the inspiration dress, so in addition to a lovely solid pink fabric, I used a tulle overlay fabric for the skirt that featured adorable little velvet bows.  (Both fabrics and the cute pink heart button on the back are from JoAnn.)


For the overlay, I did not double the width the way that I did for the skirt on the solid fabric, so it hangs rather straight instead of being full and gathered at the top.  Also, to keep things looking neat, I used French seams on the side seams of the overlay.  However, I did not hem the overlay- I cut it to the finished (hemmed) length of the solid skirt, knowing this fabric wouldn't fray.  It is perhaps not as neat- my cut lines aren't super perfect- but I felt that hemming it or trimming it with something would weigh it down too much.


I did make a few mistakes with this sew.  For one thing, I way overestimated how big of an elastic loop I would need for the keyhole button back (you can see how it gapes in the above picture).  During a fitting of the bodice, I just became so paranoid that the neck line would be too tight for her, so I cut a super huge loop.  Oops!

Also, the ruffles on the sleeves should probably have been longer.  They are a sort of squat, awkward length at her elbows, but she's a little picky about sleeve length and requested that the sleeves not fall past her elbows, so this is what we ended up with.  Maybe I should have just used wide bell-shaped sleeves with no ruffles at all?

Overall, I'm really happy with this dress.  I know it's taken me a year to post about it, but it's been a busy year!  I have improved a lot in my sewing over the past year, and I'm excited to share more of what I'm making with you here.  My current project is also being made with the Building Block Dress book so stay tuned for that!

Do you have a favorite pink dress?

Much love,

The Geeks

Monday, January 9, 2023

Fall 2022 Wrap-Up

 So, turns out a lot of stuff happened around here between Halloween and Christmas- stuff which I usually document here, but we were just way too busy.  So rather than giving each a dedicated post, I'll just give you a little taste all in one.  (If you follow me on Instagram, however, you did indeed see some of these life updates!)


Little Bean turned 18 months old, and in her aged wisdom she decided to leave behind her high chair and sit only in a booster seat in a regular chair, using utensils and eating from her own plate just like everybody else.


In November, Mr. Geek and I celebrated our tenth wedding anniversary.  I had planned to write up this sweet list of marriage advice learned over ten years, but instead I'll leave you with this- we had our parents come and stay with the kids for the weekend and we spent two night in a sweet little historic inn half an hour up the road.  That's it, that's the secret to ten happy years of marriage.


Miss Chief celebrated her 9th birthday on the same day as our wedding anniversary.  The day after we got back from our little getaway, we had a big birthday party for her.   She wore a dress that she designed and I made, and she invited all the girls in her class.  It was the first big party we've had since the pandemic started and we all had a blast.


In December, Mr. Geek and I joined Miss Chief for 3 performances of The Nutcracker with her ballet school.  Every year, they ask for parent volunteers to dance as the parents in the party scene, and since Miss Chief was cast as a child in the party scene, we decided to go for it and join her on stage.  It was a LOT of work but honestly we haven't had that much fun in a long time!

So yeah, that was our fall!  Hopefully I can get back into posting here on a semi-regular basis.  I sewed a lot of awesome things in 2022 and I'd like to share them with you!

What did the end of the year look like for you?

Much love,

The Geeks 

Sunday, December 25, 2022

Merry Christmas 2022


I know I haven't updated you lovely readers on any of the things that have happened since Halloween- I didn't post any costume tutorials, I didn't update you about Bean turning 18 months old, or Miss Chief turning 9 (!), or our 10th wedding anniversary (!!)- but here we are at Christmas, so enjoy this photo of this toddler in awe of the Christmas lights and her siblings in awe of her.

Merry Christmas,

The Geeks


Monday, October 31, 2022

Happy Halloween from Sonic and Friends!


Gotta go fast!

Happy Halloween from Knuckles, Sonic, Cream, Amy Rose, and Tails, who really just wants to fly around and doesn't want to pose for pictures.

I hope you and your family zoom from door to door collecting candy this evening!

What are you dressing as for Halloween?

Much love,

The Geeks

Tuesday, October 11, 2022

Concerning Hobbits


This weekend, we attended the Maryland Renaissance Festival for the first time since before the pandemic.  We don't always attend in costume, but it's always more fun when we do.  This year, I was inspired to dress us all up as Hobbits- specifically, Sam and Rosie and (a few of) their kids.


The weather was beautiful, but a little chilly, so we only posed barefoot for a handful of pictures.  The rest of the day, these Hobbits wore sneakers!


These pieces were all upcycled from clothing and non-clothing things I picked up at a local thrift store, as well as some items from my stash and scrap from other projects.  There were a couple of things, like ribbons, hardware, and cording, that I needed to pick up to create cohesive looks (not to mention matching thread) but all in all these were probably 90% upcycle, which I feel good about.

Now it's time to put together Halloween costumes!

Do you have a renaissance faire near you?  Do you like to go in costume?

Much love,
The Geeks