Showing posts with label crafting adventures. Show all posts

Thursday, May 25, 2023

Crafting Adventures: Butterfly Dress


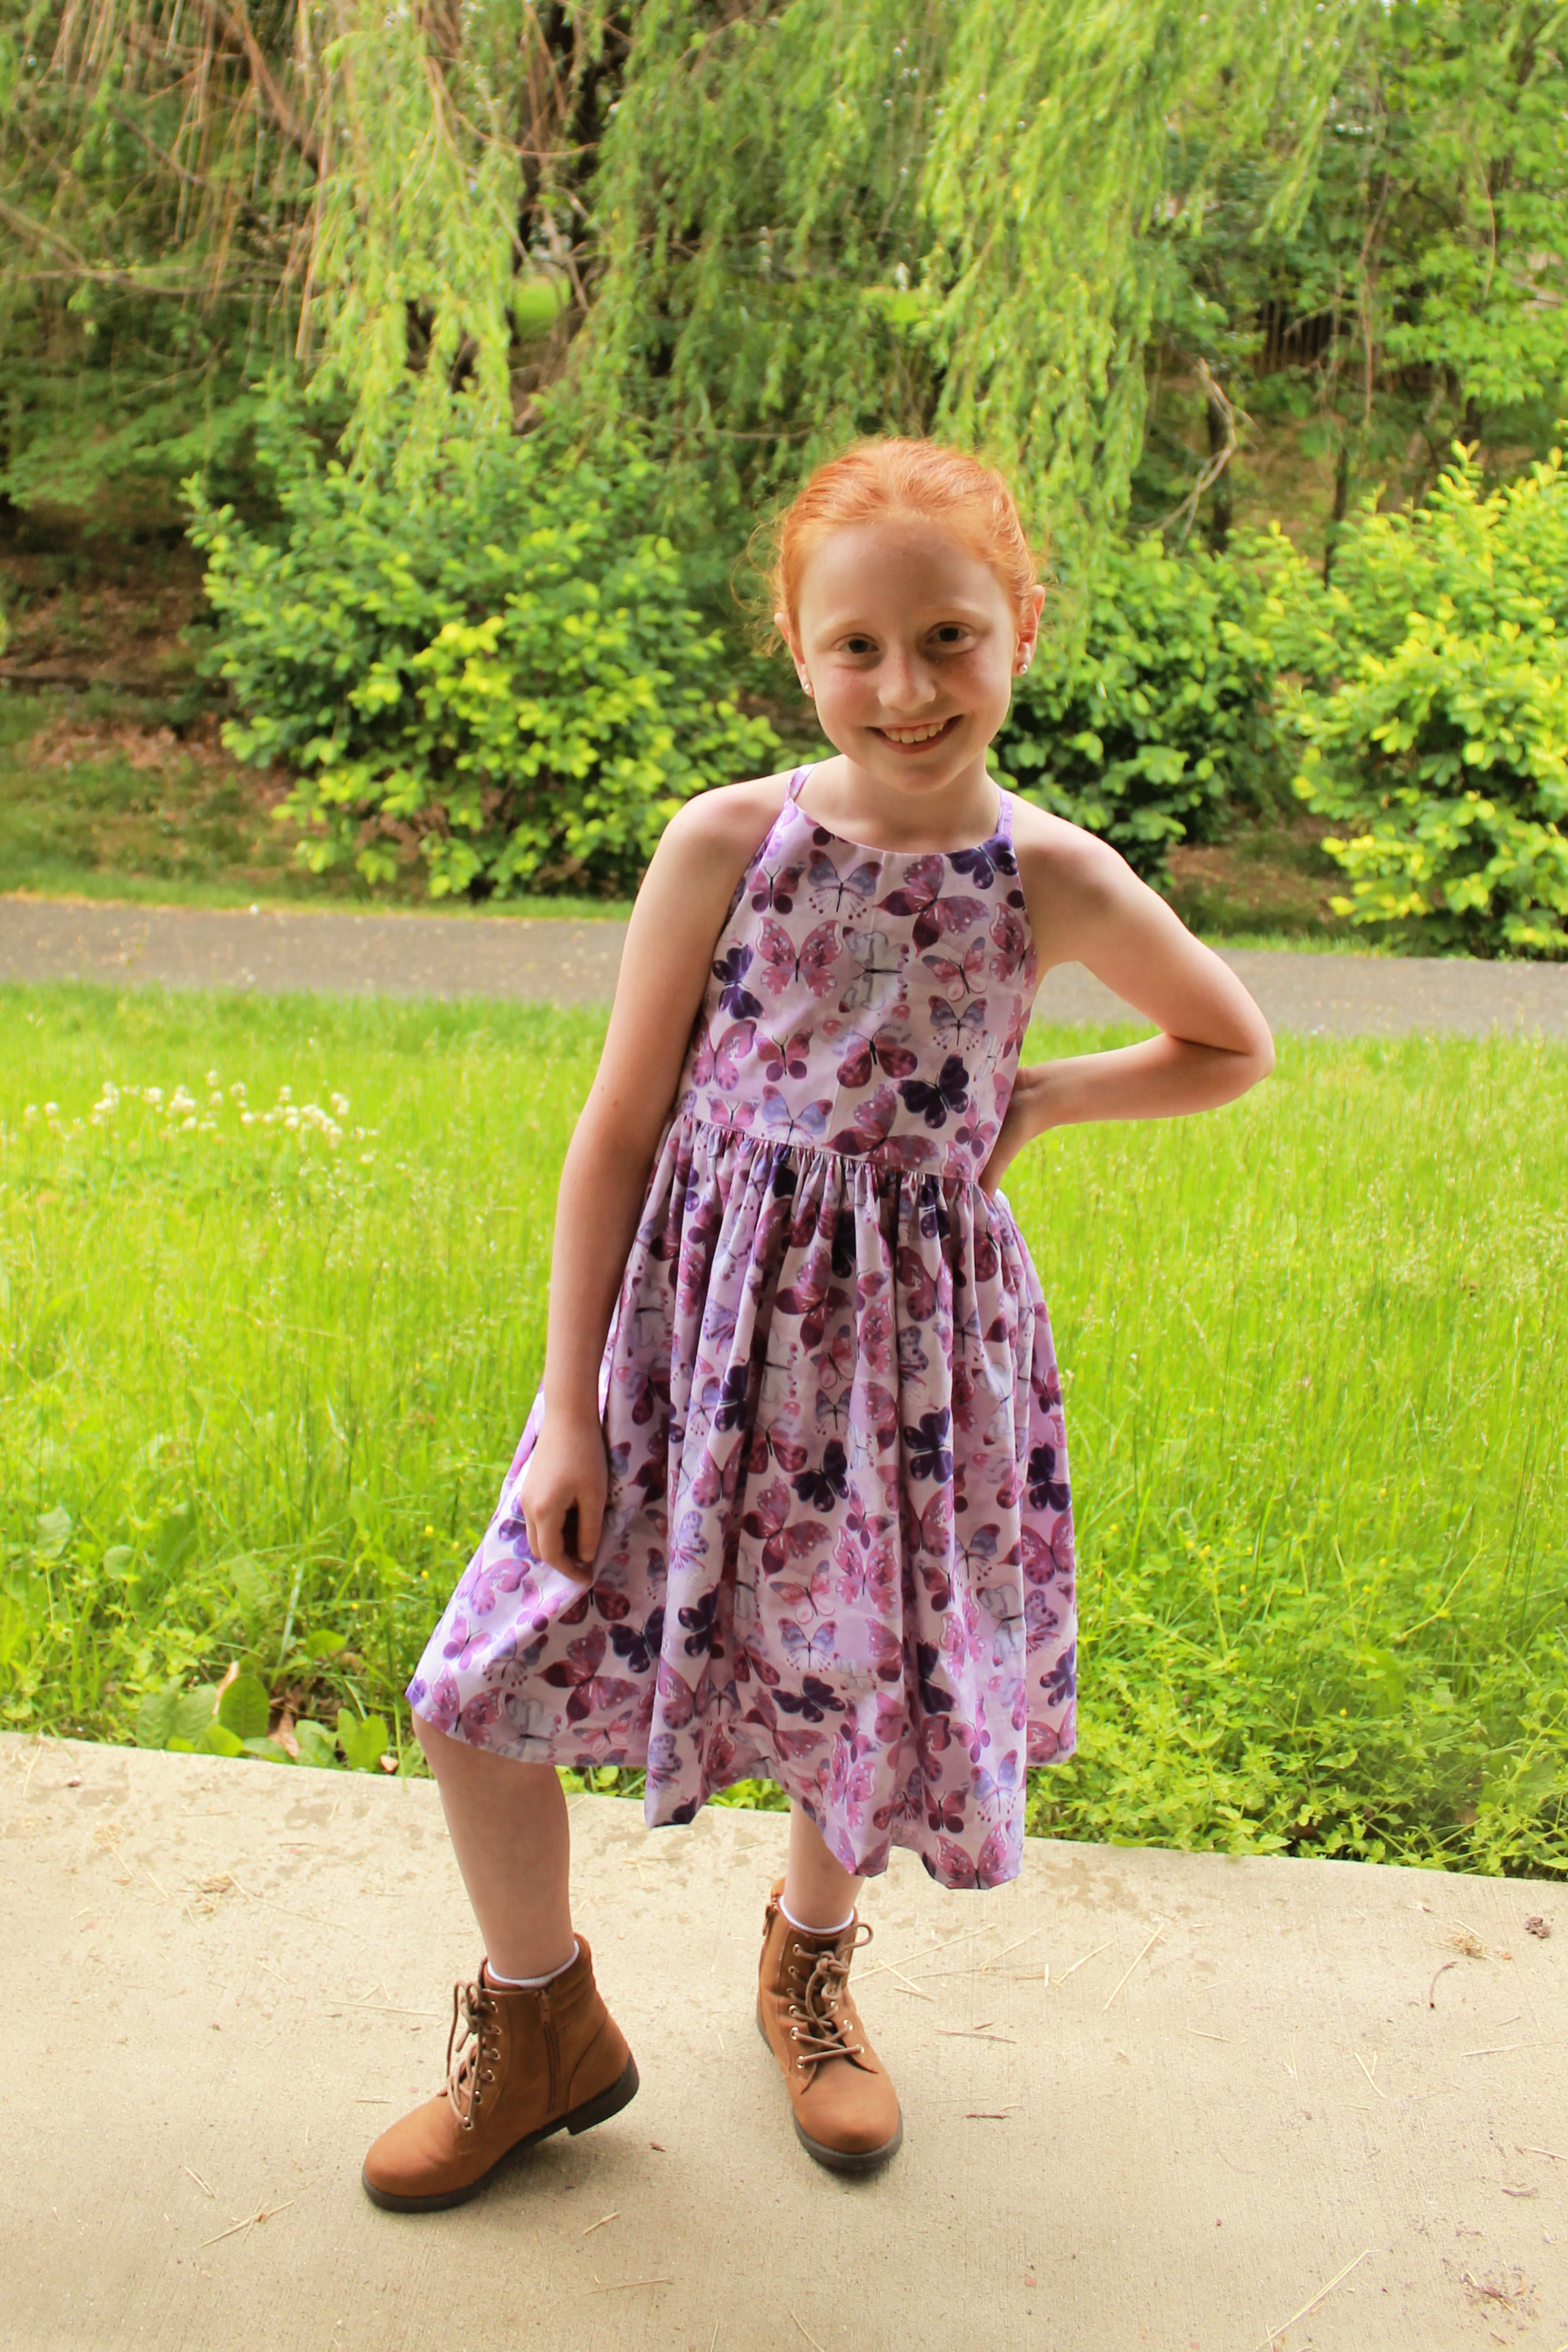
Last weekend was the Father/Daughter Dance at school, so I took the opportunity to whip up a pretty new dress for Miss Chief that would look lovely on the dance floor.  The theme was "Boots and Bows", a country music vibe, so she decided to wear what she now lovingly calls her "Anne boots" which we bought for her Anne of Green Gables photoshoot.


She picked out the butterfly fabric at JoAnn ages ago- I was originally planning to do the Simple Life Pattern Co. Blaire ruffled maxi skirt, but the season passed and then I ended up using that pattern for her Christmas look instead.  I have a bunch of summery dress patterns I've been itching to make, and these beautiful butterflies were just begging to become a sundress, so I landed on the SLP Co Mya dress.  I originally bought this pattern with the intention of making the peplum top version first, but then the dance was approaching and I needed to decide on a dress so I went for the longer length instead.


This was a very easy sew and I didn't run into any major problems.  I ended up not top stitching around the neckline/the top of the bodice but I don't think it suffers for it.  The bodice is lined and as long as you take care when clipping the curves and press it when you turn it out, it's very crisp and clean even without the top stitching.


Of course the real star of this dress is the back.  The straps are 4 separate pieces that you tie together to tighten as needed, and you can either tie them straight up-and-down or in an X pattern like I've done.  I figured criss-crossing the straps would lend added stability for her while she was jumping around on the dance floor.  The back can be made either a solid rectangle with channels for elastic which mimic shirring, or the three straps as I've chosen to do.  I made this in a size 8 which fits her like a glove, but I did end up needing to take in the elastic straps, about an inch off the top one and a half inch off the middle.  There are no traditional side seams on this bodice- the front is one piece that wraps around about a third of the way on each side of the back and connects to the elastic straps.  If I had done a fitting before putting it together, I would have just cut the elastic shorter; my solution is a little less elegant, but it's on the inside of the dress so I don't really care.  I did the gathered skirt option due to the amount of fabric I had to work with, but this would have had even more twirl factor with the circle skirt option.

I hope she gets a lot of wear out of this gorgeous dress this summer!  I can't wait to make a bunch more light and airy summer dresses.  Let's see what I've got in my stash...

Much love,

The Geeks

Tuesday, April 25, 2023

Crafting Adventures: Colorblocked Shorts


I made a pair of shorts!  If you've followed my sewing journey around here, you know that I typically stick to dresses for my little girls, but I've been wanting to branch out.

A little while ago, I purchased the Simple Life Pattern Company Emilya pattern for bermuda shorts, capris, and skinny pants without a real plan for what to do with it- I think it may have been on sale and I thought I'd probably need it eventually.  Well, I've been eager for some scrap-busting projects this spring, and this pattern presented the perfect opportunity!


I went through a phase where I would buy up tons of fat quarter sets whenever I was at the fabric store.  I just loved the fact that they are pre-cut squares of coordinating fabric that just scream "cute project!"  Obviously they are intended for quilting, but I always loved to use them to do little home decor projects or toddler-sized clothes.  For the past few years, however, they've mostly just been taking up space in my stash- potentially cute projects.  In an effort to actually use them, I've started sketching up some ideas.  My favorite idea is going to be very labor intensive, but this one was much quicker- and turned out so cute!

I had purchased 2 gingham print fat quarter collections a million years ago, and for this project I wanted to use the 2 blue and 2 red pieces for a pair of Americana bermuda shorts, perfect for summertime.


The Emilya pattern is super easy to follow.  The waistband, pockets, and cuffs really lend themselves to a colorblocked styling which is just perfect for a stash-buster, even if you're not working with pre-cut squares.  For the size 8 shorts, I was able to cut one front and one back leg from a single fat quarter with some creative positioning of the pattern pieces.  To do the waistband, I cut 2 pieces that were half the required width (plus seam allowance) for the front and 2 for the back, and then joined them together before proceeding with the instructions.  I did the same for the cuffs, except I didn't have enough fabric left to get the full width the pattern required while also including allowance for the extra seam, so they don't overlap quite as far on the outer edge as they are intended to.


I cut the pattern pieces so that the colors would continually alternate all the way around the shorts.  This means one leg is red in the front and blue in the back, and the visible part of the pocket in front is blue.  It also means the waistband is half blue and half red in both the front and back, with the blue portion attaching to the red pant leg on both sides.  Finally, the cuffs are oriented so that the blue portion of the cuff is attached to the red portion of the leg.


In terms of fit, I think these could use a bit more room in the crotch area, but that may be mostly due to the fabric choice.  Quilting cotton is perhaps not the best idea for a child's shorts; a gusset may help this issue if you're not worried about the colorblocking aspect like I was.  Although the elastic waistband does mean these are comfortable to wear and easy to take on and off, I think these shorts are going to be "fancy shorts", meaning they won't be a playground staple.  I'd like to make these again in something heavier, like denim, and see how they look.

Once again I finished the seams on this garment with the overlock stitch on my regular home-use sewing machine (still no serger here!) and this time I filmed a little tutorial for Instagram- check it out here!

Do you like working with fat quarters or other pre-cut pieces of coordinating fabrics?  Or do you prefer to shop by the yard?

Much love,

The Geeks

Friday, April 14, 2023

Crafting Adventures: Floral Finery

The following post contains affiliate links.  If you click through one of these links and make a purchase, I may make a small commission from the retailer at no additional cost to you.  Thank you for your support!

Happy Easter!  If your family celebrates Easter, I hope it was a joy-filled day with lots of "alleluias" and a little bit too much candy.

I finally have a moment to share a look at the outfits I made for my kids to wear to Easter morning Mass.  If you follow me on Instagram, you may have been watching my nightly progress on my Stories.


When creating holiday outfits for my crew, I typically choose one fabric to feature and then some accent fabric depending on the garments I'm making, and each kid typically gets their own unique garment made in that same fabric.  This time, however, I took my oldest to JoAnn- our favorite place to shop together- with only the vague idea that I wanted something floral.  We found these quilting cottons in various colors and just could not decide on a single color, so this time each kid got their own fabric- Miss Chief in blue, Peanut in green and blue, and Bean in the pink and purple.  To keep the outfits looking cohesive, I used the same pattern for the girls' dresses, but the little one got short sleeves and the oldest was sleeveless.  I also chose a lace ribbon to use as trim on both dresses and to tie off the back, and used the same buttons on each dress.  While it's certainly a departure from our usual single color palette, I think they look great together!  Mr. Geek and I shopped our closets for our looks- I wore a blue floral dress and he wore a bright pink tie.

The dress pattern I used was the Elouise from Simple Life Pattern Company.  For my 9-year-old, I did the sleeveless option with the dress length gathered skirt.  For my almost-2-year-old, I did the short sleeved version with the vintage length gathered skirt.  I used a lovely lace ribbon for the long ties in the back and to trim the hemline of the skirt on both dresses.  The back of the dress is really the star on this pattern.


For my son, I made the Classic Necktie pattern from Peek-a-boo Pattern Shop.  Unlike the many ties and bowties I've made for him in the past, this pattern is for a real tie.  I was sort of in a hurry when whipping this one up and ended up not using the woven sew-in interfacing, which would have given it a sturdy, crisp feel- I will have to make sure to do that next time.  The pattern also features adult sizing, so I'll have to make one of these for Mr. Geek next time, too!  Peanut looked like such a handsome gentleman and received so many compliments on his dapper look.


We're lucky to be spending the Easter Octave with family.  All of the cousins have really enjoyed this time together!  And we look pretty great together, too.


Happy Easter!

Much love,

The Geeks

Thursday, April 6, 2023

Crafting Adventures: Simple Floral Dress

 The following post contains affiliate links.  If you click through one of these links and make a purchase, I may make a small commission from the retailer at no additional cost to you.  Thank you for your support!


By now you know how much I love sewing clothes for my kids.  But I also have 2 nephews and a niece, and when I find a spare moment, I like to make things for them, too!  My littlest Bean and her cousin were born just a week apart from each other; we're going to celebrate their 2nd birthday, along with their other cousin's 1st birthday, when we're all together for Easter next week.  I wanted to sew a quick dress for my little niece but was afraid I wouldn't have enough time between finishing my kids' Easter looks and getting ready for the road trip, so I didn't prioritize this project.  I figured I could dig through my stash and use a pattern that was already put together from something I'd made for one of my daughters.  But then I was at JoAnn, picking up an extra roll of lace ribbon to finish the Easter dresses (if you follow along on my Instagram, you remember that saga) and as always, I perused the remnants and sale bins.  I found the most darling floral print cotton knit, just over a yard, and knew I had to take it home with me.  I hoped that I would have enough time to make something for my niece's birthday after all, but if not, this could eventually be a dress for either her or my own little Bean later in the summer.

Well, I finished the Easter looks with a few days to spare, and the worst of the packing was over, so I turned to Peek-a-boo Pattern Shop, my favorite patterns for knit and stretchy fabrics, to find something that would be a quick make.  I thought about using the Delaney dress pattern that I already owned- the one I used to upcycle my old maternity sweater- but I perused the website just in case something stood out to me.  Sure enough, I found the Dakota pattern for a Dolman-sleeved top or dress with optional sleeve ruffles.  I knew that it would be a quick sew, the dress cut would be the perfect design for the bold floral fabric, and I had some leftover solid magenta knit from our Sonic the Hedgehog Halloween costumes that would be perfect for the ruffles.  Plus, I knew I'd be able to use the same pattern in the t-shirt cut without the ruffles to make shirts for my son!


Y'all...isn't she lovely?  The Dolman sleeve design means that the sleeve and bodice are one continuous piece- so you simply attach the front to the back at the shoulders and side seams, hem the bottom and sleeves (or attach the ruffles to the sleeves), and add the neckband, and you're done!  I chose to leave the hem of my ruffles raw since this material won't unravel and it gives them an airy feel.  This was the first time I used the stretch stitch settings on my machine; I don't have a serger, so when I sew with knits, I typically use a narrow zig-zag stitch.  This time, I tried the built in stretch overlock stitch for all the seams, and the triple stretch stitch for my top stitching.  The neckline is still looking a bit wonky, so I clearly need more practice, but overall it's a really clean, professional look.  I assembled everything but the neckline Tuesday night, and did the neckband last night.  (I'm sure if my toddler had gone to bed when she was supposed to on Tuesday, I could have finished the whole thing then.)  For me, that's a very quick make indeed!

If you love this pattern as much as I do, you can get it now for FREE by simply joining the Peek-a-boo Pattern Shop Facebook group or signing up for their newsletter!  (Click here for more details!)

It just so happens that the first week's theme for Project Run and Play is "I can buy myself flowers", with an emphasis on bold floral designs, so I'm submitting this look to their Season 27 sew along!  Check out this season's themes and see if you have time to whip something up and play along!

Do you like working with knits?  Got any tips to make my neck band less wonky?

Much love,

The Geeks


Tuesday, March 21, 2023

Crafting Adventures: Toddler Sweater Dress

 The following post contains affiliate links.  If you click through one of these links and make a purchase, I may make a small commission from the retailer at no additional cost to you.  Thank you for your support!


We all have a fabric stash, right?  Maybe it's scrap leftover from previous projects; maybe it's supplies you purchased for a project that you never got around to making; or maybe it's a small collection of "better snag this while it's on sale, I'm sure I can use it for something!"  I've got...all of those.  I've also got an ever-growing stash of clothing that no longer fits either myself or my husband but which is still in excellent condition.  Now, I should probably consign or donate this clothing, but something about each piece makes me want to upcycle it instead.

When I was pregnant with my first baby, I was a tiny, cute pregnant lady who wore tiny, cute maternity clothes.  By the time I was pregnant with my third baby, those tiny, cute maternity clothes were too small for my massive belly, so many of them entered the upcycle stash because I was still sentimentally attached to them.  This white sweater is one such piece- I wore it for our Christmas card picture where we formally announced my second pregnancy:

Christmas 2016

In the week between Christmas and New Years this past December, when no one was quite sure what day it was and the world was a haze of wrapping paper and cookie crumbs, I picked up this sweater and decided to give it new life.

I used the Delaney Dress and Tunic pattern from Peek-a-boo Pattern Shop.  I had already used this pattern once when making our 2022 Halloween costumes so I knew it was easy to follow and produced a cute, comfy, well-sized garment.  Plus, upcycling generally comes with some shortcuts along the way (at least, the way I do it) so I knew I could throw this together in an afternoon.

I used the dress-length pattern with long sleeves, a regular banded neckline (no hood), and no kangaroo pocket in a size 2T to turn my maternity sweater into a simple A-line long sleeved dress for my toddler who was wearing size 2T in typical retail clothing.  Because I wanted to take advantage of the cuffs that already existed on this knit sweater, I cut the sleeve pattern short by the length they would have been hemmed (3/4", per the pattern instructions).  I used the sweater's original neck band to create the neckband for the dress and didn't need to worry about folding it in half because there was only a raw edge on one side.  In the original pattern, the front hemline of the dress (or tunic) curves upwards in the middle, and the back hemline curves downwards, so that it is slightly shorter in front than it is in the back.  I wanted to take advantage of the knit band that already existed around the bottom of the sweater, so I opted to not incorporate these curves.  Instead, I cut both the front and back pieces so that they were the length of the shortest point of the front pattern piece.  This resulted in a simple A-line silhouette with a straight hem all the way around (that I didn't actually have to hem!) and the whole dress came together rather quickly.  Of course, a serger would have been the ideal machine to construct this garment with, but I don't have one yet, so instead I used a good ol' zig-zag stitch.  

While I don't have step-by-step pictures of this make, I did create a little reel on Instagram that shows the construction (and some action shots of the finished product!) which you can see here.

The Delaney Dress and Tunic pattern is for sizes 3 months - 12 years and has many different options- dress or tunic lengths; hood or banded neckline; short, 3/4, or long sleeves; and an optional kangaroo pocket.  

Have you upcycled anything lately?

Much love,

The Geeks

Monday, March 6, 2023

Crafting Adventures: Anne of Green Gables


So even though it turns out our school only let kids 2nd grade and under dress up for it, we still had a lot of fun putting together a costume for Read Across America Day for my 3rd grader.  We even did a photoshoot and put together a fun little film which you can check out over on my Instagram account.


Once again I turned to the Oliver + S Building Block Dress book to create my own pattern for both the dress and the pinafore.  Here's a look at the pattern alterations I made, as well as some mistakes I would create were I to do this again.


I used the Building Block Dress book to draft an empire waist bodice with buttons in the back, a Peter Pan collar, a gathered ankle-length skirt, and simple long sleeves with elastic cuffs.  To make the elastic cuffs, I measured the wrist end of the original long sleeve pattern and cut out a rectangle of fabric which was the same width and 2 3/4" long.  Rather than stitching together the sides of the bodice and then inserting the sleeves, I inserted the open sleeves while the bodice sides were still undone.  I attached the cuff piece to the wrist of the sleeve, then folded it up and over and top stitched it in place, so that I had a rectangular tube attached to the bottom of each sleeve.  Then I measured the circumference of my little Anne-girl's wrist and cut a piece of 1" elastic to that length, inserted it into the cuff, and stitched down both ends.  I gathered the front and back skirt pieces separately and attached them to the front and back bodice pieces, then sewed up the side seams last, doing the sleeve, bodice, and skirt side seam all in one go.  This is not how the book instructs you to assemble the dress, but it worked best for how I wanted to create this.

For the pinafore, I created another empire waist bodice, but this time I lined the bodice and gave it a square neck.  The pinafore is slightly shorter than the dress, and the back gathered skirt is two separate pieces so that it stays separate in the back, with pearl snaps on the back of the bodice portion only.  

I bought a green queen size flat sheet and a white full size flat sheet at the thrift store to upcycle for this project.  I love using bedsheets for these historical-inspired costumes, like when I made our Hobbit outfits for last year's Renaissance Festival.  Working with thrifted bedsheets gives you a lot of fabric for pretty cheap, and I love being able to "cheat" by using the already finished edges for my seams and hems- the large hem at the top of a flat sheet looks fantastic as the hem of a long dress like this.


I definitely made some mistakes with this costume.  First things first, my girl is between sizes.  I assumed that, since the empire waist is not form-fitting, I could use the smaller size (the one that corresponds better to her waist measurement) since it's free-flowing in the hips, but I would have done better to just size up.  I sized up for the pinafore and it fits much better in the shoulders than the dress.  (I was planning to size up for the pinafore either way, however, because it was going to be worn on top of the dress.)  You can tell most obviously in the sleeve- even with the added cuff, the sleeve is much too short (although I wanted her to be able to push them up away from her wrists and have them stay put either way, because she doesn't like sleeves that touch her hands- but these sleeves became 3/4 rather than long sleeves).  I think my biggest mistake was in drafting the empire waist bodice, however.  I did not give myself enough room beneath the armscye- I believe I gave 1/2" exactly, which is the seam allowance, so the waist line lies even with the bottom of the arm hole, making the shoulder fit much too tight.  I should have lowered the waist by about an inch to give us more wiggle room there.  Finally, I chose the wrong fabric for making the pinafore.  The only white sheet I could find at the thrift store was this knit, t-shirt-like material.  I interfaced the "button" placket but it simply would not cooperate for sewing on buttonholes.  If I were better at making buttonholes I'm sure I could have conquered it, but instead I admitted defeat and installed snaps for a closure.  Of course I did this while a rambunctious toddler was pestering me and I was angry about the failed buttonholes, so one of the snaps is installed backwards!  You can't tell when the other two are closed, however.  


We found the boots at The Children's Place and the hat at Target- it's intended for an adult so the brim is much too wide, but I think that and the too-short sleeves are perfect for Anne Shirley when we first meet her in the book, as she would be wearing imperfect clothes that don't quite fit.  

All in all, I'm really proud of this costume.  It was a learning experience, and my girl is so happy wearing it.

Who is your favorite book character?

Much love, 

The Geeks

Friday, March 3, 2023

Crafting Adventures: If You Give a Mouse a Cookie


Here's another look at what my kindergartener looked like for his school's celebration of Read Across America Day yesterday.  He decided to dress as the mouse in If You Give a Mouse a Cookie.

The outfit was really simple to assemble.  He wore a long-sleeved neutral colored shirt that we already had in his closet, and a pair of denim overalls.  I made him some ears (which admittedly were a bit too floppy) and attached them to an old headband, and I made a pillow for him to carry around shaped like a chocolate chip cookie.

Here's a really simple how-to so you can make your own cookie pillow!

Supplies:

-a circular pillow form

-light brown fleece

-dark brown fleece

-tools to measure, cut, and sew

1. Lay your pillow form on top of your light brown fleece.  Trace around the outside of the pillow, approximately 1/2 an inch away from the pillow all the way around.  Alternatively, you can measure the diameter of your pillow and draw a circle on your fleece which is 1" larger in diameter than the pillow.

2. Fold the rest of your light brown fleece in half.  Draw another circle the same size as the one you just drew. Find the horizontal diameter of this circle (that is, the exact midpoint line, running side-to-side) and then measure down 2".  Draw a straight horizontal line at this point, slicing off the bottom of the circle.

3. Cut out this new partial circle from your folded fleece, resulting in 2 identical partial circles.

4. Free-hand cut out some vaguely chocolate chip shaped pieces of your dark brown fleece.  Pin them to your full circle piece, randomly distributed around the right side.

5. Attach the chocolate chips to the front of the cookie by sewing all the way around each shape with a zig-zag stitch.  I use one with a short length and a wide width.  Go around twice to make sure it's good and secure.

6. If you wish, you can fold the straight edge of each partial circle towards the wrong side by half an inch and stitch them down to hem these pieces.  I chose not to do this as the fleece will not fray, but it could give your pillow cover a cleaner look.

7. Lay one partial circle piece on top of your cookie front, right sides together.  Lay the other piece on top of that, right side down, so that the straight edge overlaps the other piece's straight edge.  By this I mean that if your first partial circle shares its rounded edge with the top of your cookie front and the horizontal line lies below the center line, then your second partial circle should be flipped upside down from this so that its rounded edge lines up with the bottom of your cookie front and the horizontal line lies above the center line.  Secure all 3 pieces together with either pins or clips.

8. Sew the 3 pieces together with a straight stitch and a 1/4" seam allowance.

9. Turn your pillow cover rightside out and you will have what's called an envelope pillowcase. The overlapping pieces on the back can be spread open, you can stuff your round pillow form inside, and the back pieces can overlap again to keep it tucked in safe.

Check out this video on my Instagram page for a visual look at this tutorial.

Now, who wants a cookie?

Much love,

The Geeks


Friday, January 27, 2023

Crafting Adventures: Double Bow Tie

 My two oldest kids go to a school that requires uniforms- rather formal uniforms, including ties for the boys.  They have a sort of Spirit Week coming up next week where they get an out-of-uniform day, plus several themed days where they get to wear dress code-breaking accessories.  One of those days is red-white-and-blue themed, and so I decided to whip up a quick red, white, and blue bow tie for my Kindergartener to swap out for his regular uniform tie.  Also, it just so happens that Project Run and Play is hosting a Sew Your Stash link-up, so I was inspired to dig through my stash- specifically my scrap fabric pile from past projects- rather than buying new fabric.  I did have to buy one notion for this project, which is the bow tie clip set that I'll show you later in the post.

I have made many a bow tie in my day, including a set for all the men in our wedding party.  I've made several bow ties and regular ("fake") neck ties for my little man, too, using many different methods- snap tape, buttonhole elastic, Velcro... But I've never used an actual clip set to make a "real" clip-on tie before, and for whatever reason, I decided THIS project required one.  Honestly I'm so glad I did it though, because the whole thing looks much more professional than any tie I've made in the past, and the best part is I can swap out the bow and always use the same neck piece (unless I want a different color, of course).  And it was SO EASY.

For this quick project, you need:

-fabric for your large bow

-fabric for your small bow

-fabric for the loop around the middle (this can be the same as one of the bows, but for mine it's different)

-fabric for the neck piece (again this can be the same or complementary)

-a bow tie clip set, which can be found at JoAnn or other fabric retailers

-lightweight fusible interfacing


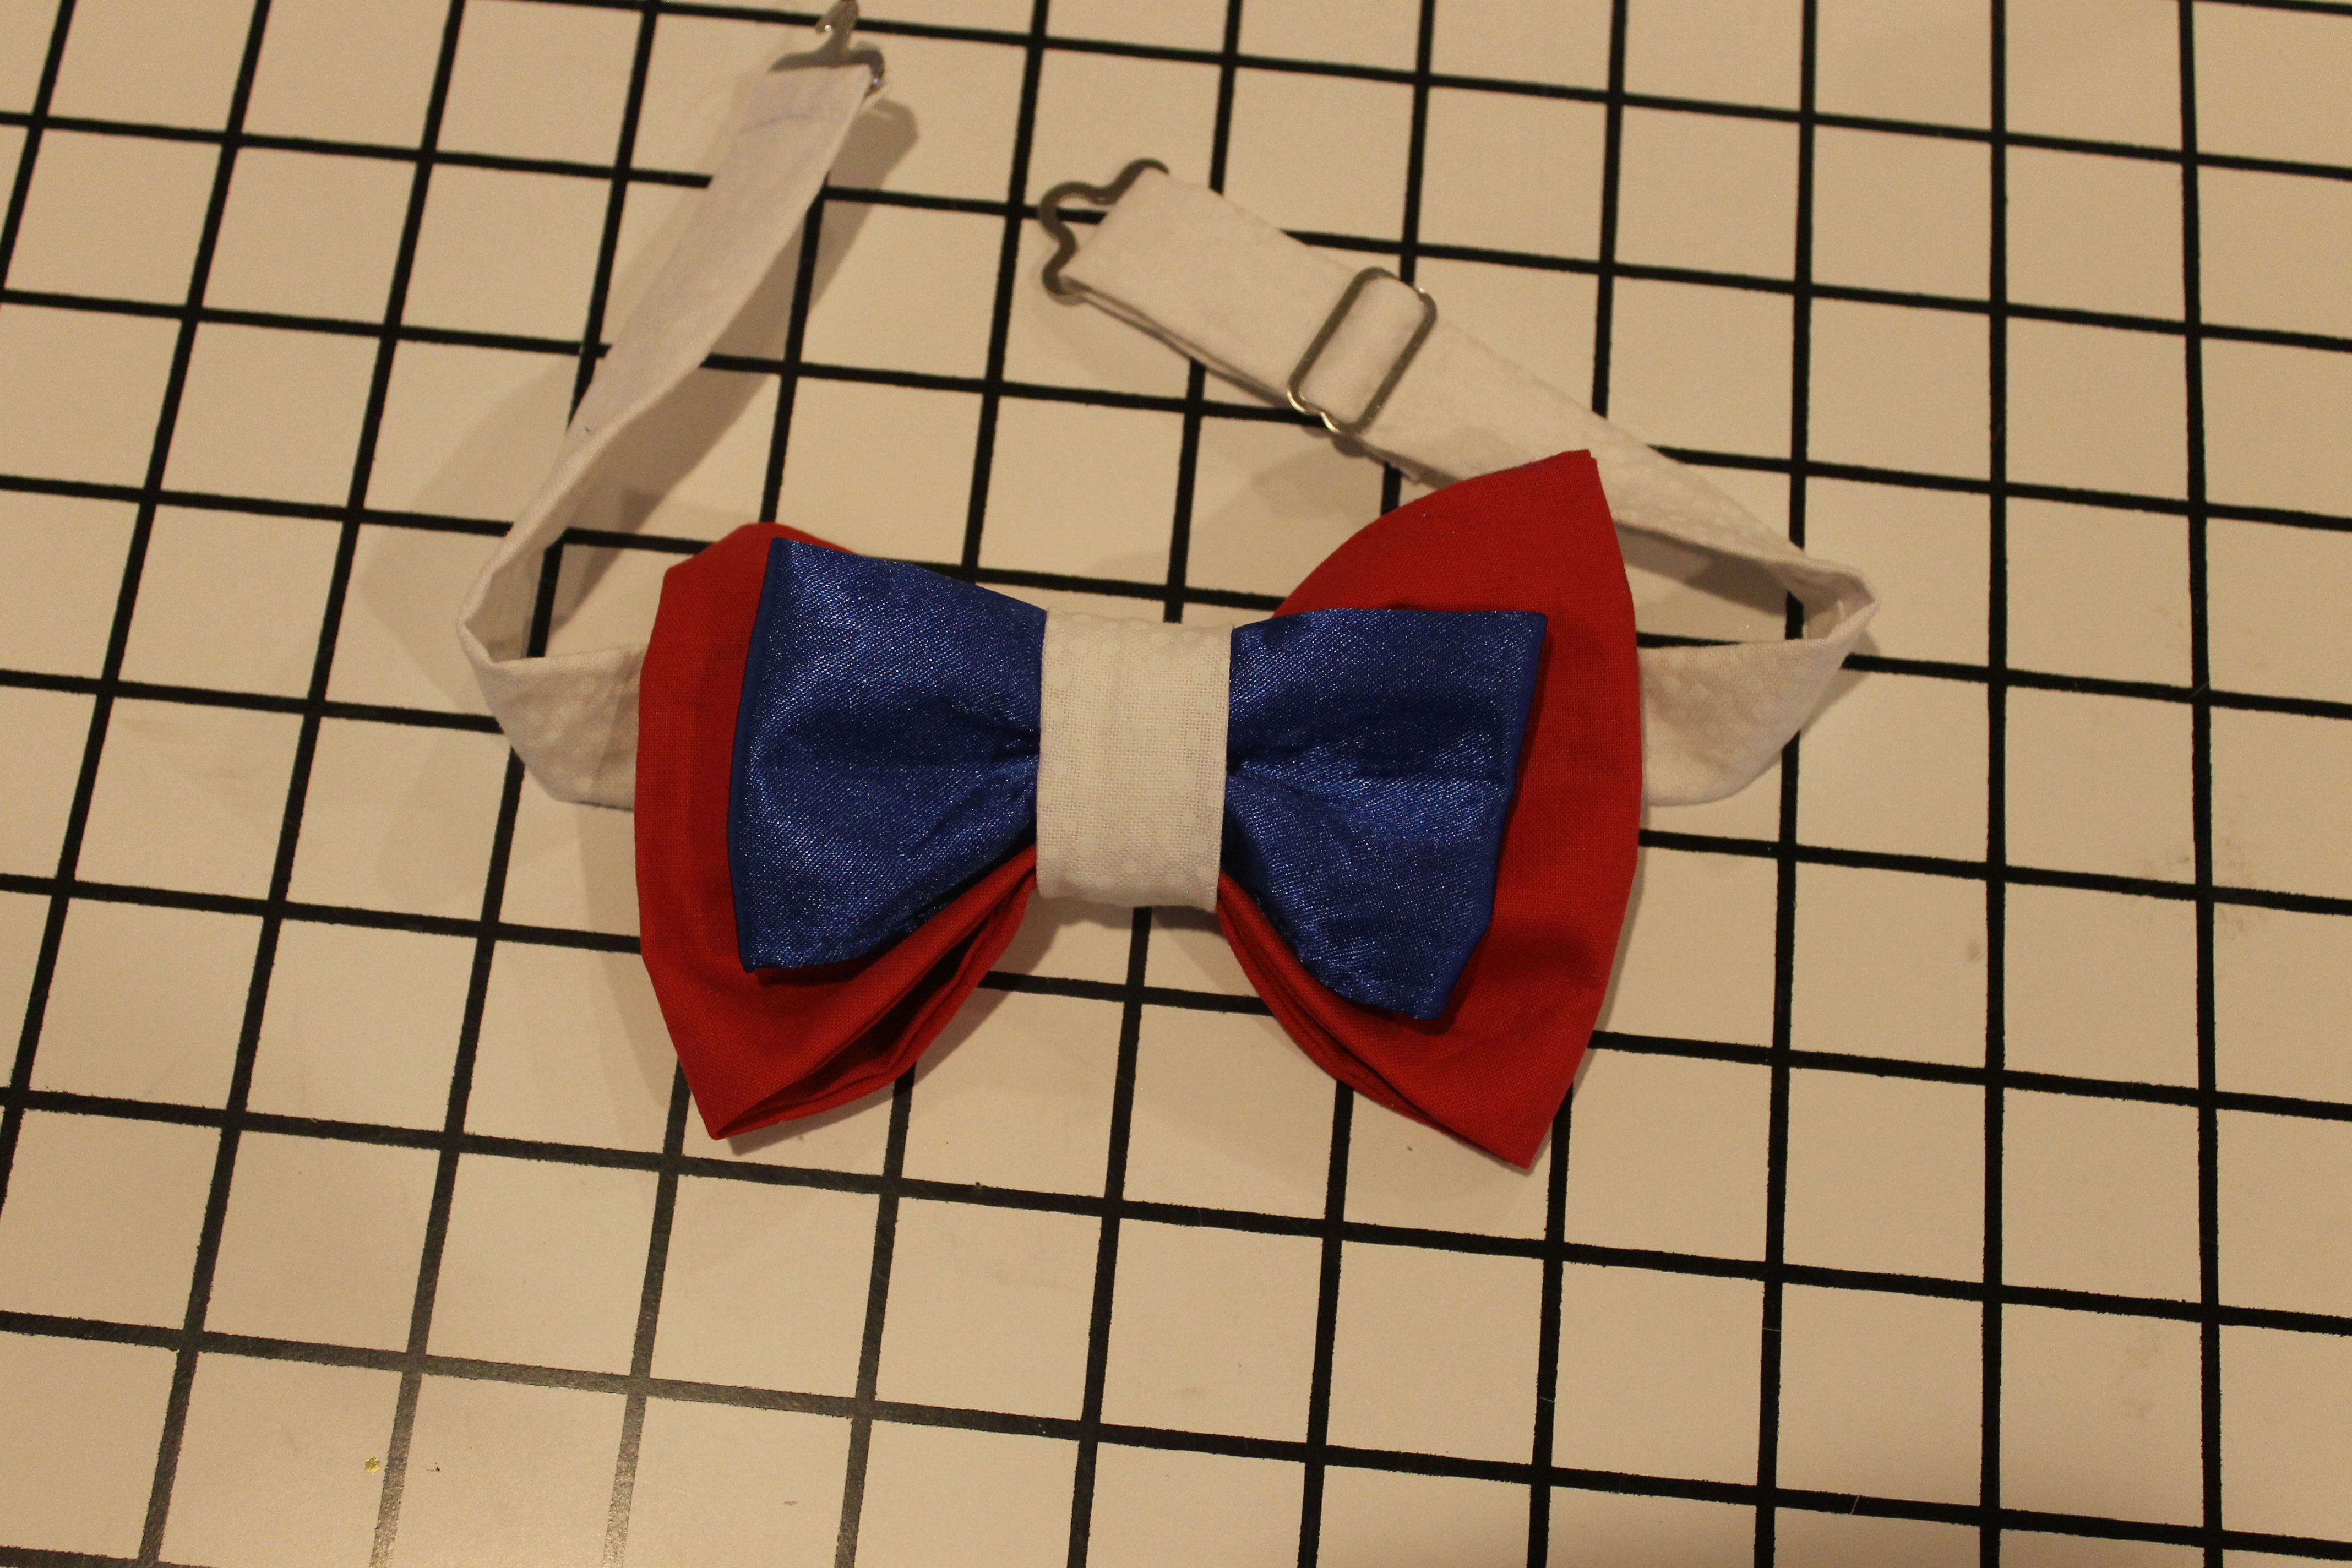
1. To start, cut your fabric as shown in the image above.  You need 2 large rectangles, 2 small rectangles, 1 neck piece, and 1 center piece for the bow.  I used 10.5"x4" for the large bow, 8.5"x2.5" for the small bow, 18.5"x2.5" for the neck piece, and 2"x4" for the bow center.  (Note that I took this photo with the original pieces of fabric I cut for this project, sorta eyeballing it, but later realized my center piece was too small and had to cut a new one.  The dimensions listed here are the ones you need although the actual piece of fabric shown in the image is obviously smaller than the listed dimensions.)  Finally, cut one piece of interfacing for both of your bows- I went with 5"x3" and 4"x2".  Apply the interfacing to the wrong side of one large and one small rectangle.


2.  Next, lay your two large rectangles right sides together and stitch around 3 sides, leaving one short side open, using a 1/4" seam allowance.  Turn right side out and press.  (To get really crisp corners, clip the corners before you turn it out.)  Repeat with the small rectangles.  


3. Next, take your large rectangle and fold it in half with the wrong side on the outside, lining up the short ends.  Sew those short ends together with a 1/4" seam allowance, press the seam open, and then turn your newly-created loop right side out.  Position it so that the seam is in the center and press flat into a rectangle.  Repeat with your small bow.  In the image above, the small (blue) bow is shown face up and the large (red) bow is shown face down.


4. Take your tiny rectangle, which will be the center loop holding the bows together.  Fold it in half, right sides facing, so that the long edges match up.  Sew down the long edge with a 1/8" seam allowance.  Turn right side out; you will have a long tube.  Fold that tube in half so that the raw edges are together, right sides facing, and sew the raw edges together with a 1/8" seam allowance.  Turn right side out, and press flat so that the seam is in the middle.  You'll have something that looks like the image above (only larger, because this one was my mistake piece).


5.  Place your small bow on top of your large bow and squeeze them into an accordion shape.  Slide the little loop over both bows.


6.  Take your neck piece and fold it in half, right sides facing, so that the long edges match up.  Sew down the long side with a 1/4" seam allowance.  Turn the loop right side out and press flat with the seam running down the middle.


This is the bow tie clip set I used.  I found it at my local JoAnn- I ordered curbside pickup so I wouldn't be tempted to waltz through the aisles grabbing more fabric I don't need- and the package comes with simple instructions on the back.  You can also find packages of bulk sets that will make several bow ties, but I just wanted to make one first to make sure I could handle it.


7.  Follow the instructions on the package to attach the hardware.  I highly recommend putting everything on and PINNING IT first, then attempting to hook it together, BEFORE you sew it in place, to make sure you have everything facing the right way.


8.  Slide the neck piece through the back of the bow tie loop and you're done!  The little slider bar that comes as a part of the hardware set can be used to adjust the strap, so this should grow with your child for quite some time.  I can't wait to see how he looks next week!

I'm entering this post into Project Run and Play's Sew Your Stash linkup.  All of the fabric came from my stash- my scrap stash, that is.  The red fabric was used in this past year's Christmas outfits, the blue fabric was used in my Nutcracker costume, and the white fabric had been hanging around in my stash forever until it finally became the lining in some of our Hobbit costumes.  All of the fabric is from JoAnn.

Made anything for your little guy lately?  Have you ever sewed with a bow tie clip set before?

Much love,

The Geeks

Friday, January 13, 2023

Crafting Adventures: Fancy Pink Dress


Every year, the kids' school puts on a Father-Daughter Dance.  This event typically takes place in January or February, near Valentine's Day, so last year, I assumed it would fall at the same time.  I got it in my head that I wanted to sew up a sweet little Valentine's dress for our daughter to wear to the dance, but then I found out that it wouldn't be happening until later in the spring.  Still, I couldn't be deterred, and decided to go ahead and make the dress I had in my head.

I saw this gorgeous dress on Pinterest, via Sew Much Ado:


Her blog post includes a pattern and tutorial for a size 4 dress, but that wasn't the right size for my girl, so I turned to the Oliver + S Building Block Dress Book to draft my own pattern.

To mimic the Sew Much Ado dress, I altered the Building Block Dress pattern following the directions in the book to have an empire waist, keyhole button back, and bell sleeves with ruffles.  I also loved the look of the lace overlay in the inspiration dress, so in addition to a lovely solid pink fabric, I used a tulle overlay fabric for the skirt that featured adorable little velvet bows.  (Both fabrics and the cute pink heart button on the back are from JoAnn.)


For the overlay, I did not double the width the way that I did for the skirt on the solid fabric, so it hangs rather straight instead of being full and gathered at the top.  Also, to keep things looking neat, I used French seams on the side seams of the overlay.  However, I did not hem the overlay- I cut it to the finished (hemmed) length of the solid skirt, knowing this fabric wouldn't fray.  It is perhaps not as neat- my cut lines aren't super perfect- but I felt that hemming it or trimming it with something would weigh it down too much.


I did make a few mistakes with this sew.  For one thing, I way overestimated how big of an elastic loop I would need for the keyhole button back (you can see how it gapes in the above picture).  During a fitting of the bodice, I just became so paranoid that the neck line would be too tight for her, so I cut a super huge loop.  Oops!

Also, the ruffles on the sleeves should probably have been longer.  They are a sort of squat, awkward length at her elbows, but she's a little picky about sleeve length and requested that the sleeves not fall past her elbows, so this is what we ended up with.  Maybe I should have just used wide bell-shaped sleeves with no ruffles at all?

Overall, I'm really happy with this dress.  I know it's taken me a year to post about it, but it's been a busy year!  I have improved a lot in my sewing over the past year, and I'm excited to share more of what I'm making with you here.  My current project is also being made with the Building Block Dress book so stay tuned for that!

Do you have a favorite pink dress?

Much love,

The Geeks

Wednesday, May 4, 2022

Crafting Adventures: Star Wars Dress


May the 4th be with you!

...and with your spirit.

Wait, no, sorry, that's not the appropriate response.  

But little Bean did in fact wear her brand new Star Wars dress to the Saturday evening vigil Mass this weekend and she certainly looked adorable in it!

A peasant dress is really the perfect design for a quick, easy garment- easy to sew and easy to put on and take off of squirmy babies.


I used the free peasant dress pattern from Scattered Thoughts of a Crafty Mom in the 12-18 month size and I love the fit.  My little string bean is tall and thin for her age, and she's very mobile, so this tea-length is perfect.

I chose to do a simple hem on the short sleeves with no elastic, and rather than the 1" hem in the tutorial, I just trimmed the hem with a package of bias tape, so the overall dress is a tad bit longer than it would be if I had done a traditional hem.

I am committed to busting my stash this year- having to pack up my sewing room to move across town opened my eyes to exactly how much fabric I've been accumulating over the years.  This fabric in particular was purchased way back when I was pregnant with my oldest (who is now 8!).  It's a simple quilting weight cotton I picked up at JoAnn, and I had intended to use it to make a sheet for the crib to match her space-themed bedroom, but I ended up using a simple galaxy print instead and then running out of energy to make anything else.  I still have a bit of this Star Wars print leftover, so big brother might be getting a Star Wars neck tie soon.


How are you celebrating Star Wars Day?

Much love,

The Geeks

Tuesday, October 12, 2021

Crafting Adventures: Tinker Bell Costume


So this little pixie absolutely adored her costume, and it was definitely the most labor intensive costume I've made to date.  (This year's costumes are beating that record by far, though, so stay tuned!)  Unfortunately I didn't take any in-progress photos or make many notes, so I'm just going to give you a general idea of how to design and make your own.  I really wanted to play with the idea of a dress made out of leaves, so both the bodice and the skirt are pieced from multiple pieces that could ostensibly have come from individual leaves.  I installed a zipper in the back to make it easy to slip on and off, and created a ribbon belt to make the waist adjustable.  The entire thing is fully lined, including each pointy leaf on the skirt.  Finally, there are clear adjustable straps to give the illusion of a strapless dress without risking the bodice slipping down.

Supplies

-green cotton fabric

-green thread

-wide green ribbon (2 1/2" or so should be fine)

-green zipper, or invisible zipper if you're comfortable installing one

-clear adjustable straps

-fairy wings

1. Grab a camisole tank top, leotard, or swimsuit that fits your pixie well.  You're going to use it to rough out your pattern pieces for your bodice.  Begin by measuring from the waist up to the place where the straps being on your tank/leotard/swimsuit.  Next measure the width from seam to seam.

2.  I knew I wanted the front of the bodice to be composed of two overlapping leaf pieces, so I used the measurements taken in step 1 to sketch out one such leaf shape, knowing that I wanted both leaves to overlap by a few inches at the bottom and separate at the top like a V-neck.  (Ultimately, that V ended up being a little deep for my 6 year old, so I went back and added a little modesty panel out of a small triangle shape to bridge most of that separation.  I would recommend making your bodice leaves wide enough at the top that your V-neck isn't too deep.)  Cut out a couple of your leaf shapes from paper or even a muslin if you're fancy like that and lay them over your sample garment (or your model, if she'll stand still for you) to make sure you've got the shape, size, and coverage you want.  Cut out 4 of these leaf shapes from your green fabric, making sure to add seam allowance all the way around.  (If you've read any of my other tutorials, you'll know I've long preferred 1/4" seam allowance.  Lately I've decided to give myself more grace with a 3/8" seam allowance, and I've noticed my garments are much cleaner now.  Use whatever seam allowance you prefer.)

3.  Take two leaves and sew them together around the curved outsides, right sides together, leaving the bottom open.  Turn right side out and press, but don't top stitch.  To really sell the idea that these are leaves, you're going to essentially embroider some veins on them.  (I purposefully used a thread that was a lighter green than my fabric so that the veins would stick out.)  Use a straight stitch with a long-ish length and make a vertical line up the center of your leaf, with some smaller lines radiating out from it at regular intervals.  You can either sketch it first in chalk and stitch on top, or just freehand.  Repeat with the other 2 leaf pieces.  Now you've got 2 leaf pieces made of double your fabric thickness, giving them a pretty sturdy shape.

4.  Lay your two leaves overlapping each other to form the front half of your bodice and pin.  Top stitch on the top leaf as close to the edge as possible, all the way around the curve of the leaf, starting on the segment that is overlapping the other one.  Then topstitch the bottom leaf, starting where the two meet and going all the way around the outside of the curve to the edge of the waist, again staying as close to the edge as possible.  This way your top stitching looks purposeful and the garment looks more finished.  (I had to add in my little modesty triangle at this point, because this is when I discovered the V was too deep.  I just stitched right on top of the top stitching I had already done so it blended in and again looked purposeful.)

5.  To finish the front of the bodice, attach your thick green ribbon across the bottom, leaving long enough tails on both sides that they can be wrapped around your pixie and tied in a bow in the back.  Do this by laying the ribbon on top of the right side of your bodice, aligning the edge with the raw edge of the bodice.  Sew them together, then open and press the seam up towards the bodice.  Top stitch across the front of the bodice to hold that pressed seam in place.  Finish the ends of the ribbon tails so they don't unravel.

6.  Now you're going to create the back of your bodice.  You want to create two rectangle pieces which will be attached in the middle by the zipper.  Measure from about the armpit of your bodice down to the bottom of the attached ribbon; this is the height of each rectangle.  The width of each rectangle will be half of the width of the bodice.  Add seam allowances on all 4 sides and then cut out 4 of these rectangles from your green fabric.

7.  Take 2 rectangles and lay them right sides together, then sew around 3 sides (the top and 2 long sides).  Turn right side out and press, but don't top stitch.  Repeat with the other 2 rectangles.

8.  Attach the zipper in the middle of your rectangle pieces, and when you top stitch on the sides of the zipper, go ahead and extend that top stitching across the top.  (Don't bother with the sides or bottom.)  

9.  I went ahead and embroidered veins into these pieces as well- again a vertical line up the middle of each rectangle, with smaller lines branching out at even spacing.

10.  Place your bodice pieces right sides together, lining up the bottom edges.  Keep the tails of your ribbon waistband tucked safely out of the way and sew up the sides, then turn out and press.

11.  Now for the skirt.  For simplicity's sake, I wanted the skirt to be composed of many triangles, all the exact same size, so I just had to cut out about a million of the same shape.  In retrospect, they don't look very leaf-y, so maybe next time I'd do more of a curvy free-hand shape rather than triangles.  Determine how many triangles (or leaves) you want to create your skirt.  I made an identical front and back to the skirt, each with 5 triangles- a top layer of 3 slightly overlapping, and a bottom layer of 2 more peeking out in between the other 3.  You want the height of each triangle (or curvy leaf-y shape) to be the length you want your skirt to be, and you want them wide enough so that you get enough coverage when you overlap them.  Once you've determined a good size and shape, add seam allowance and then cut out twice as many from your green fabric as the number of triangles you ultimately need, because each skirt panel will be two triangles sewn together.  This mean I needed 20 triangles all together, as I have 10 panels total for my skirt.

11.  Take a pair of skirt panels and line them up right sides together, then sew across two sides, leaving the horizontal top piece open.  Turn right side out and press.  You will probably want to embroider veins on these panels as well, but I was running out of time, so I skipped that part.  Repeat with every pair of panels.

12.  Take the panels you need for the front of your skirt (in my case, 5 triangles) and overlap them to create the front of your skirt.  Sew them together across the top.  Repeat with the panels for the back of the skirt.

13.  Place the front of the skirt and the back of the skirt right sides together, lining up the waist edges, and sew together at the sides.  This will really only be a few inches of stitches total.

14.  Lay your bodice on the table right side out, front side up.  Take your skirt and lay it below the bodice the same way.  Then flip the skirt up, so that the wrong side is facing out.  Slide the bodice into the skirt so that the raw edges of each line up and the right sides are together.  Pin and sew all the way around.  Turn out and press the seam up.  You can top stitch all the way around the bottom of the bodice.

15.  Finally, you need to create some tiny loops of fabric to hook your clear elastic straps into.  Place one at the peak of each of the front leaves, and one in the top middle of each of the back rectangles.  Adjust the straps so that they fit your pixie and insert them into the loops.  I had my pixie wear the straps in an X in the back to keep everything secure.

14.  My pixie wore her leaf dress with green shorts underneath, and tights to keep her legs warm.  She wore store bought fairy wings.  Put your pixie's hair in a bun, using a bun maker or "donut" to create that distinctive shape.  For some extra fun, spray on some "pixie dust" body and hair glitter.

Do you have any fairies in your house?

Much love,

The Geeks

Monday, October 4, 2021

Crafting Adventures: Peter Pan Costume

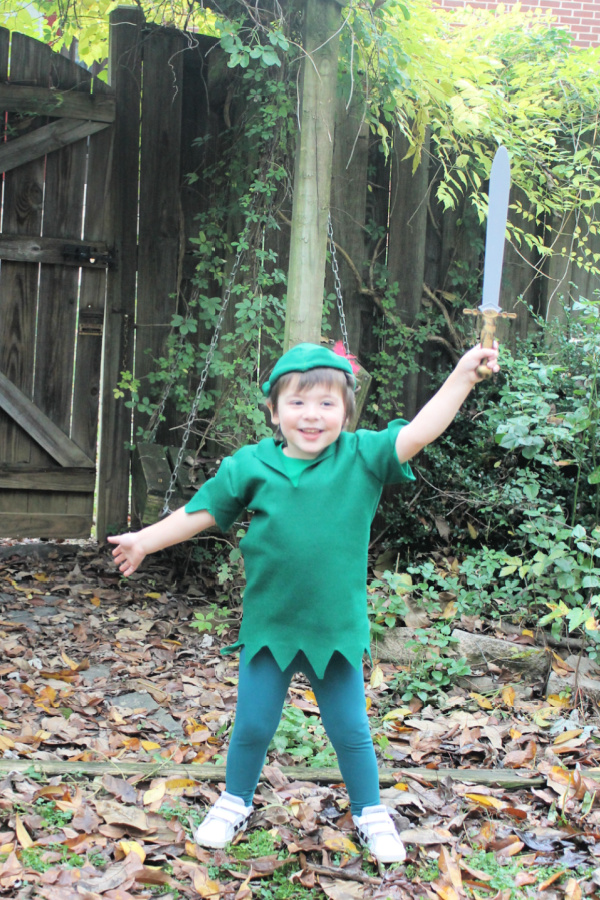
 If you follow me on Instagram, you know that last year, our family of 4 (with one on the way) dressed as the characters from Peter Pan for Halloween!  Although we did not trick-or-treat, we weren't going to let the pandemic ruin my favorite holiday and an excuse to make and wear some fun costumes.  Our neighborhood had an outdoor cookout where we got to show off our costumes (with masks on) and see other families' fun looks, too.  So now that it's October again, it's time to show you how I created these costumes- they're so easy, you can do it, too!

Peter Pan family photo

All children grow up.

Except one.

And if you'd like to create his costume, check out this simple tutorial!

Supplies:

-Green felt [sketch out your pattern to determine how much you need!)

-Red craft feather

-Green tshirt

-Green leggings

-Sword

-Brown belt (not pictured, because I bought it too early and he outgrew it before Halloween!)

1. To start, you want to create a pattern for the tunic.  Grab a t-shirt that fits your Pan well, tuck the sleeves in (so it looks like a tank), and fold it in half so that the shoulders are on top of each other.  Lay it on a large piece of paper (a roll of wrapping paper works well, especially if you have the kind with a grid printed on the back, but you can also use kraft paper, tracing paper, printer paper even, if your Pan is a tiny one) and trace around it.  You're probably going to end up with something that looks like a rectangle with an arm hole cut out of it; if you want, you don't have to really trace the neckline of your shirt, you can just leave it as a right angle.  It certainly makes sewing easier, and you're just going to cut the front of the tunic open in a wide V anyway, so you don't have to worry about pretty curves.  If you choose to go this route, make a mark on your tracing of where the neck opening begins on your sample t-shirt; you'll need to know this later.
Peter Pan costume

2. Now you need to add seam allowance and extra length to your pattern.  Because this is felt and it does not unravel, and also because Peter Pan is a wild lost boy whose clothes can probably look unfinished, I chose to NOT HEM the bottom of the tunic, the ends of the sleeves, or the neckline.  If you're going the no-defined-neckline route like me, add 1/2 an inch for seam allowance to the top of your rectangle-with-an-armhole-cut-out-of-it (make sure to repeat your mark that denotes where the neckline of your sample t-shirt started).  Add that same 1/2 an inch seam allowance to your armhole curve and to the side of the shirt beneath the armhole as well.  Do NOT add seam allowance to the side of the shirt that was folded; you're going to cut this pattern out on the fold.  To remind yourself, you can write the word FOLD in bold letters on that side.  For the bottom of the tunic, you want the finished product to extend below the waistband of the pants in a zig-zag pattern, so that there are those classic points hanging down.  Decide how long and how wide you want those points to be (I went with 2 1/2" for the length) and go ahead and draw them on the bottom of your pattern.  You can freehand this, or you can measure it all out so that each little triangle shaped point is the same exact size.  You do you.

3.  Next, you need a pattern for your sleeve.  This is a REALLY rough way of doing this, fyi, and only works because felt is sorta stiff and has its own structure, and again, I was going for a rough-and-unfinished look for our lost boy.  What you're going to do is measure the height of the arm hole on your PATTERN (not your sample t-shirt).  Place your ruler at the top point of the arm hole (which would lay on the apex of the shoulder) and measure straight down to where the bottom of the arm hole falls (which would lay under the armpit).  If you imagine this curve on your pattern as a right triangle rather than a curve, you would draw the horizontal side of the triangle from the armpit point inward, and you would draw the vertical side of the triangle from the shoulder point down, and you would draw the hypotenuse from the shoulder point to the armpit point; the measurement we're interested in is the straight line down from the shoulder.  Got it?  Now, get some more pattern-making paper.  Draw yourself a rectangle.  The height of the rectangle is that measurement you just took- the height of the armhole- plus an additional 1/2" for seam allowance (you only need seam allowance where the sleeve is sewn to itself, at the bottom).  The length of the rectangle is going to be whatever you want the length of the sleeve to be- measure your Pan from the point of his shoulder down to where you'd like the sleeve to hit (I went with an oversized short sleeve)- plus an additional 1/2" for seam allowance (you only need seam allowance where the sleeve attaches to the bodice, since you don't have to hem felt).  Finally, you're going to add some points to the sleeve just like you did for the bottom of the tunic.  Depending on how you measured your sleeve, you can either draw zig-zags to add additional length to your rectangle, or cut a triangle shape out of your existing rectangle so that the sleeve length you decided on represents the tip of the points.  Just to remind yourself, go ahead and write the word FOLD at the top of your rectangle (perpendicular to where you put your zig-zags), because you're going to cut it out on the fold.  

4.  You're going to cut out 2 identical bodice pieces on the fold, and 2 sleeve pieces on the fold.  Use that knowledge to determine how much felt you need to buy (or be like me and drastically over-estimate because you fear you'll screw it up and have to start over several times).  When you cut out your bodice pieces, you need to transfer that mark you made denoting where the neckline starts (if you're going the right angle route, like I did, and didn't draw in a neckline shape).  To do this, take a piece of tailor's chalk (or a straight pin) and mark the place on the top of your cut piece, then, leaving the piece still folded, turn it over, turn your pattern paper piece face down, and make a mark on that side.  This way, when you un-fold your bodice pieces, you have two marks blocking off what will become the hole that Pan will stick his head through.

5. Assembling this tunic is really, really easy.  Place the bodice pieces on top of each other, right sides together, making sure to line up the arm holes (and the nice thing about felt is that there is no right or wrong side, so just lay them however).  You're going to attach these pieces together at the shoulder seams- but if, like me, your bodice has no defined shoulders separate from the neck, just a straight line, this means you're going to start each seam at the outer corner, and stop at the place where you marked the neck.  Use a serger if you have one, or, if you don't (like me), then use a zig-zag stitch.

6.  To attach the sleeves, you're going to open up your tunic and lay it flat on your table, right side up.  Then, take one sleeve rectangle and pin it, right sides together, to one armhole curve of the bodice, so that the zig-zag edge of the sleeve is pointing in towards the neck hole.  Pinning a straight line to a curve is tricky; line up the place where the rectangle was folded with the seam you just sewed at the shoulders, and line up the corners of the rectangle with the corners of the armhole.  Use lots of pins, and fold the felt in little pleats to make the rest match up (either evenly spaced and purposeful, or a bit more haphazard for that I-live-in-a-forest look).  Do the same on the other side.  Sew with a zig-zag stitch again.

7.  Now, fold the whole tunic together again, so that it looks like a shirt, with the wrong side facing out.  Line up the sleeves with themselves, and the sides of the tunic.  Sew in a continuous line from the outer edge of one sleeve, down the side of the bodice to the bottom.  Repeat on the other side.

8.  To finish the tunic, we're going to create that front neckline.  Measure your Pan and decide how deep you want the V to be.  Find the exact center of the front neckline and cut a straight line that length.  Simply fold open the fabric and press and it will probably hold its shape, creating a pointed collar of sorts; if it won't stay on its own, you can tack the corners down with a quick hand stitch.  Ta-da!

Little Peter gives Wendy his "kiss"

9.  Now for that hat.  You need to measure your lost boy's head in a few places.  Find the crown of his head- the highest point- and measure down to his forehead, or where you want the front of the hat to lay, and call this measurement A.  Now measure from the crown down the back of his head to where you want the back of the hat to lay, and call that measurement B.  Finally, measure from the crown of his head down the side to just above his ear, and call that measurement C.


10.  Get some more of your pattern making paper.  Draw a straight, horizontal line that is A + B + 1 inch (assuming a 1/2" seam allowance; adjust accordingly based on your preference for seam allowance.  Now, from the left side, measure in a distance of B + 1/2" (or whatever your seam allowance is).  From that point, draw a perpendicular line straight down a height of C + 1/2" (or...you get the picture).  Now, draw a curve from one end of your line to the other so that the lowest point of the curve is at the end of your perpendicular line; you'll end up with a sort of half-teardrop shape, or half-ovalish thing, that's thicker on one end than the other.  Separately, draw yourself a rectangle with a length of A + B + 2" (NOT 1/2" like in the picture, my bad) and a height of whatever you want the height of the brim of your hat to be + 1/2".  Cut one teardrop-shape piece with the straight line on the fold, and cut 2 rectangles, not on the fold.

11.  Lay your two rectangles on top of each other and sew the short ends together, both sides, so that you're left with a tube.  Open up your teardrop shape and decide which side is going to be your "right" side (the outside of the hat).  Take your tube and pin it with its right side against the WRONG side of the teardrop shape, making sure the seams on the tube line up with the very front point and very pack point of the teardrop, respectively.  Stitch them together, then fold the rectangle tube up and out of the hat, so that it becomes the brim.  If you press it down, it should hold its shape, because felt is so stiff, but if you need to, you can tack it down in a couple of places by hand-stitching.  

12.  Last, find where you'd like your red feather to go.  Draw two short parallel lines, 1/2" apart from each other, just tall enough so that you can slip the feather in.  Use an exacto knife or very sharp scissors to slit those lines open, and slide the feather in so that the quill points towards the front of the hat.

Peter Pan fighting Mr. Smee

Your Peter Pan should wear green leggings and a green t-shirt, then wear the tunic on top.  (Felt can be scratchy, and the extra layer will provide warmth if your Octobers are cold.)  If he has a brown belt that fits, buckle it around his waist (you can even snip in some belt loops, the same way we created a place to slide the feather in his cap).  Wear the hat on his head and carry a toy sword or dagger, for dealing with those pesky pirates.  (If the hat won't stay well on his noggin, you can pin it to his hair with Bobby pins crossed over each other in an X, one X on each side of his head.)

Is your little one going to fly off to Neverland with the lost boys?

Much love,

The Geeks

Tuesday, April 13, 2021

Crafting Adventures: Easter Outfits


So, I made the kids' Easter outfits this year- or, at least, the fancy bits.  Ever since we discovered little Bean is a girl, I've been doing a lot of sewing for her.  The kids have had so much fun helping me dig through my stash of scrap fabrics and piles of fat quarters I've collected over the years to assemble skirts, dresses, and rompers for their new baby sister.  Neither has expressed any jealousy- maybe they're both too cool to want handmade clothes from Mom (unless it's a Halloween costume!)- but even still, I wanted to make something from scratch for Miss Chief, who really enjoys watching me sew.  She has loved spending spare moments over the past few months scrolling my Pinterest with me, looking at patterns and tutorials for babies and big kids alike.  I found a simple tutorial to make a little pinafore and showed it to her, asking if she would wear it if I made it for her.  She said yes, assuming that I meant at some point in the future, not any time soon.  Although I do have quite a stash of barely cut or unused fabrics, I wanted this to feel special for her, so I found this adorable floral print at Joann.  When the fabric arrived in the mail, I asked if she would like me to use it to make that pinafore, and she was so excited!  I had every intention of this being just a play dress, something she could wear on weekends, climbing trees and doing monkey bars, but then, when I was about halfway through construction, she told her grandparents that I was making her Easter dress!

Record scratch.

Okay then, not a play dress, an Easter dress.  That meant it needed a little more care, and I couldn't skimp on the stuff I tend to skip when I'm making costumes and the like- pressing seams, top stitching...you know, stuff that real seamstresses do.  Okay, no pressure, right?  (Wrong.  Lots of pressure.)


Honestly, I think it looks pretty great!  The tutorial I used is this one from Back to the Land Living, with just a few adjustments.  Although I did line the top, because this quilting-weight cotton wasn't sheer and has a bit of body, I didn't bother with lining the skirt.  Also, I'm sort of terrified of button holes, so I used snaps for the closure on the straps instead of buttons.  (I bought a TON of snap tape when I started obsessively making baby clothes around Christmas time, and it's just so much easier to attach than buttons or zippers or individual snaps.  I'm a wimp!)  Fair warning- when the tutorial reaches the part where you start working on the waistband, I got a little lost.  I had to watch her video several times to figure out exactly how that construction was supposed to work, but eventually I figured it out.  I still consider myself mostly a beginner sewist (hence the fear of button holes) so maybe you won't have this issue if you give it a shot.


With a few weeks to go before Easter, I planned to just buy the boys matching ties and call it a day, but Miss Chief remembered seeing a bow tie tutorial on one of our trips through Pinterest.  So, obviously, Peanut wanted a bow tie to match!  I used this tutorial from Vanilla Joy to make the bow, then I measured a length of white single fold bias tape and slid the bow on.  I attached more of that magical snap tape to make the whole thing adjustable, and voila- adorable, matching bow tie for brother!


Although long time readers will recall I'm no stranger to making bow ties for grown ups, too, I ran out of time (or maybe energy) to do one for Mr. Geek, so we just pulled a purple-patterned tie out of his closet, and I used the occasion to pick up a new dress (which I can wear after Bean gets here, too).

I can't wait until Bean gets here and is able to model the outfits I've made for her so far- and yes, I have about a billion pins worth of inspiration for the future!  Also, since these simple Easter outfits were such a hit with the big kids, I've been informed that I'll be making Christmas outfits for all three of them!  (If so, I'll probably have to get started in...August, or so.  Yikes.)

Made anything for your crew lately?

Much love,

The Geeks