Showing posts with label halloween. Show all posts

Monday, October 31, 2022

Happy Halloween from Sonic and Friends!


Gotta go fast!

Happy Halloween from Knuckles, Sonic, Cream, Amy Rose, and Tails, who really just wants to fly around and doesn't want to pose for pictures.

I hope you and your family zoom from door to door collecting candy this evening!

What are you dressing as for Halloween?

Much love,

The Geeks

Sunday, October 31, 2021

Happy Halloween- and May the Force be With You!


Happy Halloween from a galaxy far, far away!


What did you dress as this year?

Much love,

The Geeks

Tuesday, October 12, 2021

Crafting Adventures: Tinker Bell Costume


So this little pixie absolutely adored her costume, and it was definitely the most labor intensive costume I've made to date.  (This year's costumes are beating that record by far, though, so stay tuned!)  Unfortunately I didn't take any in-progress photos or make many notes, so I'm just going to give you a general idea of how to design and make your own.  I really wanted to play with the idea of a dress made out of leaves, so both the bodice and the skirt are pieced from multiple pieces that could ostensibly have come from individual leaves.  I installed a zipper in the back to make it easy to slip on and off, and created a ribbon belt to make the waist adjustable.  The entire thing is fully lined, including each pointy leaf on the skirt.  Finally, there are clear adjustable straps to give the illusion of a strapless dress without risking the bodice slipping down.

Supplies

-green cotton fabric

-green thread

-wide green ribbon (2 1/2" or so should be fine)

-green zipper, or invisible zipper if you're comfortable installing one

-clear adjustable straps

-fairy wings

1. Grab a camisole tank top, leotard, or swimsuit that fits your pixie well.  You're going to use it to rough out your pattern pieces for your bodice.  Begin by measuring from the waist up to the place where the straps being on your tank/leotard/swimsuit.  Next measure the width from seam to seam.

2.  I knew I wanted the front of the bodice to be composed of two overlapping leaf pieces, so I used the measurements taken in step 1 to sketch out one such leaf shape, knowing that I wanted both leaves to overlap by a few inches at the bottom and separate at the top like a V-neck.  (Ultimately, that V ended up being a little deep for my 6 year old, so I went back and added a little modesty panel out of a small triangle shape to bridge most of that separation.  I would recommend making your bodice leaves wide enough at the top that your V-neck isn't too deep.)  Cut out a couple of your leaf shapes from paper or even a muslin if you're fancy like that and lay them over your sample garment (or your model, if she'll stand still for you) to make sure you've got the shape, size, and coverage you want.  Cut out 4 of these leaf shapes from your green fabric, making sure to add seam allowance all the way around.  (If you've read any of my other tutorials, you'll know I've long preferred 1/4" seam allowance.  Lately I've decided to give myself more grace with a 3/8" seam allowance, and I've noticed my garments are much cleaner now.  Use whatever seam allowance you prefer.)

3.  Take two leaves and sew them together around the curved outsides, right sides together, leaving the bottom open.  Turn right side out and press, but don't top stitch.  To really sell the idea that these are leaves, you're going to essentially embroider some veins on them.  (I purposefully used a thread that was a lighter green than my fabric so that the veins would stick out.)  Use a straight stitch with a long-ish length and make a vertical line up the center of your leaf, with some smaller lines radiating out from it at regular intervals.  You can either sketch it first in chalk and stitch on top, or just freehand.  Repeat with the other 2 leaf pieces.  Now you've got 2 leaf pieces made of double your fabric thickness, giving them a pretty sturdy shape.

4.  Lay your two leaves overlapping each other to form the front half of your bodice and pin.  Top stitch on the top leaf as close to the edge as possible, all the way around the curve of the leaf, starting on the segment that is overlapping the other one.  Then topstitch the bottom leaf, starting where the two meet and going all the way around the outside of the curve to the edge of the waist, again staying as close to the edge as possible.  This way your top stitching looks purposeful and the garment looks more finished.  (I had to add in my little modesty triangle at this point, because this is when I discovered the V was too deep.  I just stitched right on top of the top stitching I had already done so it blended in and again looked purposeful.)

5.  To finish the front of the bodice, attach your thick green ribbon across the bottom, leaving long enough tails on both sides that they can be wrapped around your pixie and tied in a bow in the back.  Do this by laying the ribbon on top of the right side of your bodice, aligning the edge with the raw edge of the bodice.  Sew them together, then open and press the seam up towards the bodice.  Top stitch across the front of the bodice to hold that pressed seam in place.  Finish the ends of the ribbon tails so they don't unravel.

6.  Now you're going to create the back of your bodice.  You want to create two rectangle pieces which will be attached in the middle by the zipper.  Measure from about the armpit of your bodice down to the bottom of the attached ribbon; this is the height of each rectangle.  The width of each rectangle will be half of the width of the bodice.  Add seam allowances on all 4 sides and then cut out 4 of these rectangles from your green fabric.

7.  Take 2 rectangles and lay them right sides together, then sew around 3 sides (the top and 2 long sides).  Turn right side out and press, but don't top stitch.  Repeat with the other 2 rectangles.

8.  Attach the zipper in the middle of your rectangle pieces, and when you top stitch on the sides of the zipper, go ahead and extend that top stitching across the top.  (Don't bother with the sides or bottom.)  

9.  I went ahead and embroidered veins into these pieces as well- again a vertical line up the middle of each rectangle, with smaller lines branching out at even spacing.

10.  Place your bodice pieces right sides together, lining up the bottom edges.  Keep the tails of your ribbon waistband tucked safely out of the way and sew up the sides, then turn out and press.

11.  Now for the skirt.  For simplicity's sake, I wanted the skirt to be composed of many triangles, all the exact same size, so I just had to cut out about a million of the same shape.  In retrospect, they don't look very leaf-y, so maybe next time I'd do more of a curvy free-hand shape rather than triangles.  Determine how many triangles (or leaves) you want to create your skirt.  I made an identical front and back to the skirt, each with 5 triangles- a top layer of 3 slightly overlapping, and a bottom layer of 2 more peeking out in between the other 3.  You want the height of each triangle (or curvy leaf-y shape) to be the length you want your skirt to be, and you want them wide enough so that you get enough coverage when you overlap them.  Once you've determined a good size and shape, add seam allowance and then cut out twice as many from your green fabric as the number of triangles you ultimately need, because each skirt panel will be two triangles sewn together.  This mean I needed 20 triangles all together, as I have 10 panels total for my skirt.

11.  Take a pair of skirt panels and line them up right sides together, then sew across two sides, leaving the horizontal top piece open.  Turn right side out and press.  You will probably want to embroider veins on these panels as well, but I was running out of time, so I skipped that part.  Repeat with every pair of panels.

12.  Take the panels you need for the front of your skirt (in my case, 5 triangles) and overlap them to create the front of your skirt.  Sew them together across the top.  Repeat with the panels for the back of the skirt.

13.  Place the front of the skirt and the back of the skirt right sides together, lining up the waist edges, and sew together at the sides.  This will really only be a few inches of stitches total.

14.  Lay your bodice on the table right side out, front side up.  Take your skirt and lay it below the bodice the same way.  Then flip the skirt up, so that the wrong side is facing out.  Slide the bodice into the skirt so that the raw edges of each line up and the right sides are together.  Pin and sew all the way around.  Turn out and press the seam up.  You can top stitch all the way around the bottom of the bodice.

15.  Finally, you need to create some tiny loops of fabric to hook your clear elastic straps into.  Place one at the peak of each of the front leaves, and one in the top middle of each of the back rectangles.  Adjust the straps so that they fit your pixie and insert them into the loops.  I had my pixie wear the straps in an X in the back to keep everything secure.

14.  My pixie wore her leaf dress with green shorts underneath, and tights to keep her legs warm.  She wore store bought fairy wings.  Put your pixie's hair in a bun, using a bun maker or "donut" to create that distinctive shape.  For some extra fun, spray on some "pixie dust" body and hair glitter.

Do you have any fairies in your house?

Much love,

The Geeks

Monday, October 4, 2021

Crafting Adventures: Peter Pan Costume

 If you follow me on Instagram, you know that last year, our family of 4 (with one on the way) dressed as the characters from Peter Pan for Halloween!  Although we did not trick-or-treat, we weren't going to let the pandemic ruin my favorite holiday and an excuse to make and wear some fun costumes.  Our neighborhood had an outdoor cookout where we got to show off our costumes (with masks on) and see other families' fun looks, too.  So now that it's October again, it's time to show you how I created these costumes- they're so easy, you can do it, too!

Peter Pan family photo

All children grow up.

Except one.

And if you'd like to create his costume, check out this simple tutorial!

Supplies:

-Green felt [sketch out your pattern to determine how much you need!)

-Red craft feather

-Green tshirt

-Green leggings

-Sword

-Brown belt (not pictured, because I bought it too early and he outgrew it before Halloween!)

1. To start, you want to create a pattern for the tunic.  Grab a t-shirt that fits your Pan well, tuck the sleeves in (so it looks like a tank), and fold it in half so that the shoulders are on top of each other.  Lay it on a large piece of paper (a roll of wrapping paper works well, especially if you have the kind with a grid printed on the back, but you can also use kraft paper, tracing paper, printer paper even, if your Pan is a tiny one) and trace around it.  You're probably going to end up with something that looks like a rectangle with an arm hole cut out of it; if you want, you don't have to really trace the neckline of your shirt, you can just leave it as a right angle.  It certainly makes sewing easier, and you're just going to cut the front of the tunic open in a wide V anyway, so you don't have to worry about pretty curves.  If you choose to go this route, make a mark on your tracing of where the neck opening begins on your sample t-shirt; you'll need to know this later.
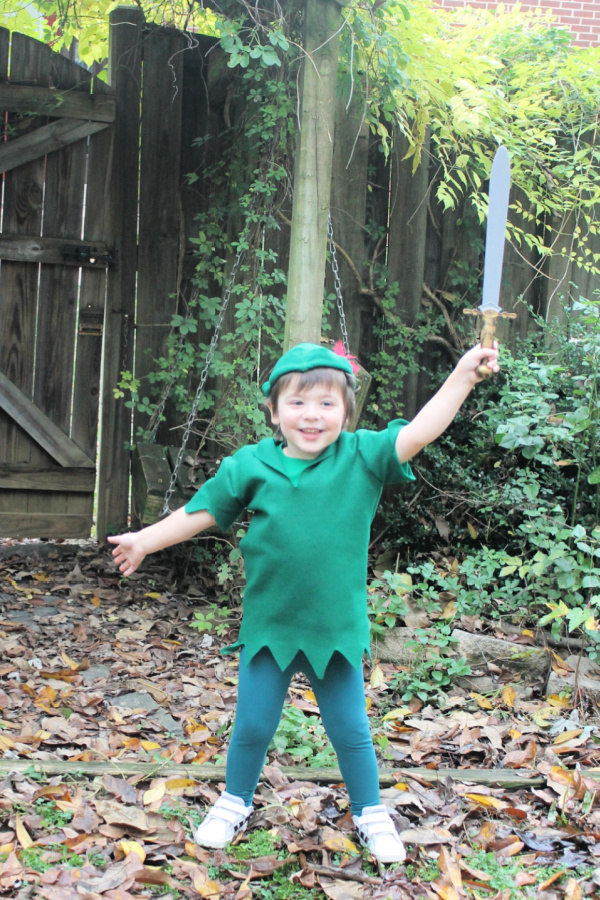
Peter Pan costume

2. Now you need to add seam allowance and extra length to your pattern.  Because this is felt and it does not unravel, and also because Peter Pan is a wild lost boy whose clothes can probably look unfinished, I chose to NOT HEM the bottom of the tunic, the ends of the sleeves, or the neckline.  If you're going the no-defined-neckline route like me, add 1/2 an inch for seam allowance to the top of your rectangle-with-an-armhole-cut-out-of-it (make sure to repeat your mark that denotes where the neckline of your sample t-shirt started).  Add that same 1/2 an inch seam allowance to your armhole curve and to the side of the shirt beneath the armhole as well.  Do NOT add seam allowance to the side of the shirt that was folded; you're going to cut this pattern out on the fold.  To remind yourself, you can write the word FOLD in bold letters on that side.  For the bottom of the tunic, you want the finished product to extend below the waistband of the pants in a zig-zag pattern, so that there are those classic points hanging down.  Decide how long and how wide you want those points to be (I went with 2 1/2" for the length) and go ahead and draw them on the bottom of your pattern.  You can freehand this, or you can measure it all out so that each little triangle shaped point is the same exact size.  You do you.

3.  Next, you need a pattern for your sleeve.  This is a REALLY rough way of doing this, fyi, and only works because felt is sorta stiff and has its own structure, and again, I was going for a rough-and-unfinished look for our lost boy.  What you're going to do is measure the height of the arm hole on your PATTERN (not your sample t-shirt).  Place your ruler at the top point of the arm hole (which would lay on the apex of the shoulder) and measure straight down to where the bottom of the arm hole falls (which would lay under the armpit).  If you imagine this curve on your pattern as a right triangle rather than a curve, you would draw the horizontal side of the triangle from the armpit point inward, and you would draw the vertical side of the triangle from the shoulder point down, and you would draw the hypotenuse from the shoulder point to the armpit point; the measurement we're interested in is the straight line down from the shoulder.  Got it?  Now, get some more pattern-making paper.  Draw yourself a rectangle.  The height of the rectangle is that measurement you just took- the height of the armhole- plus an additional 1/2" for seam allowance (you only need seam allowance where the sleeve is sewn to itself, at the bottom).  The length of the rectangle is going to be whatever you want the length of the sleeve to be- measure your Pan from the point of his shoulder down to where you'd like the sleeve to hit (I went with an oversized short sleeve)- plus an additional 1/2" for seam allowance (you only need seam allowance where the sleeve attaches to the bodice, since you don't have to hem felt).  Finally, you're going to add some points to the sleeve just like you did for the bottom of the tunic.  Depending on how you measured your sleeve, you can either draw zig-zags to add additional length to your rectangle, or cut a triangle shape out of your existing rectangle so that the sleeve length you decided on represents the tip of the points.  Just to remind yourself, go ahead and write the word FOLD at the top of your rectangle (perpendicular to where you put your zig-zags), because you're going to cut it out on the fold.  

4.  You're going to cut out 2 identical bodice pieces on the fold, and 2 sleeve pieces on the fold.  Use that knowledge to determine how much felt you need to buy (or be like me and drastically over-estimate because you fear you'll screw it up and have to start over several times).  When you cut out your bodice pieces, you need to transfer that mark you made denoting where the neckline starts (if you're going the right angle route, like I did, and didn't draw in a neckline shape).  To do this, take a piece of tailor's chalk (or a straight pin) and mark the place on the top of your cut piece, then, leaving the piece still folded, turn it over, turn your pattern paper piece face down, and make a mark on that side.  This way, when you un-fold your bodice pieces, you have two marks blocking off what will become the hole that Pan will stick his head through.

5. Assembling this tunic is really, really easy.  Place the bodice pieces on top of each other, right sides together, making sure to line up the arm holes (and the nice thing about felt is that there is no right or wrong side, so just lay them however).  You're going to attach these pieces together at the shoulder seams- but if, like me, your bodice has no defined shoulders separate from the neck, just a straight line, this means you're going to start each seam at the outer corner, and stop at the place where you marked the neck.  Use a serger if you have one, or, if you don't (like me), then use a zig-zag stitch.

6.  To attach the sleeves, you're going to open up your tunic and lay it flat on your table, right side up.  Then, take one sleeve rectangle and pin it, right sides together, to one armhole curve of the bodice, so that the zig-zag edge of the sleeve is pointing in towards the neck hole.  Pinning a straight line to a curve is tricky; line up the place where the rectangle was folded with the seam you just sewed at the shoulders, and line up the corners of the rectangle with the corners of the armhole.  Use lots of pins, and fold the felt in little pleats to make the rest match up (either evenly spaced and purposeful, or a bit more haphazard for that I-live-in-a-forest look).  Do the same on the other side.  Sew with a zig-zag stitch again.

7.  Now, fold the whole tunic together again, so that it looks like a shirt, with the wrong side facing out.  Line up the sleeves with themselves, and the sides of the tunic.  Sew in a continuous line from the outer edge of one sleeve, down the side of the bodice to the bottom.  Repeat on the other side.

8.  To finish the tunic, we're going to create that front neckline.  Measure your Pan and decide how deep you want the V to be.  Find the exact center of the front neckline and cut a straight line that length.  Simply fold open the fabric and press and it will probably hold its shape, creating a pointed collar of sorts; if it won't stay on its own, you can tack the corners down with a quick hand stitch.  Ta-da!

Little Peter gives Wendy his "kiss"

9.  Now for that hat.  You need to measure your lost boy's head in a few places.  Find the crown of his head- the highest point- and measure down to his forehead, or where you want the front of the hat to lay, and call this measurement A.  Now measure from the crown down the back of his head to where you want the back of the hat to lay, and call that measurement B.  Finally, measure from the crown of his head down the side to just above his ear, and call that measurement C.


10.  Get some more of your pattern making paper.  Draw a straight, horizontal line that is A + B + 1 inch (assuming a 1/2" seam allowance; adjust accordingly based on your preference for seam allowance.  Now, from the left side, measure in a distance of B + 1/2" (or whatever your seam allowance is).  From that point, draw a perpendicular line straight down a height of C + 1/2" (or...you get the picture).  Now, draw a curve from one end of your line to the other so that the lowest point of the curve is at the end of your perpendicular line; you'll end up with a sort of half-teardrop shape, or half-ovalish thing, that's thicker on one end than the other.  Separately, draw yourself a rectangle with a length of A + B + 2" (NOT 1/2" like in the picture, my bad) and a height of whatever you want the height of the brim of your hat to be + 1/2".  Cut one teardrop-shape piece with the straight line on the fold, and cut 2 rectangles, not on the fold.

11.  Lay your two rectangles on top of each other and sew the short ends together, both sides, so that you're left with a tube.  Open up your teardrop shape and decide which side is going to be your "right" side (the outside of the hat).  Take your tube and pin it with its right side against the WRONG side of the teardrop shape, making sure the seams on the tube line up with the very front point and very pack point of the teardrop, respectively.  Stitch them together, then fold the rectangle tube up and out of the hat, so that it becomes the brim.  If you press it down, it should hold its shape, because felt is so stiff, but if you need to, you can tack it down in a couple of places by hand-stitching.  

12.  Last, find where you'd like your red feather to go.  Draw two short parallel lines, 1/2" apart from each other, just tall enough so that you can slip the feather in.  Use an exacto knife or very sharp scissors to slit those lines open, and slide the feather in so that the quill points towards the front of the hat.

Peter Pan fighting Mr. Smee

Your Peter Pan should wear green leggings and a green t-shirt, then wear the tunic on top.  (Felt can be scratchy, and the extra layer will provide warmth if your Octobers are cold.)  If he has a brown belt that fits, buckle it around his waist (you can even snip in some belt loops, the same way we created a place to slide the feather in his cap).  Wear the hat on his head and carry a toy sword or dagger, for dealing with those pesky pirates.  (If the hat won't stay well on his noggin, you can pin it to his hair with Bobby pins crossed over each other in an X, one X on each side of his head.)

Is your little one going to fly off to Neverland with the lost boys?

Much love,

The Geeks

Monday, October 12, 2020

Crafting Adventures: Misty


Of course with a Pokemon theme, our little redhead obviously wanted to dress as Ash's friend Misty and, fortunately for me, this costume required exactly zero sewing!


Supplies

-yellow tank top

-red suspenders

-jean shorts

-optional, for cold nights: long sleeved skin-colored shirt, skin-colored tights

This costume is, thankfully, assembled with just a few pieces of actual clothing that can be worn again when it's not Halloween.  A yellow tank top and some jean shorts with red suspenders clipped on are all you need.  Of course, the look isn't complete without Misty's signature side ponytail.  If it's cold when you trick-or-treat, you can always wear a long sleeved shirt under the tank, and some tights under the shorts.  A Pokeball is always the perfect accessory for Misty.


Much love,

The Geeks


Friday, October 9, 2020

Crafting Adventures: Nurse Joy


Of course, if my hubby was going to dress as Brock for this family costume, I would naturally be choosing between Nurse Joy or Officer Jenny.  Nurse Joy seemed like an easier outfit to assemble, so here we are!  The only pieces that I created were the apron and the hat; I found the pink dress on Amazon and have worn it a couple of times since, and while I briefly considered dying my hair pink, the thought of bleaching my hair at home terrified me, so I got a cheap pink wig instead from the costume store.  Here's a quick and easy tutorial to put this together yourself.

Supplies:

-white fabric

-2" wide white ribbon

-1 1/5" wide white elastic

-3x5 index card

-red fabric paint

-hair clips

-pink dress

-white tights

-pink wig

1.  So let's start with a (very much not to scale) sketch of what the finished product is going to look like.  This apron is essentially an hourglass shape with sharp corners and very defined lines across the top and bottom- again, a stylized, anime look.  I just played with a measuring tape to figure out dimensions that would work for me and arrived at these; feel free to do the same for your body type.  I took this design and turned it into 2 pattern pieces- one for the top and one for the bottom.  Remember to give yourself a 1/4" seam allowance all the way around (that effectively means adding 1/2" to each of these measurements).  You'll want to cut 2 top pieces and 2 bottom pieces out of your white fabric.  Whatever you settle on as the measurement for the short sides of your trapezoids (that's my 10" measurement here), cut a piece of white ribbon that's the same length (+ 1/2").  

2.  Take your two bottom pieces and line them up, right sides together.  Stitch around 3 sides (leaving the short side- the 10" bit in my drawing- open) using a zig-zag stitch and a 1/4" seam allowance.  Turn it right side out.  

3.  Your ribbon is going to act as a crisp little waistband, connecting the bottom piece to the top.  Line up the edge of your ribbon with the short, unfinished end of the bottom of your apron, right sides together.  Using a straight stitch, sew as close to the edge of your ribbon as you can to attach the two.  Unfold the pieces and press the seam flat.

4.  Now, a word about the back of this apron.  Because I was planning to wear this while chasing some kids around at both a trunk-or-treat and a Mall-o-ween, I didn't want to actually have to tie any ribbons and worry about them coming un-tied.  So I thought- why not use elastic instead of ribbon?  That way I could sew it all in place, exactly how I want it to look from the back, and it would stretch and let me pull it on and off over my head.  I could even attach a finished bow that would never come undone so the whole look was clean and sharp.  I sketched out the above look.  The finished product involves having two straps of elastic that attach at the top corners of the apron, go over the shoulders, make an X in the back, and finish with two loops of fabric (or ribbon or more elastic, if you wish).  Then there is a third piece of elastic that goes around the waist, attached to the ribbon waistband in front, creating one continuous circle.  This elastic band feeds through the loops on the ends of the shoulder straps before you attach it to that front ribbon (and it will also feed through the loop of the big pretty bow, which will sit right in the small of your back).  To determine the lengths of these three pieces of elastic, you're going to have to play with the measuring tape again, tossing it over your shoulder and whatnot to figure out exactly how you want it to fall.  My apron is very narrow in the middle; it does not extend from hip to hip, but is rather tiny to help provide an illusion of a narrow waist.  That means the elastic that runs around the waist is going to cover the width of my back but also come in towards my center in order to reach the ribbon at the front.  All of this means I somehow ended up with the exact same measurement for each of my 3 pieces of elastic- 24".  Cut those three pieces of elastic, cut 2 pieces of ribbon to create your loops (about 3 1/2" should do you), and cut enough ribbon to make a nice big bow.

5.  THIS STEP IS OPTIONAL.  Before you start attaching anything, if you don't want it to be obvious that all these straps are actually just pieces of elastic, you can hide them inside tubes of fabric.  If you want to do this, cut a rectangle of white fabric that is 3 1/2" wide and about an inch longer than the length as your elastic (so in my case, that would mean 25").  Cut one of these rectangles for each of the three pieces of elastic.  Fold the rectangle in half, right sides together, and stitch down the long side using a straight stitch and a 1/4" seam allowance.  This creates a tube; turn it right side out (you might need to use an unsharpened pencil to help you turn it all the way).  Arrange the tube so that the seam is in the center of the back side of it and then feed your piece of elastic all the way through.  Line up one edge of the elastic with one of the unfinished ends of the fabric tube and sew into place using a zig-zag stitch, as close to the edge as possible.  Because your elastic is shorter than the fabric tube, you'll have to pull the other end of it, stretching the elastic, in order to line it up with the ends of the tube, then sew it into place the same way.  When you're done sewing, your fabric rectangle will contract to the resting length (24") of your elastic, with the telltale pleats you see on elastic waist bands.  Do this for all three pieces of elastic.  

6.  Whether you followed step 5 or not, take your two small pieces of ribbon and fold them into loops.  Attach the loops to one end of each of your shoulder strap pieces using a zig-zag stitch, then press the seam.


7.  Now to make the bow.  First, cut a big rectangle of ribbon.  Fold it in half, right sides together, and stitch up the short side with a straight stitch, close to the edge.  Turn it right side out, and arrange it so the seam is in the middle of the back.  Create two "tails" for your bow (this could even be one long piece of ribbon that you fold at an angle) and stitch them to the middle of the back of your rectangle.  Finally, (not pictured), you're going to cut another (smaller) rectangle and loop it around the middle of your bow.  Stitch the rectangle closed (the stitch will be on the outside, but since it's hiding behind your bow it doesn't matter).  Now your bow is complete, and you have this convenient little loop so you can slide your elastic through it.

8.  Let's assemble the rest of the apron!  Take the two top pieces of your apron and create a sandwich- one piece of fabric right side up, and then your shoulder straps, and then the other piece of fabric right side down.  You want the shoulder straps to be as close to the corners of what will be the very top edge of your apron as possible.  Just like with the bottom pieces, sew around 3 sides, leaving the small side (the 10" side in my drawing) open, using a zig-zag stitch and 1/4" seam allowance.  Turn out and press.

9.  To attach the top to the bottom, lay the bottom of the apron right side up, with the ribbon at the top.  Lay the top of the apron on top of it, right side down, so that the unfinished edge lines up with the top of the ribbon.  Using a straight stitch, sew as close to the edge of the ribbon as you can, then turn out and press flat.

10.  Now you just need to finish the back.  Take one edge of your elastic waistband and attach it to one side of the ribbon waist band, using a zig-zag stitch and 1/4" seam allowance, then press the seam flat.  Take your shoulder straps and cross them in to the X shape.  Feed your waist band through the loop at the bottom of the first strap, then through the loop at the back of the bow, and then through the loop at the bottom of the other strap.  Attach the free end to the other side of the ribbon in the same way as the first.

11.  Finally, you need to make the little nurse hat.  Cut 2 squares of white fabric, 5 1/2" each side.  On the right side of one square, draw a red cross with your fabric pen.  Place the squares right sides together and sew around 3 edges, leaving the bottom edge open, with a zig-zag stitch and 1/4" seam allowance.  Turn your little square pocket right side out and press.  Slide the 3x5 index card into the pocket; there should be about 2" of pocket hanging at the bottom.  You can bend the index card slightly so that it curves a little.  You're going to use the hair clips to clip the empty part of the fabric to your hair, and stand the card upright.  (You could also attach the little hat to a headband.)


Wear a cute short sleeved pink dress with white shoes.  Slip the apron over your head- the elastic stretches nicely so you can pull it on.  Wear the pink wig and clip the hat on top.  (Technically, in the show, she wears her hair in these pigtails that are tied up in big loops, but I couldn't make this curly wig cooperate.)  Offer to care for any sick or injured Pokemon that come your way, and if Brock asks you on a date, turn him down!

Much love,
The Geeks


Wednesday, October 7, 2020

Crafting Adventures: Brock


Pokemon trainer Brock is another really simple costume to put together.  Really all you need to make is the vest; an orange tshirt and some jeans complete the look.  And after that Ash costume, you're a pro at making vests, right?

Supplies:

-orange tshirt

-jeans

-green fabric

Before I launch into the instructions, I want to say a word or two about the fabric choice here.  I wanted to attempt to recreate the exaggerated, bulky look of the anime.  In the show, the vest is probably supposed to be a sort of puffer vest, but I wasn't confident enough to create that from scratch.  The vest definitely has some bulk and holds its shape- it doesn't really move much when Brock walks.  To achieve this sort of feeling, I went to the outdoor fabric section and chose a medium weight canvas material, something you might use to make cushions for outdoor furniture.  This material achieves the look of standing on its own, but boy was it heavy to work with on my sewing machine.  Also, it has NO STRETCH WHATSOEVER, so when I drafted the pattern for this vest, I had to add in panels on the sides so that Mr. Geek could actually put the thing on.  Finally, although the structure made it easy to hem a straight line across the bottom, folding curves was much more difficult- handling this material reminded me of folding origami more than creating with fabric.  If you'd like to save yourself some of this headache, feel free to use a lighter weight canvas (like something you would use to make a tote bag), or even just a regular quilting weight cotton (but then I would line it with a second layer).

1.  You're going to use your t-shirt as a guide to cut your pattern pieces.  Turn it inside out, tuck in the sleeves, and trace one piece for the back.  Then fold it in half to trace your two pieces for the front.  Finally, to account for the lack of stretch, you want two additional rectangular panels to go in the sides.  For an adult, I made them 6" wide and the height of the vest from the bottom hem to the bottom of the arm hole.  Add in a 1/4" seam allowance all the way around your pattern pieces, then cut them out in your green fabric.  Finally, the finished vest has 4 curved pockets, each with a curved flap covering the top.  I just freehand drew a pocket and a flap, added 1/4" seam allowance, and cut 4 of each piece.  The finished pockets are pretty wonky looking, but at least they're identically wonky.

2. Before assembling the vest, attach the pockets and flaps to the right sides of the front pieces.  The top two should be about level with the arm holes, and the bottom two just a few inches below them.  Place them however you like, just make sure that the pockets on the right exactly mirror the pockets on the left in terms of spacing.  Start with the pocket pieces.  Fold under the seam allowance on the top (the straight side) and stitch in place using a straight stitch.  Then, fold under the seam allowance on the curve (which is tricky!)  and top stitch to attach it to the front piece of the vest.  For the flap pieces, it's the reverse- first you hem the curve, and then you fold under the seam allowance on the straight side at the top and top stitch to attach that piece to the vest.  (If you try to attach the flap pieces before the pocket pieces, you'll have to move them out of the way to attach the pockets.)

3.  Just like with the Ash costume, our next step is to attach the front pieces to the back piece at the shoulder.  Lay one of the front pieces on top of the back piece, right sides together, making sure to line up the arm hole curve.  Sew a zig-zag stitch with a 1/4" seam allowance.  Then repeat with the other front piece.


4. Next, hem the neckline.


5.  Now we're going to start to add in the panels.  Take one panel and place it on top of one of the front pieces of the vest, right sides together, lined up on the outer edge (where the arms go).  Sew a zig-zag stitch with a 1/4" seam allowance straight down that side.  Then repeat with the other panel on the other front piece.  Next, hem the arm holes, including the tops of the panels you just attached.

6.  Next, finish assembling the vest by attaching the sides of the back piece to the sides of the panels, again with a zig-zag stitch and 1/4" seam allowance.

7.  Finally, hem the bottom of the vest, all the way around, 1/4" with a zig-zag stitch (and then again with a top stitch, if you want to make sure it sits nice and flat and doesn't roll).  Also hem the inner edges of the front, where a closure would normally go, using the same method.


And that's it!  Brock should wear jeans, an orange t-shirt, and the green vest on top.  A Pokeball is always a good idea for a trainer to carry.  Of course, he's always around to help his friend Ash!

See, easy-peasy.  Only one more of these costumes involves any sewing- the other is just finding some basic clothing pieces and doing a particular hair style.  Come back to see!

Much love,
The Geeks


Monday, October 5, 2020

Crafting Adventures: Ash Ketchum

 We're not going to any parties or trick-or-treating this year because of the pandemic, but that doesn't mean we can't still dress up in costumes and celebrate Halloween at home.  If you're looking for some inspiration for some quick and easy homemade costumes, I'm once again offering some tutorials for our family costumes.


The Pokemon craze is still alive and well in our household; if you follow me on Instagram, you've probably seen a video or two of Peanut belting out the theme song.  He'll even request it as a lullaby, and has solemnly promised to sing it for his new baby sibling as a dutiful big brother.  His bedroom has been Pokemon themed since he was born so, naturally, this seemed the perfect theme for family costumes last year, with Peanut himself dressed as amateur Pokemon trainer Ash Ketchum.  This was a really simple costume to put together, requiring only beginner-level sewing skills, with truly adorable results.


Supplies:

-white short-sleeved button-down shirt

-green short-sleeved t-shirt

-jeans

 -lime green gloves

-blue cotton fabric

-1" wide yellow ribbon 

-narrow yellow ribbon (thinner than 1")

-red and white trucker hat

-green fabric marker

1. In the original cartoon, Ash wears a blue jacket with a white collar and white sleeves.  To simply things for myself, I decided to essentially attach a blue vest to a white oxford shirt rather than go through the hassle of creating that collar myself.  The resulting jacket has no closures in front and the pockets are fake, but it looks sleek when worn over the t-shirt and my two-year-old was capable of putting it on himself.  So, to start, the first thing you need to do is create a pattern for this "vest" using the white shirt.  Simply turn the shirt inside out and tuck in the sleeves, so that the shirt itself looks like a vest.  Using a large piece of paper (I like wrapping paper for this, especially the kind with a grid printed on the back) trace a single piece for the back of the shirt, and two separate pieces for the front, one on each side.  Remember to add 1/4" seam allowance all the way around on your pattern pieces.  Also, for the front pieces, be sure you include the button placards; your resulting blue "vest" is going to cover them.

2. Cut your three pieces from the blue fabric; they should roughly resemble the above image.  You're going to assemble the vest completely first, and then attach it to the white shirt.  (Remember these steps, as you'll use them to make another vest in this costume series...)  Start by attaching the front pieces to the back piece at the shoulder seams.  Place the front pieces on top of the back piece, right sides together, and use a zig-zag stitch and a 1/4" seam allowance.  

3. So now your vest is going to look like this.  The next step is to hem the neckline and the arm holes.  You can either roll the fabric under 1/8", press, and roll another 1/8" before stitching (which would leave a cleaner hem) OR, since that hem is going to be hidden by the white oxford shirt, you can be lazy like me and just fold under 1/4", sew, and be done with it.  

4. Finally, to finish the "vest", you're going to sew up the side seams.  Arrange the vest as if it were complete, inside out, and sew straight lines to attach the front pieces to the back piece.  Again use a 1/4" seam and a zig-zag stitch for strength.  Turn the vest right side out.  You'll notice we have left the bottom hem unfinished, as well as the places where the two front pieces come together (where closures would normally be).  If you were making a real vest, you'd do those bits next.  We're not, though!


5.  Okay, this next bit is going to sound crazy, but it works, just trust me.  Take your white oxford shirt and make sure it's turned fully right side out, ready to be worn.  To make things smoother, you can go ahead and remove all the buttons, including the ones that hold down the collar.  (Even if you don't remove the buttons, be sure to unbutton the collar so the points aren't trapped under the blue fabric when we're done.)  Next, take your blue "vest" and turn it right side out, then tuck it inside the shirt like a lining; make sure the right side of the "vest" is facing the wrong side of the shirt.  Carefully line up the inner edges where the shirt closes.  When drafting my pattern pieces, I traced the neckline of my "vest" below the topmost button on the white shirt, so that's where I pinned the top of my blue piece to the inside of the shirt; once you pin all the way down, you'll notice some of the blue pokes out from the bottom- that's your seam allowance.  Pin both edges this way.  Now, once you sew where you've pinned, you're going to pull that blue piece out and turn it right side out, pulling the sleeves of white shirt through the arm holes of the blue vest.  I gingerly practiced this turn out several times with everything pinned in place before sewing; if you don't believe it's going to work, practice it yourself, just to make sure.  Once you're satisfied, go ahead and sew, again with a zig-zag stitch, just the innermost edge of each side of the shirt closure.  Bring that zig-zag stitch right to the edge; don't worry about seam allowance.  


6. Here's what it looks like all turned the right way out, with the sleeves pushed through.  If it makes you feel better, you can top stitch a nice straight stitch right over where you just sewed, but I didn't bother.  Make sure you pull the collar of the white shirt through the neckline of the blue vest; give everything a good press if it looks terribly wrinkly, like mine.

7.  Now all that's left are some finishing touches!  Take your yellow 1" ribbon and use it to hem the bottom of the jacket.  I lined up the bottom of the ribbon with the bottom edge of the white shirt, sandwiching the bottom of the blue vest between them so that its edge also lined up.  Leave a little extra length on either end of the ribbon, fold it under the insides of the jacket at the closure, and stitch in place with a zig-zag stitch.  Then, use a straight stitch all the way around the outside of the jacket on the bottom edge of the ribbon.  For a nice clean finish, you can repeat the straight stitch around the edge of the top of the ribbon as well.

8.  Finally, you're going to create faux pockets using your thin yellow ribbon.  Simply cut two identical lengths of this small ribbon, and attach them at an angle on either side of the front of the jacket, using your best judgement to place where pockets ought to go.  Make sure the ribbons are mirror images of each other, angling down towards the outside of the jacket.  The hard part is over!

9.  For the accessories, you simply need to cut the fingers off of the green gloves (although I was able to find cheap lime green fingerless gloves on Amazon) and paint the L-shaped symbol on the front of the trucker hat.  A word of caution- I ordered a toddler sized hat for my two-year-old, and it was much too small; I don't know if he just had a big head at the time (probably) or if "toddler" sizes are just too small.  Either way, next time, I would go with a regular child sized hat; worst case, it would be slightly too big and look adorable in photos.


And there you have it!  Ash wears jeans and a green t-shirt (although sometimes in the show it looks black...whatever you have on hand!) with the jacket on top, fingerless gloves, and the hat (preferably on his head).  A stuffed Pokemon or two make great companions, along with a red Pokeball.

This was by far the most complicated of this group of costumes, and it really isn't so bad at all.  Tune in all week for the rest of the tutorials!

Much love,

The Geeks

Thursday, October 31, 2019

Happy Halloween!

Pokemon trainer Misty catching 'em all
Happy Halloween from the cast of the original Pokemon anime!  Somehow we didn't manage to get a photo of all four of us together, so these separate snapshots will have to do.

Gym leader Brock is very serious about battling Pokemon
Ash Ketchum is so glad to have found Nurse Joy so she can care for Pikachu!
What did your crew wear for Halloween this year?  Can you pull off a family theme, or are everyone's interests too varied?  I know we're quickly approaching the day where this isn't "cool" anymore, but here's hoping we have a few years of family costumes left!

Much love,
The Geeks

Wednesday, October 9, 2019

Crafting Adventures: Prince Eric and Vanessa Costume Tutorials

The Ariel and Flounder costumes were pretty intense construction, for me, anyway, so luckily my plans for the parents' part of this group only involved creating one accessory for each of us.

Of course in any group where our preschooler is the princess, the role of the prince is naturally played by Daddy!  Prince Eric only needed a simple red sash to complete his outfit which was otherwise composed of pieces Mr Geek already had in his closet.  And Vanessa- the human incarnation of Ursula, using Ariel's stolen voice- needed only the magic shell necklace, which didn't even involve sewing!


Prince Eric Supplies:

-red fabric (preferably something shiny)
-black fabric
-1" wide elastic
-white button-up shirt
-jeans

Vanessa supplies:

-gold card stock
-black yarn
-purple tank top
-purple maxi skirt

1. First, convince your husband to let you measure him around the waist.  It's a hard sell, but necessary.  Measure him all the way around wherever he typically wears a belt (probably more on the hips than the proper waist).  Call this measurement C.  Next, eyeball how tall you want the belt/sash to be- maybe 6"?  Call that value H.


2. You need to cut one red rectangle, one black rectangle, and 2 mirror image black trapezoids using the dimensions shown above.

3. Sew a 1/4" hem on both the top and bottom of your red rectangle.


4. You're going to create 2 1" pleats in the fabric.  Identify a line a couple inches above the center of the red rectangle and fold it over 1", then stitch it down with a 1/4" seam allowance using a straight stitch.  Do the same thing below the center line at the same distance.  (The dotted lines above visually represent what I'm talking about; the actual spacing here is up to your aesthetic).

5. Fold your black rectangle in half, ride sides together, and sew along the long end with a 1/4" seam allowance, creating a long black tube that is just slightly taller than your elastic.  Turn it rightside out.

6. Cut your elastic 1" shorter than the length of this black tube.  Feed the elastic into the tube.  Sew down one end of the elastic so that it is lined up perfectly with the edge of the tube, attaching it to the black fabric.  Gently pull the other end of the elastic to line it up with the edge of the tube on that end, and sew it in place.  When you let go, the whole thing will shrink in a little bit.

7. Fold down the angled edges of your two trapezoids by 1/4" each and sew them down with a straight stitch.  These pieces are going to connect your elasticized band to the pretty pleated red sash.

8. Attach the tall edge of each trapezoid to the ends of the red rectangle using a zigzag stitch and a 1/4" seam allowance.  Attach the short edge of each trapezoid to the ends of the elastic waistband.  Ta da!  [As an aside- you can use the same technique on a much smaller scale to make a soft elastic headband!]

9. Have Prince Eric wear his jeans and white shirt, rolling the sleeves up to the elbows and leaving the top couple of buttons undone.  Pull on the belt over the jeans at waist level.


10. Vanessa's seashell necklace is rather simple.  Draw the shape of the shell with a permanent black marker on the gold cardstock, then cut it out.  Cut the black yarn to the desired length and attach it to the shell.  Wear the purple tank and skirt, with the necklace prominently displayed.  Remind your princess that she can't talk, and steal the prince!

Do the parents get in on the Halloween action in your family?

Much love,
The Geeks

Monday, October 7, 2019

Crafting Adventures: Flounder Costume Tutorial


Obviously our red haired princess was Ariel for our family Little Mermaid Halloween costume.  Since Baby Brother has a tendency to act like such a guppy, I figured Flounder would be the perfect character!  To achieve this look, I created a rather simple hooded fleece sweatshirt, with striped sleeves to act as the fins, as well as a few fins along the hood.

Supplies:

-yellow fleece
-baby blue fleece
-navy blue fleece
-thread to match


1. Start with a nice big hoodie that fits your little fish.  Tuck the sleeves in, then trace around the outside, adding 1/4" for seam allowance.  You'll want to have one piece for the back, which will have a higher neckline, and one piece for the front, which will have a lower neckline- feel free to exaggerate that neckline to make putting it on and taking it off a little easier.  Cut this front and back piece from your yellow felt.  Next, pull the sleeves back out of the hoodie and trace around them, again with a 1/4" seam allowance.  Cut 2 identical pieces for each sleeve from the baby blue fleece.  Next, you need two long, thin rectangles of the navy blue fleece; the length should be the same length as the sleeve pieces, and the width is up to you, but I went with 1" for my toddler.  Finally, cut two freehand ovals from the blue fleece; they will be placed on the back of the pullover, one on top of the other, as the stripes on Flounder's back.


2. Take the back piece and fold it in half both ways so that you find both the horizontal and the vertical center lines.  Using these creases as your guide, arrange and pin the blue ovals onto the right side of the fabric, with their right sides up.  You want the ovals to be placed along the vertical center line, with one just above and one just below the horizontal center line.  Sew these on like appliques, using a zigzag stitch right at the edge.


3. Now you're going to attach the front piece to the back piece at the shoulders.  Place the two pieces on top of each other, right sides facing.  See how the front piece has very distinct, narrow shoulders?  You're going to sew the front to the back at those two points only, using a 1/4" seam allowance.  [It's important to note here that I'm not worried about hemming anything for a couple of reasons- it's fleece, so it doesn't fray like regular cotton fabric....and also it's a costume that's only going to be worn a couple of times.]


4. Next, you need to piece together the sleeves.  Lay out two of the light blue pieces with each navy blue rectangle, like this.  Sew the three pieces together with a 1/4" seam allowance.  Do this one side at a time, placing the rectangle on top of the light blue piece, right sides together, lining up the long edge of the rectangle with what will ultimately be the top of the sleeve, and sewing straight down that line with a straight stitch.  Then repeat with the other piece.


5. Now you're going to create that hood.  Use the hood of your original sweatshirt as a guide to cut two hood-shaped pieces of the yellow fleece.  Next, cut some shapes from both the light and dark blue fleece to be the little "mohawk" of fins along Flounder's head; cut two identical pieces of each shape.  Put those pairs of shapes together and sew along three sides, leaving an opening (like a bunch of little socks) so you can turn the fins right side-out again.  Finally, lay the two hood pieces on top of each other, right sides together, and sandwich the little fins in the middle, placed however you'd like along the curve.  [I did end up hemming the edge of the hood closest to the face, just for a clean edge.]

6. Finally, you're going to put the whole thing together.  Attach each sleeve to the bodice first along the shoulder curve on each.  Once that's done, put the whole piece together so that you're looking at an inside-out sweatshirt and sew up the side of the body and then along the sleeve, from the armpit out to the wrist.  Turn the sweatshirt the right way out, and then attach the hood to the neckline; leave a gap in the front for your fishie's big head!  Now, you can put elastic in the wrists if you'd like, but I didn't think to do that before we took this little fish out, so I ended up rolling up the cuffs instead.


And there's your fish!  Your Flounder can wear a light-colored T-shirt underneath his pullover, and whichever sort of pants are the most comfortable.  (If he's going to be walking around much, yellow sweatpants would be great!  Since our Flounder spent most of his time in a stroller, we went with jeans.)

What is your toddler wearing for Halloween this year?

Much love,
The Geeks

Wednesday, October 2, 2019

Crafting Adventures: Ariel Costume Tutorial


Last year, our crew did Halloween as the cast of The Little Mermaid.  If you've followed this blog for a while (at Halloween time, anyway) you'll know that my sewing projects tend to be mostly upcycle projects- I like to start with an already constructed garment, tear it apart, and rebuild it as something new.  I tend to be daunted by the idea of making any garment purely from scratch because I'm just not that confident in my skills.  Of course, I did make the vest for the Ryder costume from scratch the year that we did the Paw Patrol...but I didn't exactly nail the zipper on that one.

Well, The Little Mermaid costumes changed that posture for me.  Everything that I actually made for these costumes was done from scratch- one full costume, one partial costume, and two accessories.  That doesn't mean these costumes were particularly professional looking- they still look very much homemade!  But still, there was a lot of love in these garments and I think we all looked pretty great, don't you?

So today, let's talk about the Ariel costume.  While the mermaid get-up would probably have been easier to pull off, I felt  it was less appropriate for October weather, so we went with the "exploring the town" dress instead.  This costume is 4 parts- a black faux corset worn over a blue long-sleeved shirt, a blue skirt with an elastic waist, and of course a navy blue bow worn in the hair.

It's important to note that while a lot of the costumes I've made could be adapted to adult sizes merely by changing the measurements, the construction on this one really does presume it will be worn by a little girl- that is, someone with no curves.

Supplies:

-a baby blue long-sleeved tshirt in your mermaid's size
-black fabric
-black separating zipper
-black thread
-royal blue fabric
-royal blue thread
-1/2" elastic
-navy blue ribbon
-hair clip


1. First, measure your mermaid.  Have her hold her hands out to the side so she makes the letter T, and wrap your tape measure around her chest, right at the armpit level.  (Afterwards, she can strike a sassier pose, like this.)  Divide that measurement by 2 and you have the W measurement shown above.  Next, place one end of your measuring tape in her armpit, and measure down to her hip; this value we'll call H.  Find the spot on her breastbone at the level of her armpit, and then measure up towards her throat, stopping wherever you would prefer the neckline of this bodice to land (remember that we're going to cut a notch in it, so the center of the bodice will actually be lower than this point); call this B.  Then, wrap your measuring tape around her body at the belly button level and call this C.  Finally, measure from the belly button down to about the ankles, or wherever you'd like the bottom of the skirt to fall, and call that L.


2. Now you're going to cut the fabric for the front of the faux corset.  You'll need two identical pieces, and each piece needs to be perfectly symmetrical.  I achieved this by folding two pieces of black fabric in half and stacking them on top of one another; I suppose you could also achieve this by folding the fabric in half and then in half again, such that when you make just one cut, you'll end up with two identical (folded) pieces.  (Truth be told, with a heavy enough cotton, you don't really need to double up on your fabric, but I was using sort of a thin cotton from a pile of fat quarters, and I wanted this bodice to hold its shape.  Plus, I anticipated the notch that would be cut, and I figure it's easier to sew two pieces together along that sharp corner than to hem it; I'll leave it up to you to decide how to handle this, but my instructions will assume there are two front pieces.)  You're going to have to free-hand some of this shape; I suggest creating a pattern piece using whatever large paper you may have on hand, like wrapping paper or kraft paper.  Follow the guide shown here for how to sketch out that pattern piece, and cut it accordingly on your doubled fabric so that you end up with two pieces.


3. Now you're going to cut that notch.  Use your judgement to determine how deep and how wide you want the V to be; the depth will be measurement X and the measurement Y is the width divided in half.  Draw a right triangle with the X and Y as two of the sides, and then draw a hypotenuse to connect them.  Cut along that angled line to create the notch.


4. Now to cut the fabric for the back of the faux corset.  This time you want 2 pieces that mirror each other (although they are just rectangles, so they will be identical).  To achieve this, once again fold your piece of black fabric in half, but this time you're going to line up your pattern piece on the cut edge of the fabric, rather than lining it up with the fold.  Again, we're just cutting a rectangle here (and will end up with two) so the pattern is much more straight forward.

5. Time to begin assembly!  First, lay your front pieces on top of each other, right sides facing.  Using a 1/4" seam and a zig-zag stitch, sew across the top, and then sew across the bottom.  (If you want, you can do one continuous stitch by also going down one side, but only one side.  You need to leave the fourth side open.)  Turn the bodice front rightside-out, taking special care around the notch.

6. Next, hem both the tops and bottoms of both of your back pieces, again with a 1/4" seam allowance (a straight stitch is fine).

7. Attach your separating zipper to the two back pieces.  I followed a simple tutorial for doing this, found here.  I happened to find a zipper that was the exact right size for this bodice, so I didn't have to worry about dealing with the ends!

8. Finally, you're going to attach the front piece to the back piece.  To do so, place the back pieces on top of the front of the front piece (does that make sense?), right sides together.  Again with a 1/4" seam allowance, sew straight down on each piece.  Finish the seams however you wish.  (I don't have a fancy serger, so I just use a zig-zag stitch and call it a day.)  That's it!  So simple to make this beautiful little top.

9. Okay now we're going to take a pause and do some math.  That C measurement you took up there- the waist?  That stands for circumference, of course.  Remember how C = 2*pi*R ?  Let's round pi to 3.25 (I know, cringe, but estimates are okay here because we're doing an elastic waistband!) and solve for R = C/(2*3.25).  Now multiply that R value by 1.5 for a nice twirly skirt.


10. Take your royal blue fabric and fold it in half, then fold it in half again.  Using your L measurement and your newly found R, cut according to the image above.  Making circles is difficult; the trick is to take a string cut to the length you want the circle to be, tack it to the corner of your folded fabric, and tie a piece of chalk to the other end.  Then use it like a compass to sketch out a quarter of a circle!  When you're done, and you unfold, you'll have a big blue donut.

11. Hem the outside of the donut 1/4".  I happened to have some black bias tape and for whatever reason I thought it would look super cool, so I attached that to the bottom instead of just folding and hemming.  I don't know why.  Just go with it!

12. Cut a piece of elastic that is actually your waist measurement (C).  Fold over the top edge of the inner part of your blue donut so that the elastic will slip inside (for 1/2" elastic, make that about 7/8", or maybe a round 1" for wiggle room).  Sew that all the way around, using a 1/4" seam allowance, and leave a couple inches' worth of a gap.

13. Take a safety pin and attach it to one end of your elastic.  Feed the safety pin into one end of the tube you've just sewn, and slowly and carefully fish the elastic into the tube and allllll the way around, pulling the safety pin out the other side.  It'll get tough towards the end there, but you can do it!  Remove the safety pin and overlap the ends of your elastic by about 1" and stitch it together securely, definitely use a zig-zag stitch.  Finally, sew down the gap that you left in the waistband so it's fully closed.

14. The last piece is the bow!  Take your ribbon and create a large, 80s-style bow, and attach it (with hot glue, for some retro flair) to your hair clip. 

15. To wear the costume, your mermaid should put on the long-sleeved shirt, slip on the skirt, and zip the faux corset over the shirt.  Put her hair in a half-up pony and clip in the bow.


Phew!  What a costume!  I have to be honest with you, I really messed up the skirt on this outfit.  I messed up my cut so that the fabric was not so much a circle as a wobbly, wavy, vaguely rectangular shape.  I didn't leave enough gap for the waistband so most of it came undone when I was forcing the elastic through, and I somehow overstretched the elastic so it ended up being too big!  I had to overcompensate by adding a makeshift belt.  And finally that business with the bias tape- I really should have just hemmed it.

But you know what?  She still looked pretty adorable.  Ariel had a great time exploring the Rennaissance Festival with her Prince, and meeting humans at Air and Scare, and collecting candy on Halloween night.

So what is your little one going as for Halloween this year?

Much love,
The Geeks