Showing posts with label crafting. Show all posts

Friday, October 9, 2020

Crafting Adventures: Nurse Joy


Of course, if my hubby was going to dress as Brock for this family costume, I would naturally be choosing between Nurse Joy or Officer Jenny.  Nurse Joy seemed like an easier outfit to assemble, so here we are!  The only pieces that I created were the apron and the hat; I found the pink dress on Amazon and have worn it a couple of times since, and while I briefly considered dying my hair pink, the thought of bleaching my hair at home terrified me, so I got a cheap pink wig instead from the costume store.  Here's a quick and easy tutorial to put this together yourself.

Supplies:

-white fabric

-2" wide white ribbon

-1 1/5" wide white elastic

-3x5 index card

-red fabric paint

-hair clips

-pink dress

-white tights

-pink wig

1.  So let's start with a (very much not to scale) sketch of what the finished product is going to look like.  This apron is essentially an hourglass shape with sharp corners and very defined lines across the top and bottom- again, a stylized, anime look.  I just played with a measuring tape to figure out dimensions that would work for me and arrived at these; feel free to do the same for your body type.  I took this design and turned it into 2 pattern pieces- one for the top and one for the bottom.  Remember to give yourself a 1/4" seam allowance all the way around (that effectively means adding 1/2" to each of these measurements).  You'll want to cut 2 top pieces and 2 bottom pieces out of your white fabric.  Whatever you settle on as the measurement for the short sides of your trapezoids (that's my 10" measurement here), cut a piece of white ribbon that's the same length (+ 1/2").  

2.  Take your two bottom pieces and line them up, right sides together.  Stitch around 3 sides (leaving the short side- the 10" bit in my drawing- open) using a zig-zag stitch and a 1/4" seam allowance.  Turn it right side out.  

3.  Your ribbon is going to act as a crisp little waistband, connecting the bottom piece to the top.  Line up the edge of your ribbon with the short, unfinished end of the bottom of your apron, right sides together.  Using a straight stitch, sew as close to the edge of your ribbon as you can to attach the two.  Unfold the pieces and press the seam flat.

4.  Now, a word about the back of this apron.  Because I was planning to wear this while chasing some kids around at both a trunk-or-treat and a Mall-o-ween, I didn't want to actually have to tie any ribbons and worry about them coming un-tied.  So I thought- why not use elastic instead of ribbon?  That way I could sew it all in place, exactly how I want it to look from the back, and it would stretch and let me pull it on and off over my head.  I could even attach a finished bow that would never come undone so the whole look was clean and sharp.  I sketched out the above look.  The finished product involves having two straps of elastic that attach at the top corners of the apron, go over the shoulders, make an X in the back, and finish with two loops of fabric (or ribbon or more elastic, if you wish).  Then there is a third piece of elastic that goes around the waist, attached to the ribbon waistband in front, creating one continuous circle.  This elastic band feeds through the loops on the ends of the shoulder straps before you attach it to that front ribbon (and it will also feed through the loop of the big pretty bow, which will sit right in the small of your back).  To determine the lengths of these three pieces of elastic, you're going to have to play with the measuring tape again, tossing it over your shoulder and whatnot to figure out exactly how you want it to fall.  My apron is very narrow in the middle; it does not extend from hip to hip, but is rather tiny to help provide an illusion of a narrow waist.  That means the elastic that runs around the waist is going to cover the width of my back but also come in towards my center in order to reach the ribbon at the front.  All of this means I somehow ended up with the exact same measurement for each of my 3 pieces of elastic- 24".  Cut those three pieces of elastic, cut 2 pieces of ribbon to create your loops (about 3 1/2" should do you), and cut enough ribbon to make a nice big bow.

5.  THIS STEP IS OPTIONAL.  Before you start attaching anything, if you don't want it to be obvious that all these straps are actually just pieces of elastic, you can hide them inside tubes of fabric.  If you want to do this, cut a rectangle of white fabric that is 3 1/2" wide and about an inch longer than the length as your elastic (so in my case, that would mean 25").  Cut one of these rectangles for each of the three pieces of elastic.  Fold the rectangle in half, right sides together, and stitch down the long side using a straight stitch and a 1/4" seam allowance.  This creates a tube; turn it right side out (you might need to use an unsharpened pencil to help you turn it all the way).  Arrange the tube so that the seam is in the center of the back side of it and then feed your piece of elastic all the way through.  Line up one edge of the elastic with one of the unfinished ends of the fabric tube and sew into place using a zig-zag stitch, as close to the edge as possible.  Because your elastic is shorter than the fabric tube, you'll have to pull the other end of it, stretching the elastic, in order to line it up with the ends of the tube, then sew it into place the same way.  When you're done sewing, your fabric rectangle will contract to the resting length (24") of your elastic, with the telltale pleats you see on elastic waist bands.  Do this for all three pieces of elastic.  

6.  Whether you followed step 5 or not, take your two small pieces of ribbon and fold them into loops.  Attach the loops to one end of each of your shoulder strap pieces using a zig-zag stitch, then press the seam.


7.  Now to make the bow.  First, cut a big rectangle of ribbon.  Fold it in half, right sides together, and stitch up the short side with a straight stitch, close to the edge.  Turn it right side out, and arrange it so the seam is in the middle of the back.  Create two "tails" for your bow (this could even be one long piece of ribbon that you fold at an angle) and stitch them to the middle of the back of your rectangle.  Finally, (not pictured), you're going to cut another (smaller) rectangle and loop it around the middle of your bow.  Stitch the rectangle closed (the stitch will be on the outside, but since it's hiding behind your bow it doesn't matter).  Now your bow is complete, and you have this convenient little loop so you can slide your elastic through it.

8.  Let's assemble the rest of the apron!  Take the two top pieces of your apron and create a sandwich- one piece of fabric right side up, and then your shoulder straps, and then the other piece of fabric right side down.  You want the shoulder straps to be as close to the corners of what will be the very top edge of your apron as possible.  Just like with the bottom pieces, sew around 3 sides, leaving the small side (the 10" side in my drawing) open, using a zig-zag stitch and 1/4" seam allowance.  Turn out and press.

9.  To attach the top to the bottom, lay the bottom of the apron right side up, with the ribbon at the top.  Lay the top of the apron on top of it, right side down, so that the unfinished edge lines up with the top of the ribbon.  Using a straight stitch, sew as close to the edge of the ribbon as you can, then turn out and press flat.

10.  Now you just need to finish the back.  Take one edge of your elastic waistband and attach it to one side of the ribbon waist band, using a zig-zag stitch and 1/4" seam allowance, then press the seam flat.  Take your shoulder straps and cross them in to the X shape.  Feed your waist band through the loop at the bottom of the first strap, then through the loop at the back of the bow, and then through the loop at the bottom of the other strap.  Attach the free end to the other side of the ribbon in the same way as the first.

11.  Finally, you need to make the little nurse hat.  Cut 2 squares of white fabric, 5 1/2" each side.  On the right side of one square, draw a red cross with your fabric pen.  Place the squares right sides together and sew around 3 edges, leaving the bottom edge open, with a zig-zag stitch and 1/4" seam allowance.  Turn your little square pocket right side out and press.  Slide the 3x5 index card into the pocket; there should be about 2" of pocket hanging at the bottom.  You can bend the index card slightly so that it curves a little.  You're going to use the hair clips to clip the empty part of the fabric to your hair, and stand the card upright.  (You could also attach the little hat to a headband.)


Wear a cute short sleeved pink dress with white shoes.  Slip the apron over your head- the elastic stretches nicely so you can pull it on.  Wear the pink wig and clip the hat on top.  (Technically, in the show, she wears her hair in these pigtails that are tied up in big loops, but I couldn't make this curly wig cooperate.)  Offer to care for any sick or injured Pokemon that come your way, and if Brock asks you on a date, turn him down!

Much love,
The Geeks


Wednesday, October 7, 2020

Crafting Adventures: Brock


Pokemon trainer Brock is another really simple costume to put together.  Really all you need to make is the vest; an orange tshirt and some jeans complete the look.  And after that Ash costume, you're a pro at making vests, right?

Supplies:

-orange tshirt

-jeans

-green fabric

Before I launch into the instructions, I want to say a word or two about the fabric choice here.  I wanted to attempt to recreate the exaggerated, bulky look of the anime.  In the show, the vest is probably supposed to be a sort of puffer vest, but I wasn't confident enough to create that from scratch.  The vest definitely has some bulk and holds its shape- it doesn't really move much when Brock walks.  To achieve this sort of feeling, I went to the outdoor fabric section and chose a medium weight canvas material, something you might use to make cushions for outdoor furniture.  This material achieves the look of standing on its own, but boy was it heavy to work with on my sewing machine.  Also, it has NO STRETCH WHATSOEVER, so when I drafted the pattern for this vest, I had to add in panels on the sides so that Mr. Geek could actually put the thing on.  Finally, although the structure made it easy to hem a straight line across the bottom, folding curves was much more difficult- handling this material reminded me of folding origami more than creating with fabric.  If you'd like to save yourself some of this headache, feel free to use a lighter weight canvas (like something you would use to make a tote bag), or even just a regular quilting weight cotton (but then I would line it with a second layer).

1.  You're going to use your t-shirt as a guide to cut your pattern pieces.  Turn it inside out, tuck in the sleeves, and trace one piece for the back.  Then fold it in half to trace your two pieces for the front.  Finally, to account for the lack of stretch, you want two additional rectangular panels to go in the sides.  For an adult, I made them 6" wide and the height of the vest from the bottom hem to the bottom of the arm hole.  Add in a 1/4" seam allowance all the way around your pattern pieces, then cut them out in your green fabric.  Finally, the finished vest has 4 curved pockets, each with a curved flap covering the top.  I just freehand drew a pocket and a flap, added 1/4" seam allowance, and cut 4 of each piece.  The finished pockets are pretty wonky looking, but at least they're identically wonky.

2. Before assembling the vest, attach the pockets and flaps to the right sides of the front pieces.  The top two should be about level with the arm holes, and the bottom two just a few inches below them.  Place them however you like, just make sure that the pockets on the right exactly mirror the pockets on the left in terms of spacing.  Start with the pocket pieces.  Fold under the seam allowance on the top (the straight side) and stitch in place using a straight stitch.  Then, fold under the seam allowance on the curve (which is tricky!)  and top stitch to attach it to the front piece of the vest.  For the flap pieces, it's the reverse- first you hem the curve, and then you fold under the seam allowance on the straight side at the top and top stitch to attach that piece to the vest.  (If you try to attach the flap pieces before the pocket pieces, you'll have to move them out of the way to attach the pockets.)

3.  Just like with the Ash costume, our next step is to attach the front pieces to the back piece at the shoulder.  Lay one of the front pieces on top of the back piece, right sides together, making sure to line up the arm hole curve.  Sew a zig-zag stitch with a 1/4" seam allowance.  Then repeat with the other front piece.


4. Next, hem the neckline.


5.  Now we're going to start to add in the panels.  Take one panel and place it on top of one of the front pieces of the vest, right sides together, lined up on the outer edge (where the arms go).  Sew a zig-zag stitch with a 1/4" seam allowance straight down that side.  Then repeat with the other panel on the other front piece.  Next, hem the arm holes, including the tops of the panels you just attached.

6.  Next, finish assembling the vest by attaching the sides of the back piece to the sides of the panels, again with a zig-zag stitch and 1/4" seam allowance.

7.  Finally, hem the bottom of the vest, all the way around, 1/4" with a zig-zag stitch (and then again with a top stitch, if you want to make sure it sits nice and flat and doesn't roll).  Also hem the inner edges of the front, where a closure would normally go, using the same method.


And that's it!  Brock should wear jeans, an orange t-shirt, and the green vest on top.  A Pokeball is always a good idea for a trainer to carry.  Of course, he's always around to help his friend Ash!

See, easy-peasy.  Only one more of these costumes involves any sewing- the other is just finding some basic clothing pieces and doing a particular hair style.  Come back to see!

Much love,
The Geeks


Monday, October 5, 2020

Crafting Adventures: Ash Ketchum

 We're not going to any parties or trick-or-treating this year because of the pandemic, but that doesn't mean we can't still dress up in costumes and celebrate Halloween at home.  If you're looking for some inspiration for some quick and easy homemade costumes, I'm once again offering some tutorials for our family costumes.


The Pokemon craze is still alive and well in our household; if you follow me on Instagram, you've probably seen a video or two of Peanut belting out the theme song.  He'll even request it as a lullaby, and has solemnly promised to sing it for his new baby sibling as a dutiful big brother.  His bedroom has been Pokemon themed since he was born so, naturally, this seemed the perfect theme for family costumes last year, with Peanut himself dressed as amateur Pokemon trainer Ash Ketchum.  This was a really simple costume to put together, requiring only beginner-level sewing skills, with truly adorable results.


Supplies:

-white short-sleeved button-down shirt

-green short-sleeved t-shirt

-jeans

 -lime green gloves

-blue cotton fabric

-1" wide yellow ribbon 

-narrow yellow ribbon (thinner than 1")

-red and white trucker hat

-green fabric marker

1. In the original cartoon, Ash wears a blue jacket with a white collar and white sleeves.  To simply things for myself, I decided to essentially attach a blue vest to a white oxford shirt rather than go through the hassle of creating that collar myself.  The resulting jacket has no closures in front and the pockets are fake, but it looks sleek when worn over the t-shirt and my two-year-old was capable of putting it on himself.  So, to start, the first thing you need to do is create a pattern for this "vest" using the white shirt.  Simply turn the shirt inside out and tuck in the sleeves, so that the shirt itself looks like a vest.  Using a large piece of paper (I like wrapping paper for this, especially the kind with a grid printed on the back) trace a single piece for the back of the shirt, and two separate pieces for the front, one on each side.  Remember to add 1/4" seam allowance all the way around on your pattern pieces.  Also, for the front pieces, be sure you include the button placards; your resulting blue "vest" is going to cover them.

2. Cut your three pieces from the blue fabric; they should roughly resemble the above image.  You're going to assemble the vest completely first, and then attach it to the white shirt.  (Remember these steps, as you'll use them to make another vest in this costume series...)  Start by attaching the front pieces to the back piece at the shoulder seams.  Place the front pieces on top of the back piece, right sides together, and use a zig-zag stitch and a 1/4" seam allowance.  

3. So now your vest is going to look like this.  The next step is to hem the neckline and the arm holes.  You can either roll the fabric under 1/8", press, and roll another 1/8" before stitching (which would leave a cleaner hem) OR, since that hem is going to be hidden by the white oxford shirt, you can be lazy like me and just fold under 1/4", sew, and be done with it.  

4. Finally, to finish the "vest", you're going to sew up the side seams.  Arrange the vest as if it were complete, inside out, and sew straight lines to attach the front pieces to the back piece.  Again use a 1/4" seam and a zig-zag stitch for strength.  Turn the vest right side out.  You'll notice we have left the bottom hem unfinished, as well as the places where the two front pieces come together (where closures would normally be).  If you were making a real vest, you'd do those bits next.  We're not, though!


5.  Okay, this next bit is going to sound crazy, but it works, just trust me.  Take your white oxford shirt and make sure it's turned fully right side out, ready to be worn.  To make things smoother, you can go ahead and remove all the buttons, including the ones that hold down the collar.  (Even if you don't remove the buttons, be sure to unbutton the collar so the points aren't trapped under the blue fabric when we're done.)  Next, take your blue "vest" and turn it right side out, then tuck it inside the shirt like a lining; make sure the right side of the "vest" is facing the wrong side of the shirt.  Carefully line up the inner edges where the shirt closes.  When drafting my pattern pieces, I traced the neckline of my "vest" below the topmost button on the white shirt, so that's where I pinned the top of my blue piece to the inside of the shirt; once you pin all the way down, you'll notice some of the blue pokes out from the bottom- that's your seam allowance.  Pin both edges this way.  Now, once you sew where you've pinned, you're going to pull that blue piece out and turn it right side out, pulling the sleeves of white shirt through the arm holes of the blue vest.  I gingerly practiced this turn out several times with everything pinned in place before sewing; if you don't believe it's going to work, practice it yourself, just to make sure.  Once you're satisfied, go ahead and sew, again with a zig-zag stitch, just the innermost edge of each side of the shirt closure.  Bring that zig-zag stitch right to the edge; don't worry about seam allowance.  


6. Here's what it looks like all turned the right way out, with the sleeves pushed through.  If it makes you feel better, you can top stitch a nice straight stitch right over where you just sewed, but I didn't bother.  Make sure you pull the collar of the white shirt through the neckline of the blue vest; give everything a good press if it looks terribly wrinkly, like mine.

7.  Now all that's left are some finishing touches!  Take your yellow 1" ribbon and use it to hem the bottom of the jacket.  I lined up the bottom of the ribbon with the bottom edge of the white shirt, sandwiching the bottom of the blue vest between them so that its edge also lined up.  Leave a little extra length on either end of the ribbon, fold it under the insides of the jacket at the closure, and stitch in place with a zig-zag stitch.  Then, use a straight stitch all the way around the outside of the jacket on the bottom edge of the ribbon.  For a nice clean finish, you can repeat the straight stitch around the edge of the top of the ribbon as well.

8.  Finally, you're going to create faux pockets using your thin yellow ribbon.  Simply cut two identical lengths of this small ribbon, and attach them at an angle on either side of the front of the jacket, using your best judgement to place where pockets ought to go.  Make sure the ribbons are mirror images of each other, angling down towards the outside of the jacket.  The hard part is over!

9.  For the accessories, you simply need to cut the fingers off of the green gloves (although I was able to find cheap lime green fingerless gloves on Amazon) and paint the L-shaped symbol on the front of the trucker hat.  A word of caution- I ordered a toddler sized hat for my two-year-old, and it was much too small; I don't know if he just had a big head at the time (probably) or if "toddler" sizes are just too small.  Either way, next time, I would go with a regular child sized hat; worst case, it would be slightly too big and look adorable in photos.


And there you have it!  Ash wears jeans and a green t-shirt (although sometimes in the show it looks black...whatever you have on hand!) with the jacket on top, fingerless gloves, and the hat (preferably on his head).  A stuffed Pokemon or two make great companions, along with a red Pokeball.

This was by far the most complicated of this group of costumes, and it really isn't so bad at all.  Tune in all week for the rest of the tutorials!

Much love,

The Geeks

Monday, October 14, 2019

Crafting Adventures: Saint Teresa of Calcutta

So, you've got all those Halloween costumes out of the way, and then you remember- your little girl needs a costume for All Saints' Day!  My preschooler picked Saint Teresa of Calcutta for the All Saints parade last year and I was able to whip up this costume in one night with minimal sewing.  Read on to see how you can put together your own!

Saint Teresa of Calcutta Costume

Supplies:

-white fabric
-1" navy blue ribbon
-3/8" navy blue ribbon
-1" elastic
-thick flat plastic headband
-white thread
-navy blue thread


1. First, you need to measure your little saint- do this before you buy fabric to make sure you have enough!  Now, for our preschool All Saints parade, the little ones needed to be able to put on their own costumes over top of their uniforms, so it couldn't be anything too complicated like a real sari.  I designed this costume in two parts- a veil and a sash.  The first measurements you're going to take are for the sash.  Measure one shoulder, from the base of the neck to the edge of the shoulder, and call that W.  Next, take your measuring tape and hold one end at the edge of the shoulder, and drape the measuring tape down to the opposite hip, then around her body and back up the other side to meet at the edge of the tape (like a deacon's vestments).  The entire length you just measured will be X.  (This picture is a little deceptive, in that you can't really tell that I intend you to measure all the way around.  What's shown here- a flat measurement from shoulder to hip- is really .5X, if you want to be pedantic.)  For the veil, you want to first drape your measuring tape starting at one hip, climbing up all the way to the top of her head, then down the other side to the opposite hip- the full length of this arc is what we'll call Y.  Now, you're going to take one last measurement which I couldn't show in this picture- start at the hairline and measure over the top of her head and all the way down her back to the hip level (so that it ends at the same plane as the ends of your Y measurement)- this we'll call Z.

not drawn to scale

2. So here's what we do with those measurements.  For the sash, you're going to cut one rectangle of white fabric whose width is twice the W measurement plus 0.5" (for seam allowance) and whose length is your X measurement plus 0.75" (again for seam allowance- this one is going to be sewn in multiple directions, hence the extra 0.25").  For the veil, you'll need a rectangle of white fabric whose width is the Z measurement plus 0.5" for seam allowance, and whose length is the Y measurement plus 0.5" for seam allowance.  (I've really done a terrible job with this drawing; your Z measurement will probably end up being a little over half of your Y measurement.)  Of course I'm using 0.25" seams here, if you want to do differently then adjust your measurements.

3. To begin making the sash, first fold your rectangle in half, right sides together, bringing the bottom side up to the top as I've drawn it here (hence the need to double your W value).  Sew around one long side and one short side, then turn it out the right way.

not drawn to scale
4. While you've got just one long white rectangle, you're going to attach the blue ribbon to form the distinctive stripes you find on Saint Teresa's sari.  Place the wider ribbon along one of the long edges of the rectangle, and then two stripes of the narrow ribbon.  Space them all about a half of an inch apart.  To attach them, you could diligently applique around all four sides of each ribbon, but this costume probably needs to be thrown together on Halloween night itself, so ain't nobody got time for that.  Instead, set your machine to the widest zig-zag stitch, and stitch right down the middle on each ribbon.  Finally, fold the sash in half again, bringing the short sides together, right sides facing, and sew with a tighter zig-zag stitch to complete the sash.  (This takes care of the unfinished ends of your ribbon and the white fabric.  It's not perfectly finished, but it will do just fine for this simple costume.)

5. To make the veil, begin by hemming all four edges of the fabric (I simply folded over 0.25" and sewed with a straight stitch; again we're not going for perfect here).  Attach the blue ribbon in the same way as with the sash to make the stripes again (this time you'll want to fold over the ends of each ribbon and stitch them down to make a nice hem).

not drawn to scale
6.  Cut three pieces of elastic about 3" long each.  Fold your veil in half, bringing the short sides together, and mark the center.  On the wrong side of the veil, attach one piece of elastic along the center line about a half an inch back from the front edge (where the wide blue ribbon is).  Attach it with a tight zig-zag stitch several times back and forth along only the short edges, so that there is a gap where you can slide your fingers underneath.  If the edges fall under where your blue ribbon is on the other side, use blue thread.  If the fall on the white fabric, use white thread.  Attach the other two pieces of elastic in the same way on either side of the middle, about two inches away from your center piece.


7. To wear the costume, your little saint should put the sash over her shoulder so that the blue stripes are closest to her face.  To wear the veil, slide the wide plastic headband through the elastic loops, and put the headband on her head as you would normally.  (This holds the veil neatly in place on her head for a whole parade much better than if you just used bobby pins to hold on the fabric itself, and it's something she can put on by herself if you're not there to help.)

I hope your little one is ready for All Saints' Day!

Much love,
The Geeks

Thursday, October 18, 2018

Crafting Adventures: Paw Patrol Ryder

It's time for the last tutorial from our family Paw Patrol costume: Ryder!  Of course the baby runs the show around here, so he got to dress as the human master of the Paw Patrol pups.  While the steps below show you how to make this for a baby, it will easily translate to a larger size for an older child (or Dad!) simply by using more fabric, since you're going to make your own pattern using clothing that fits your Ryder.  Of the four Paw Patrol costumes, this one involves the most sewing- and a zipper!  But don't fret, I know you can do it- no job is too big, no pup is too small!

What you need:

-white fabric
-red fabric
-yellow ribbon
-blue ribbon
-a white separating zipper
-white long-sleeved onesie/shirt
-jeans

Here's a look at Ryder:

image via Paw Patrol
This little boy wears a variation on his Paw Patrol uniform depending on the weather and the type of rescue, but his standard look involves jeans, a long sleeved white shirt, and a puffer vest that is 2/3's red and 1/3 white with a yellow accent and blue trim, plus the paw logo on his chest.


1. You're going to make your own pattern for this vest, so choose a shirt that fits your Ryder a little loosely, if possible.  I went with a rather boxy onesie; it may even be helpful to choose something one size too big because this style is not going to provide much stretch or give.  Turn the onesie (or shirt) inside out, tuck in the sleeves, and tuck in the bottom snaps, so your left with what looks like a tank top.  You're going to trace around this to create your pattern.


2. Fold the inside-out onesie in half, with the back portion on the outside, and lay it on top of a sheet of blank white paper.  Trace around the outside, giving an extra quarter inch of seam allowance on the top, arm hole, and side; do not give any seam allowance on the fold (you're going to be cutting a piece of folded fabric to get a completely symmetrical piece).  Now unfold the oneside and fold it in half again, this time with the front on the outside.  Trace this one with the seam allowance all the way around, and take care to mimic the dip in the neckline.  You're going to have two pieces for the front of the vest, so you'll need that seam allowance around all sides.

3. Now, remember this vest is color blocked, so before we cut our fabric we're actually going to cut this pattern in two pieces.  Cut your paper pieces (both the front piece and the back piece) in two just beneath the bottom of the arm hole.  For the yellow accent, I chose to use a bit of 1" ribbon.  Now, follow my math here for a moment: you're going to use 1/4" seam allowance to attach the top to the ribbon, and then the ribbon to the bottom.  So your ribbon will be 1/4" shorter on both the top and the bottom- meaning you'll have 1/2" yellow strip between your two pieces of fabric when it's finished.  So, in order to keep the same overall height of your pattern piece, you would need to remove 1/2" of paper total, or 1/4" from each piece (since it's now been cut in half), right?  But then you need to add a seam allowance to those pieces, too.  And the seam allowance is...1/4".  SO, all of this math means that all you have to do here is cut your paper as shown above, and that's it!  (For both your front pattern piece and your back pattern piece.)  Of course, this fancy math hinges on you using a 1" yellow ribbon as your accent piece- if you use a different size...you'll have to do the math yourself.  To cut your fabric, fold a piece of white fabric in half.  Lay the top portion of your back pattern piece right along the fold and cut around the pattern (remember when you unfold, you'll have a completely symmetrical piece).  Lay the top portion of your front pattern piece away from the fold and cut around it (so that you end up with 2 pieces).  Repeat with the red fabric and the bottom pattern pieces.  Cut 3 pieces of yellow ribbon- one the total width of your back fabric (unfolded), and 2 the width of your front fabric pieces.  (If you want to get fancy, you can line your vest by cutting the same pattern pieces out of a lining fabric, but without the color blocking, and sew it to your main fabric before attaching the zipper.  I'm not fancy.)

4. To assemble, you're going to start by attaching the color blocks together so that you have full front and back pieces.  Use that 1/4" seam allowance and sew the bottom of the white fabric to the top of the yellow ribbon, and the bottom of the yellow ribbon to the top of the red fabric, so you end up with a fully assembled back of your vest and two fully assembled front pieces.

5. Next, place one front piece on top of your back piece, right sides together, and sew together at the top of the shoulder.  Repeat with the other front piece.


6. I used blue ribbon to trim the arm holes rather than a strip of fabric because it makes things easier (and it's possible when you're dealing with someone so tiny).  Pin the blue ribbon around the arm hole, with the right side of the vest facing up.  (Ribbons don't really have a right or wrong side, but if they did, you'd be pinning it with the right side facing the right side of the vest.)  When the whole thing is done, you're going to fold the ribbon out (it'll almost be like a tiny little cap sleeve).

7. Now you're going to put the whole thing together, so you're going to turn the vest wrong side out, with the ribbon sandwiched in the middle.  Sew a straight line right down the side, and your vest is mostly assembled! (of course you have to do steps 6 & 7 for both front pieces)

8. Rather than having to worry about hemming, you're going to attach another piece of blue ribbon all the way around the bottom of the vest.  Do the same thing for the neckline.

9.  Now you need to attach your separating zipper.  I used the instructions that I found here at Professor Pin Cushion, but I'm going to come clean- I didn't really account for a zipper stop at the top of the vest (because yes, I had to cut my zipper down) so the zipper head would come clean off if you zipped it all the way up!  Be smarter than me, dear reader.

10.  Finally, the little paw badge.  I cut out some paw print shapes from white fabric and a badge shape from the red fabric.  I used fabric glue to attach the paw print to the badge, because the pieces were so small.  Then stitch around the badge to attach it to the white portion of the left front of the vest (the wearer's left, that is); this is an applique technically, so use a zigzag stitch to prevent fraying.

11.  Ryder needs to wear a white shirt and jeans, and then the vest on top, zipped about 3/4's of the way.  You did it!


What's your baby going to be for Halloween?

Much love,
The Geeks

Wednesday, October 17, 2018

Crafting Adventures: Paw Patrol Everest

I've shared tutorials for both Skye and Chase, so what about Everest?  This one is a little more sewing, but just a little, I promise.

What you need:

-teal sweatshirt
-purple sweatpants
-purple long sleeved shirt
-teal ski hat
-yellow ribbon
-purple fleece
-white fleece
-pillow fill or cotton balls
-and if you really want to go above and beyond, purple and white face paint

As a reminder, here's Everest:

via Paw Patrol
She has purple fur (as most Huskies do...right?) and wears a teal vest trimmed in yellow, along with a teal ski hat with a yellow stripe.


1. To start, you'll want to remove the sleeves from your sweatshirt to create your vest.  Next, sew (or hot glue, I won't judge) yellow ribbon around the arm holes and the bottom.


2. Next, cut the fabric for your ears.  You'll need 2 triangular purple shapes and one smaller triangular white shape for each ear.  I rounded the corners of the triangles a bit.  For sizing, just eyeball what looks good on top of your head. 

3. Attach your smaller white triangle to the right side of one of your purple triangles.  If you're sewing, this should be top stitched in a thread that's the same color as your "inner ear" fabric (so white or maybe a light grey).  Whereas normally I would advocate for a zigzag stitch to prevent fraying, in this case a straight stitch isn't such a bad idea- fleece doesn't really fray, and even if you do use a fabric which unravels a bit, the effect can make it look more like fur.

4.  Place your purple triangles right sides together and stitch around two of the sides, leaving the bottom of the triangle open.  Definitely use a zigzag stitch here for the added strength.  Turn the ear right side out, then stuff it with your pillow stuffing (or cotton balls). 

5. Now, I wanted to be able to re-use my teal ski hat after this costume, so I didn't want to attach the ears directly to it.  (Although I suppose it could be rather cute to walk around with Husky ears on in the winter time...)  Because I needed to add a yellow stripe to the hat any way, what I did was cut a length of the yellow ribbon long enough to tie around my head, and I sewed the ears onto the ribbon instead of the hat.  Then I just wore the hat and tied the ribbon around it; either way the effect is of two little furry ears poking out of this hat. 


6.  Finally, you need to make the tail.  Much like with Skye, you simply need to cut two tail-shaped pieces of the purple fabric and, just like with your ears, stitch together all sides but one, and stuff it with fluff.  Cut a slit in the bottom of the back of your sweatshirt and sandwich the tail in there, then stitch it closed.

7.  To assemble the costume, simply wear your purple shirt and sweatpants (representing her purple fur) and put on the now-sleeveless teal sweatshirt.  Wear the hat (with the ribbon and ears tied on top, if you go with that method).  If you want to go all-in, paint your face white with purple around the edges, and a black nose and black freckles.

Do you get dressed up with the kids at Halloween?

Much love,
The Geeks

Saturday, October 7, 2017

The Best Time of the Year

That's right folks- it's time to start talking about Halloween costumes!

If you've been following the blog for a while, you probably know by now that Halloween is my favorite holiday because I love dressing up in costume.  Now that I have my own little family, putting together family costumes is the thing I look forward to most every year.  I'm no master sewist, but I can certainly up-cycle some simple pieces to pull together a pretty adorable group look.  Here's a recap of some of our past family costumes:


Probably my favorite costumes of all time- Han, Leia, and a little ewok!


Treebeard and his two hobbit friends were certainly a hit at the Renaissance Faire.


Our single best trick-or-treating experience definitely happened when we wore our 101 Dalmatians costumes.


Although someone didn't want to pose for pictures, we looked awful cute at the Renaissance Faire last year dressed as Cinderella and two of her mice friends.


Last Halloween wasn't really a group costume, but our little Abby Cadaby sure looked adorable!

I just got started on this year's group costumes and cannot wait to show you the finished product!

What are you dressing as for Halloween?

Much love,
The Geeks

Monday, October 31, 2016

Happy Halloween from Abby Cadaby!


Friday night we went to Trunk-or-Treat at daycare, so we got to show off our costumes early (and get some candy!) as a test run for the real thing.  Since this little goober is absolutely obsessed with Sesame Street, and since Abby Cadaby is her favorite character, her costume was a no-brainer this year.

I assembled this quickly and easily- it's almost no-sew!  She's wearing a pink long-sleeved leotard, pink tights, and pink gloves as her "fur" (and to protect her from the cold without breaking character). I got a simple blue tank top and pink fairy wings from Amazon, and the wand was purchased from Sesame Place by her favorite aunt ;)  The only thing I made for this costume was her tutu.  I simply made an elastic waistband (using the same method I'd use to make her a regular skirt), cut 24" strips of turquoise and purple tulle, folded each strip in half and knotted it over the elastic.  I had also attached some smaller strips to the straps of the tank top using the same method, but she complained that they were scratchy (even though they weren't actually touching her skin but hey, toddlers) so I removed them.

The finishing touches on this look are pigtails with some purple yarn looped in, blue eye shadow, and big drawn-on freckles on her cheeks.


I went as a hastily thrown together Zoe, wearing an orange long sleeved shirt and orange tights as my "fur", a pink tshirt and pink tutu skirt as Zoe's ballerina outfit, and some pink and orange clip-in hair extensions to mimic her sparkly, multi-colored frizz.  (Mr Geek wore his Elmo tshirt to round out the crew, and carried Cookie Monster with him.)

We're so excited to trick-or-treat in the neighborhood tonight!

What are you dressing as for Halloween?

Much love,
The Geeks

Saturday, October 29, 2016

Crafting Adventures: Cinderella (and Her Mice!)


We've gone to the Maryland Renaissance Festival every year since Chief was born, and for the past two, we've gone in costume.  Last year we were Treebeard and two Hobbits; this year we were Cinderella and two mice!

Cinderella was one of the more complicated costumes I've ever made for Chief, but even still it wasn't super difficult.  Here's how I did it:


SUPPLIES: 

-a pink tank dress in your princess's size (I bought this one on Amazon)
-matching pink cotton fabric (1/2 a yard was plenty for my almost-3-year-old)
-pale pink grosgrain ribbon (nice and wide)
-3/4" elastic
-white scalloped trim (note: I didn't buy enough the first time around, so I used two different kinds for the collar and the ruffle on the skirt.  The kind I bought for the collar ended up being much too big, so I needed to fold it in half.  Don't be dumb like me; buy a ton of not-so-tall trim)
-accessories: a turquoise beaded necklace and a white headband

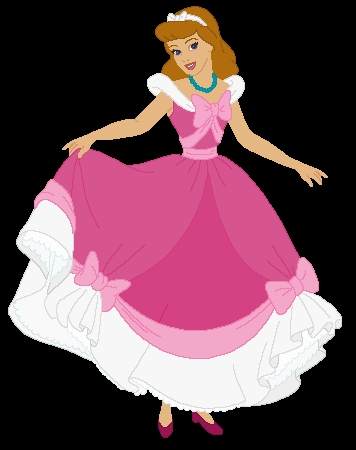
For reference, here's the dress we're making (you know, the one that the mice made for her):

via FanPop
The pink dress has sort of an over skirt that is gathered open, a white underskirt that peeks out underneath, a white collar, and pink ribbon at the waist and around the bottom.


1.  First, prepare to make the "over skirt" portion by cutting a rectangle out of your pink fabric using the math denoted in the diagram above: the height of the rectangle should be the length you want the skirt to be + 1 1/2", and the width should be the size you want the waist to be x 1.25, + 1/2".  Fold in each of the short sides by 1/4" and hem with a zig-zag stitch (or serge if you're fancy).  Then fold the rectangle in half, right sides together, lining up the short sides.  Stitch together the top one-and-a-half inches only using a 1/4" seam allowance; you've now basically got a tube of fabric, only one side is almost entirely open (except for that inch and a half).  Fold down the top 1/4" inch and press, then fold it down another inch to make a waistband for the skirt.  Sew all the way around, using a 1/4" seam allowance, and leaving a good inch or two gap so you can snake in your elastic.


2.  Cut the elastic so that it is just 1" shy of the circumference of your princess's waist.  Feed it through the pocket you've created in your skirt and then overlap the ends by 1" and stitch them together.  Push the elastic into the waistband and sew close the gap you had left.  If your princess were to put on her skirt now, it would have a nice triangular opening in the front.


3.  Take your dress and slide it into the skirt, lining up the bottom hems.  (If you want, you can use a quick whip stitch on the sides to attach the waist of the skirt to the dress, but I recommend you pull it back out again before your princess wears it.  It's more comfortable for a little toddler body and easier to put on if the elastic waist is not actually attached to the dress underneath- it lets the elastic stretch more naturally.)  Take your white trim and pin it all the way around the bottom of both skirts, upside down (right sides together).  When you've sewn the layers all together, fold the trim back down and press; your stitches are hidden and the bottom of your skirt is nice and full!


4.  Now, if you have purchased a reasonably-sized trim, this step won't be necessary.  But if you got something mega huge like me (oops), then you'll need to cut the trim so it's the right length to go all the way around the neckline of the dress (to include the straps), fold it in half (right sides together) and stitch the two short sides, then flip it right-side-out.  Now your collar is a decent width and also double in thickness, so at least it will hold its shape well!  Stitch it all the way around the neckline of the dress so that the two ends meet in the middle of the front.


5.  Okay, now for the ribbon.  You'll need enough to wrap around the waist, and then have the tail ends come up from the sides, diagonally, to meet in the middle (right at the point where the ends of the collar come together.  (I folded my ribbon in half first because the only options I could find at JoAnn were too wide or too skinny.)  I stitched the ends together and attached them to the top of the dress, and then I stitched the ribbon to itself at the sides of the waist, but otherwise I didn't actually attach the ribbon to the waist of the dress- again to let that elastic stretch as much as necessary for easy on and off.  (There are no fasteners on this thing, so it has to go on over the head and streeeetch at the middle in order to do so.)


6.  The only thing left is to run some more pink ribbon around the bottom of the dress (which you should probably completely stitch down, but I didn't because I was finishing this the night before the Festival and ran out of time!  I just attached it in a few places) and then make 3 bows- attach one at the top center of the bodice, and the other two at the points where the skirt opens.  That's it!


She's entering her "I hate posing for photos" phase, but she really does love this costume.  She's been asking to wear it almost every day since!  The weekend after the Festival, we went to a Halloween party at a friend's house and she got to wear it again, which made her very happy.  It's definitely not perfect, and was rather hastily thrown together at the last minute, but I think it's awful cute.


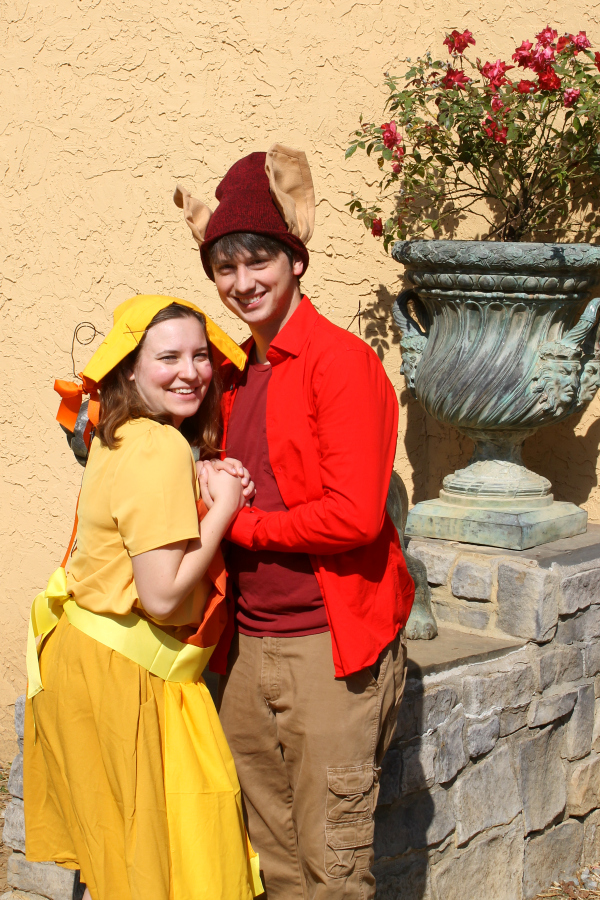
The costumes for Jacques and Nameless-Lady-Mouse were much easier.  For Lady Mouse, I adapted this tutorial to make an apron.  I used orange fabric for the top and yellow for the bottom, attached some yellow ribbon rather than a ruffle, and used ribbon for the ties.  Then I made a simple rectangular hat/veil/thing out of yellow fabric and wore it pinned in my hair with bobby pins.  I wore a yellow skirt and top, and made a tail out of floral wire with a little orange bow near the end.

As always, Mr Geek's costume was almost entirely no-sew- almost.  He wore khaki pants, a red tshirt, and an un-buttoned red shirt.  I bought a red beanie and attached two ears I made from felt, then made him a tail out of floral wire, too (but no bow for him).


What are you going to be for Halloween?

Much love,
The Geeks