
I don't know what came over me, but a few weeks ago I got it into my head that I wanted to make a couple of simple bits of decoration for Valentine's Day, to liven up the house a bit in this dreary state of sorta-winter-but-definitely-not-yet-spring. Actually, I originally only had one project in mind, but something about craft supply stores just makes me feel so hopeful, so I walked out with the supplies for this project, too. I mean, I have loads of free time, right? I could switch up the decor in here once a month with Pinterest-worthy crafts on every surface.
Yeah, no.
But I do have two projects to share with you this week that you can complete in the span of one weekend (or much less if you don't have a toddler).
Fabric-wrapped wreaths are pretty self-explanatory, and disassembled faux flowers have been all over the wedding blogosphere for years, so I won't pretend that this is an entirely new or original project. Even so, I've included a brief step-by-step below of how I went about putting my wreath together, if you'd like to give it a shot. I bought 3/4 of a yard of this pink fabric with white hearts, but I had quite a bit left over- I probably used 1/2 a yard or less with my 12" foam wreath. Next time I make a wreath, I'll probably use a bigger base...

Supplies:
-small selection of faux flowers
-1/2 yard of fabric
-fabric shears
-short flat-head straight pins
-12" foam wreath
-decorative straight pins (these have little gold spheres on the end)
-pliers
Time to complete: less than 1 naptime (She slept for about an hour and a half this particular Saturday afternoon, and I had time to do this project and a load of laundry!)

-Cut your fabric into strips. I went with 2" strips, but you may want to go bigger or smaller, depending on the print of your fabric- but probably no bigger than 3", otherwise wrapping it around the wreath frame may become difficult.

-Secure the end of one strip of fabric with one of the tiny straight pins. You'll want to be sure that your pins are short enough that they don't poke through the other side. (Or that your wreath is thick enough for the length of your pins. Whichever variable you can control, based on the stock in your friendly neighborhood craft supply store.) Wrap the fabric around the wreath, overlapping as you go- I tried to overlap at about the middle of each layer of fabric.

-When you reach the end of a strip of fabric, secure it with another pin and start with the next strip. Keep wrapping until you've covered the entire wreath.

-Using your pliers, pull apart your faux flowers. They generally consist of a plastic stamen, layers of petals, greenery, a wire stem, plastic bits that hold them all together, and some sort of rubber overlay for the stem. Be careful not to damage the petals as you pull everything apart.

-Stack the layers of petals on top of each other and stick one of the decorative pins through the hole in the center to secure the flower to the wreath- again being mindful of the length of your pin relative to the thickness of the wreath. Experiment with the placement of your petals and the number of layers you use to achieve the look you're going for.
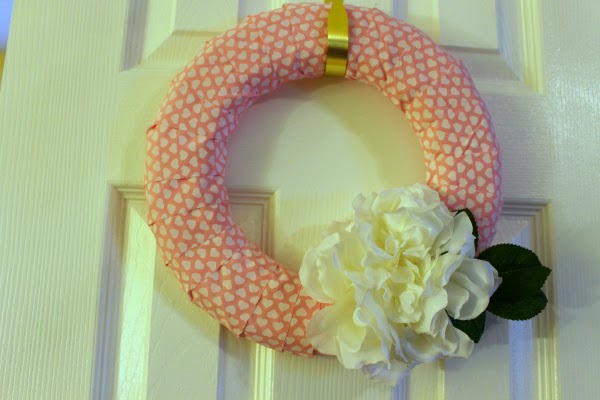
-I used three flowers for this wreath, as well as two sets of leaves. My faux flower bouquet featured some little sprigs of plastic baby's breath, so I interspersed them among the fabric flowers to fill any gaps. We've never had a wreath hanging on our front door, but it's really welcoming and makes you smile after a long day at work. And this was so easy that I just may make a new one every month!
Are you a wreath person? Do you make them or buy them? What's your go-to wreath tutorial?
Much love,
The Geeks
Yeah, no.
But I do have two projects to share with you this week that you can complete in the span of one weekend (or much less if you don't have a toddler).
Fabric-wrapped wreaths are pretty self-explanatory, and disassembled faux flowers have been all over the wedding blogosphere for years, so I won't pretend that this is an entirely new or original project. Even so, I've included a brief step-by-step below of how I went about putting my wreath together, if you'd like to give it a shot. I bought 3/4 of a yard of this pink fabric with white hearts, but I had quite a bit left over- I probably used 1/2 a yard or less with my 12" foam wreath. Next time I make a wreath, I'll probably use a bigger base...
Supplies:
-small selection of faux flowers
-1/2 yard of fabric
-fabric shears
-short flat-head straight pins
-12" foam wreath
-decorative straight pins (these have little gold spheres on the end)
-pliers
Time to complete: less than 1 naptime (She slept for about an hour and a half this particular Saturday afternoon, and I had time to do this project and a load of laundry!)
-Cut your fabric into strips. I went with 2" strips, but you may want to go bigger or smaller, depending on the print of your fabric- but probably no bigger than 3", otherwise wrapping it around the wreath frame may become difficult.
-Secure the end of one strip of fabric with one of the tiny straight pins. You'll want to be sure that your pins are short enough that they don't poke through the other side. (Or that your wreath is thick enough for the length of your pins. Whichever variable you can control, based on the stock in your friendly neighborhood craft supply store.) Wrap the fabric around the wreath, overlapping as you go- I tried to overlap at about the middle of each layer of fabric.
-When you reach the end of a strip of fabric, secure it with another pin and start with the next strip. Keep wrapping until you've covered the entire wreath.
-Using your pliers, pull apart your faux flowers. They generally consist of a plastic stamen, layers of petals, greenery, a wire stem, plastic bits that hold them all together, and some sort of rubber overlay for the stem. Be careful not to damage the petals as you pull everything apart.
-Stack the layers of petals on top of each other and stick one of the decorative pins through the hole in the center to secure the flower to the wreath- again being mindful of the length of your pin relative to the thickness of the wreath. Experiment with the placement of your petals and the number of layers you use to achieve the look you're going for.
-I used three flowers for this wreath, as well as two sets of leaves. My faux flower bouquet featured some little sprigs of plastic baby's breath, so I interspersed them among the fabric flowers to fill any gaps. We've never had a wreath hanging on our front door, but it's really welcoming and makes you smile after a long day at work. And this was so easy that I just may make a new one every month!
Are you a wreath person? Do you make them or buy them? What's your go-to wreath tutorial?
Much love,
The Geeks
No comments:
Post a Comment