Thursday, October 22, 2015

Crafting Adventures: Treebeard

Yesterday I showed you the costumes that my daughter and I wore to the Maryland Renaissance Festival this year.  But what did Mr. Geek wear?


Why he was Treebeard, of course!

Whenever Mr. Geek convinces Chief to ride around on his shoulders, he always says, "Don't be hasty, little hobbit," which is what Treebeard says to Merry and Pippin as he carries them through the forest.  So I figured it would be perfect for the two of them to dress as Merry and Treebeard!  At first, I thought I'd go as Arwen or something, but then I figured I should pick a character who was with the two of them at some point in the story.  That left Gandalf...or Pippin.  Mr. Geek was okay with wearing a beard, but I wasn't ;)

So how did I make that beard?

Well first, I found a brown zip-up hoodie.  The hoodie was so comfortable and fit him so well that I didn't want to forever tarnish it with tree-pieces (or should I say Ent-pieces), so I knew it had to be something easily removable.

So I decided to just make a beard covered in faux leaves that buttoned on to the hood.  That way, he could unbutton it to eat lunch, and when the Faire was over, all I needed to do was remove the buttons with a seam ripper and it'd be like nothing was ever attached.

The beard was really simple.  I picked up a few fat quarters in various fall colors.  I took the brown and green and cut a vaguely beard-shaped piece out of each, making sure it was wide enough that I could attach it to buttons sewn just on the inside of the hood on both sides.  Then I took the other colors and cut similar beard-shaped pieces that were all a little shorter than the brown and green.  Then I laid everything on top of each other, with the brown on top, and all of the other colors (except the green) slightly farther down than the next, and stitched them all together.

Then I cut a rectangle out of the top portion so Mr. Geek's mouth wouldn't be covered- I left about an inch on the top and on the sides.  Next, I arranged my faux leaves over the beard, including a couple on the "mustache" portion.  Finally, I attached buttons on the inside of the hood and put button holes on the beard so that the beard lined up properly on Mr. Geek's face.  In the words of my toddler- "All done!"


Are you doing any family costumes this year?

Much love,
The Geeks

Wednesday, October 21, 2015

Crafting Adventures: A Pair of Hobbits

So I know I promised to share our Ren Faire costumes with you last week and then...I didn't blog at all last week >.<  Oops!

But if you follow me on Instagram, you saw our costumes the day of!

Since I knew I would be doing 2 sets of costumes this year, I had to make sure neither set was particularly complicated.  As it turned out, I did more sewing for the Ren Faire costumes than what was involved for our Hallowe'en costumes!  Today I want to show you what Lil Chief and I wore, and tomorrow I'll show you how I made Mr. Geek's costume to round out the family photos.

image by New Line Cinema
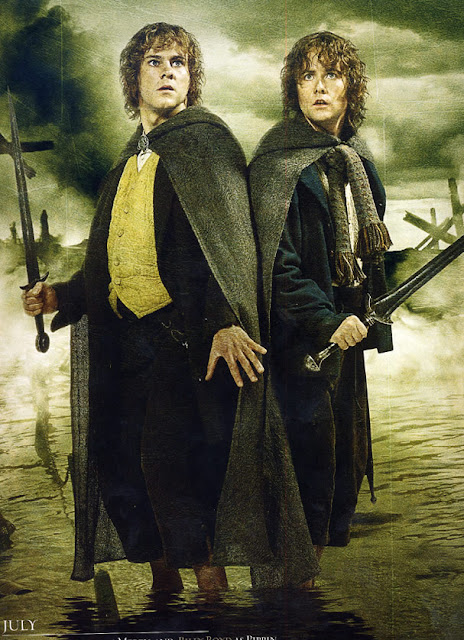
So we are nowhere near the same height (okay fine, she's just over half my height, whaaaaaaaaat?) but I decided that my almost-2-year-old and I would go as Merry (her) and Pippin (me) from Fellowship of the Ring.  Here's the result:


Most of my costume was store-bought.  I wore jean leggings, a white button-down blouse, a blue blazer that I picked up at Goodwill, and a grey scarf I found at Target.  The only thing I needed to make was the cloak, and here's how I did it:


I bought a yard and a half of a brown fleece (on sale!) because I'm just over 5 feet tall.  (The width of the fabric bolt was the perfect size to wrap around myself, so I could make it from one piece.)  Because it's fleece, I didn't have to worry about finishing the edges (they won't fray) and because this was intended to be just a one-time-use costume, I wasn't concerned with the hood looking perfect- in fact, the hood was just for show, I never actually wore it.  (It got hot at the Renn Faire in early October!)  I only made one cut on my piece of fleece.  I measured the approximate distance from my collarbone to my ankle (let's call it h for this diagram) and cut the fleece there.  The h portion would be the body of the cloak and the smaller portion would be the hood.

I took the hood portion of the fleece and cut it in half width-wise.  Then I stitched the two pieces together along the long side (labeled s in the image) and one of the short sides.  If I had a serger, I would have used that, but I don't, so I used a zig-zag stitch instead.  (Fleece is heavy, and you want a strong stitch to hold it together.)  Now, technically, I didn't stitch perfectly along the edges.  Instead of making an L shape with the seam, I stitched a curve- like the curve of my head that the hood would be covering.  (If you don't stitch along a curve, you'll end up with a pointy hood.)  Then I trimmed the excess fabric and turned it inside out.


So now that I had a complete hood (the seam represented by the dotted line in this image), all that was left was to attach it by sewing the bottom (labeled b) to the short end of the cloak body.  After that, all I had to do was attach a closure.  I found a big round decorative button that sort of looked like stone (it was definitely plastic) and attached it at the point just beneath where the hood was connected.  Done!


Little Merry needed a cloak, too.  I made hers first, and I was stupid when I planned it out- I went with a lightweight grey cotton instead of a fleece.  This meant I needed to finish the edges, but it also meant my little hobbit wasn't sweltering when the weather warmed up during the day!

I made my measurements the exact same way I did for mine, except I added an inch on both sides to this rectangle (to allow for a 1/2 inch seam on all sides), and I needed to cut the width down because the bolt of fabric was way larger than my toddler.  I assembled the cloak the exact same way, but I used straight stitches (with white thread because, like I said, I'm stupid- I didn't buy matching thread!) and did something different for the closure.

You can't tell in the above photo, but Merry's cloak actually has 2 buttons.  I couldn't really figure out exactly how the costumers did it for the film, but it looked like there was some sort of tab with 2 buttons and you could tighten the cloak based on which button you used...so that's what I made.


I laid my two buttons side by side with a decent amount of room in between them (perhaps a whole button's width- so this image is not to scale) and then drew a rectangle around them.  I cut two identical rectangles this size, stitched them together along 3 sides, turned them inside out, and stitched the fourth side closed.  (If I wanted this cloak to be worn more than once, I probably would have strengthened my little button placket with some fusible fleece in the middle of this rectangle, but that was too much work for me.)  I attached this little placket to the cloak on one side, then I attached the two buttons to either end and created a button hole on the other side of the cloak.  Done!

The rest of Chief's costume was store-bought- I got her the eleven leaf pin, a little boy's yellow vest, a white button-down blouse, and khaki pants.  I couldn't find a green toddler-sized blazer anywhere, so I did something absolutely insane.


This is a green ladies' size 4 blazer that I got for a few dollars at Goodwill.

I cut it to fit her.

Again, this costume was just for the one day, so it was acceptable for it to be kind of wonky, in my opinion.

U jelly of my artistic genius?
I turned the jacket inside out, and I took her coat and turned it inside out and laid it on top.  It wasn't quite the drastic difference as in the image, but the blazer was quite a bit larger than a coat that fit my almost-2-year-old.  First, I cut the bottom so that the coat would be the right length (just above her knees).  Then, I cut the sleeves to just a bit longer than the sleeves of her coat- I had no intention of actually finishing the edges, I just rolled the cuffs up.  Finally, making sure the center lines of the jackets were perfectly matched, I measured the distance between the shoulder of one jacket and the same shoulder of the other.  (Three inches.)  I folded the blazer in half, measured 3" in from the fold, and ran a zigzag stitch the length of the coat at that mark.  It made the collar all wonky, but it worked!  Of course, the sleeves themselves were still much too large, though they were the right length, but this jacket had padded shoulders and I was not going to mess with adjusting the armholes because, again- it was a one-day costume.

Here's how the finished product looked!


Check back tomorrow to see what Mr. Geek was dressed as- and how I made it!

Have you ever been to a Renaissance Faire?  Did you make your own costume?  What are you going to be for Hallowe'en?

Much love,
The Geeks

*all photos personal unless otherwise noted*

Monday, October 5, 2015

The Most Wonderful Time of the Year

I'm not gonna lie- Hallowe'en is my favorite holiday.  I have always loved dressing up in elaborate costumes and putting on a show- hence my love of ballet recitals starting at age 3 and that time I wrote and staged a musical for the neighborhood kids to star in (too bad said neighborhood kids were too lazy to rehearse or perform it with me).  Also, walking around and demanding candy which people are obligated to give you?  Count me in!

When we first found out we were pregnant with Little Chief, one of the things I looked forward to the most was family Hallowe'en costumes.  Last year was our first experience creating and assembling a family costume, and we didn't even do proper trick-or-treating.  This year, we get two opportunities to dress up as a family- we're heading to the Maryland Renaissance Festival next weekend and going in costume, in addition to really-for-real trick-or-treating on Hallowe'en!

I won't spoil the surprise for our Renn Faire costumes, but I will say that they're not quite historical- though that's not to say we won't fit in.  Stay tuned for pictures and a tutorial or two!

I've finished those costumes, so now it's time to start building the Hallowe'en costumes!  Needless to say, things are pretty busy around here lately, hence the lack of posting.  (Also Mr. Geek got me Disney Infinity 3.0, but I'm sure the lack of blog posts has little to do with that fact.)

To tide you over, if you're looking for ideas for your own little family costumes, check out last year's set:

*personal photo*
We were Han, Leia, and our little ewok friend, fighting together to bring down the Empire.

What are you going to be for Hallowe'en this year?

Much love,
The Geeks