

I think last year's 101 Dalmatians costumes were my favorite so far. We're getting ready to go to the Maryland Renaissance Festival once again, and the costumes I'm putting together for that are even better- so stay tuned! But for now, here's the tutorial I promised you!
To make the puppy costume, you need:
-a white hoodie in your little girl's size
-white tights in your little girl's size
-an adult sized white short sleeved tshirt (I got a simple v-neck ladies t-shirt with cap sleeves in size XL)
-1" wide elastic
-filling, used for making pillows (or you could just use cotton balls)
-1/4 yard pink fabric
-pale blue ribbon
-black fabric paint pen(s) [I used different sizes and different tips to vary the size of the spots)
-sewing supplies
1. First, use a seam ripper and scissors to take apart the t-shirt- it's going to be the ears, the tail, and the skirt for this costume. Remove the sleeves with the seam ripper. Cut a straight line to remove the bottom of the t-shirt so that the height is the length you want the skirt to be + 1 1/2". Don't discard the rest of the t-shirt quite yet!


Important note: Now, the pink fabric I chose to use was from my scrap pile- it was the leftovers from this Valentine's Day project I had done a few months before. It's a pale pink with white hearts, and I thought the hearts would be pretty adorable, but I didn't want them to be quite so prevalent- more subtle. So I decided to use the fabric inside out so that the hearts would peek through if you're looking closely, but from a distance it's a solid pink. I'm explaining this to you so that you understand that the printed side of my fabric became the "wrong" side for the purposes of this project, and the underside of the fabric became the "right" side. So don't get confused by my use of the terms "right" and "wrong" in the next step!
3. Pin the white and pink pieces with right sides together and sew all the way around, but leave a little over an inch undone- I left the gap at one of the corners. Turn the ears right-side-out and stitch closed the gap you left.

4. (Aaaaaand that's where I stopped taking pictures. Oops.) You'll want to curl your ears into C shapes and pin them on either side of the hood of the sweatshirt- it helps to get your model to wear the hoodie and then try a few different positions, gently pinning the ears in place and then removing the hoodie again and letting her run off to play. I folded down about a 1/2" lip to stitch the ears to the hood- you can use a fancy decorative stitch since you're technically "top stitching", but as it'll be technically the inside of the ear, you can just use a zig-zag stitch and call it a day. (The zig-zag is sturdier than a straight stitch.) What your left with is floppy adorable-ness :)

5. Remember how I said don't ditch the last piece of t-shirt? Use what's left to cut off two vaguely tail-shaped pieces with a pointy end. I actually ended up lining up my cut so that one side rested against the folded edge of the shirt, so that the two pieces are attached at one end. If you use the fold, make sure it's not on the edge where the tail will meet the body- you want that edge open. Cut out your tail piece(s), and sew up all the sides except the base (use a zig-zag stitch for that aforementioned sturdiness), and turn it right-side-out.

6. Use your pillow filling (or cotton balls!) to stuff that little tail until it's an adorable stubby little thing, and pin the open end closed. Take a look at the bottom of your sweatshirt- there's probably a ribbed band that goes around the bottom. Find the center of the back of your sweatshirt and snip that band in half (vertically) at that mid point. Slide the pinned base of your tail into the slit you now have in the band, and use a zig-zag stitch to sandwich it in there.

7. The blue ribbon is going to be the collar. Wrap it around the neck of the sweatshirt and stitch it in place- I left the ends long so they could be tied in a bow (I had originally hoped to do a tag but ran out of time) but you could also stop at the edges of the hood and leave it open at the base of the neck.

8. All that's left is to turn the rectangle you cut from the t-shirt into a skirt with an elastic waist using that tutorial from Make It and Love It that I always use. Super simple! All that's left is to use your fabric paint pens to place spots on the hoodie, skirt, and tights. Use as many or as few spots as you'd like, and use varying sizes- I even placed a hidden Mickey in there, just because! Fortunately, we have our very own Penny to use as a reference for spot placement. And of course, on the big day, be sure to use face paint to give your puppy a little black nose!

That's it! Super simple!
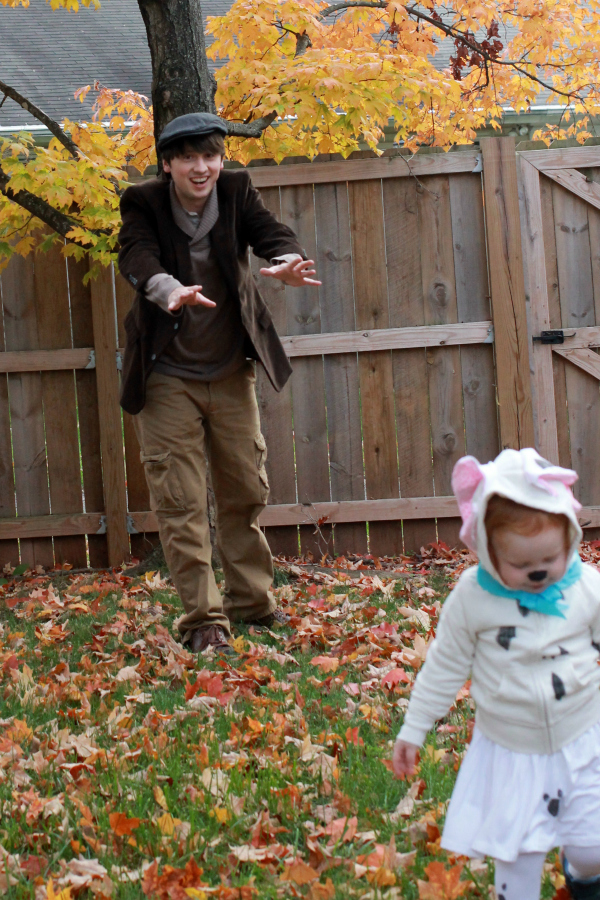
Cruella de Vil has been my favorite costume ever, but all of it was store bought. I wore a little black dress, black tights, and red pumps that I already owned. I found the coat, wig, gloves, and cigarette holder on Amazon; combined, they were much more than I would spend on a one-time costume, so I used my credit card reward points to pay for them. I had intended to try to whip up a faux fur coat but I figured there's no way I could do it justice. Remember Cruella needs a pale face, bright red lips, and blue eye shadow!

Jasper was also entirely store-bought, but these are all just regular clothing pieces Mr Geek can wear whenever. We got the cargo pants for the Treebeard costume and he already had this brown corduroy blazer. I found the newsboy cap at Target and the sweater at Macy's (and it just looks sooooo good on him, doesn't it?)
So yeah...best costumes so far ;) But this year's Ren Faire costumes are going to be pretty awesome, too, so stay tuned!
What's your favorite family costume from Hallowe'ens past?
Much love,
The Geeks
No comments:
Post a Comment